Asus P4V800D-X Motherboard DIY Troubleshooting Guide
Asus P4V800D-X Manual
 |
View all Asus P4V800D-X manuals
Add to My Manuals
Save this manual to your list of manuals |
Asus P4V800D-X manual content summary:
- Asus P4V800D-X | Motherboard DIY Troubleshooting Guide - Page 1
Motherboard P4V800D-X User Guide - Asus P4V800D-X | Motherboard DIY Troubleshooting Guide - Page 2
into any language in any form or by any means, except documentation kept by the purchaser for backup purposes, without the express written permission of ASUSTeK COMPUTER INC. (" ASUS"). Product warranty or service will not be extended if: (1) the product is repaired, modified or altered, unless such - Asus P4V800D-X | Motherboard DIY Troubleshooting Guide - Page 3
Innovative ASUS features 1-4 1.4 Before You Proceed 1-5 1.5 Motherboard Overview 1-6 1.5.1 Motherboard layout 1-6 1.5.2 Placement direction 1-7 1.5.3 Screw holes 1-7 1.6 Central Processing Unit (CPU 1-8 1.6.1 Overview 1-8 1.6.2 Installing the CPU 1-8 1.7 System Memory 1-9 1.7.1 Overview - Asus P4V800D-X | Motherboard DIY Troubleshooting Guide - Page 4
System 3-2 3.2 Support CD Information 3-2 3.2.1 Running the support CD 3-2 3.2.2 Drivers menu 3-3 3.2.3 Utilities menu 3-3 3.2.4 Contacts menu 3-4 3.3 VIA RAID configurations 3-5 3.3.1 Installing hard disks 3-5 3.3.2 VIA RAID configurations 3-6 3.3 Creating a RAID driver disk 3-9 iv - Asus P4V800D-X | Motherboard DIY Troubleshooting Guide - Page 5
if not installed and used in accordance with manufacturerʼ s instructions, may cause harmful interference to radio communications. However, there the dealer or an experienced radio/TV technician for help. The use of shielded cables for connection of the monitor to the graphics card is required to - Asus P4V800D-X | Motherboard DIY Troubleshooting Guide - Page 6
signal cables from the motherboard, ensure that all service technician or your retailer. Operation safety • Before installing the motherboard and adding devices on it, carefully read all the manuals screws, and staples away from connectors, slots, sockets and circuitry. • Avoid dust, humidity, and - Asus P4V800D-X | Motherboard DIY Troubleshooting Guide - Page 7
to change system settings through the BIOS Setup menus. Detailed descriptions of the BIOS parameters are also provided. • Chapter 3: Software Support This chapter describes the contents of the support CD that comes with the motherboard package. Conventions used in this guide To make sure that you - Asus P4V800D-X | Motherboard DIY Troubleshooting Guide - Page 8
P4V800D-X Specifications Summary CPU Chipset Front Side Bus (FSB) Memory Expansion Slots Storage Audio LAN USB Special features Back panel I/O ports Internal I/O connectors Socket 478 for Intel Pentium 4/Celeron up to 3.4GHz+ Intel Hyper-Threading Technology ready VIA PT880 Ultra VIA VT8237R PLUS - Asus P4V800D-X | Motherboard DIY Troubleshooting Guide - Page 9
, ASUS CrashFree BIOS 2, C.P.R. MyLogo PCI 2.2, USB 2.0/1.1 WfM 2.0, DMI 2.0, WOL by PME, WOR by PME ATX power supply (with 4-pin 12V plug) Drivers ASUS PC Probe Anti-Virus Software (OEM Version) Userʼs Manual 1 x UltraDMA 133/100/66 cable 1 x SATA cable 1 x SATA power cable 1 x FDD cable I/O shield - Asus P4V800D-X | Motherboard DIY Troubleshooting Guide - Page 10
x - Asus P4V800D-X | Motherboard DIY Troubleshooting Guide - Page 11
This chapter describes the motherboard features and the new technologies it supports. 1Product Introduction - Asus P4V800D-X | Motherboard DIY Troubleshooting Guide - Page 12
for the following items. Motherboard ASUS P4V800D-X motherboard Cables 1 x Ultra 133/100/66 DMA cable 1 x Serial ATA cable 1 x Serial ATA power cable 1 x Floppy Disk Drive cable Accessories I/O shield Application CDs ASUS motherboard support CD Documentation User guide If any of the - Asus P4V800D-X | Motherboard DIY Troubleshooting Guide - Page 13
technology that speeds up the PCI bus. PCI Express features point-to-point serial interconnections between devices and allows higher clockspeeds by carrying data in packets. This high speed interface is software compatible with existing PCI specifications. ASUS P4V800D-X Motherboard 1-3 - Asus P4V800D-X | Motherboard DIY Troubleshooting Guide - Page 14
through the support CD when a bootable disk is not available, and go through the simple BIOS auto-recovery process. ASUS motherboards now enable users to enjoy this protection feature without the need to pay for an optional ROM. ASUS EZ Flash BIOS With ASUS EZ Flash, you can update BIOS before - Asus P4V800D-X | Motherboard DIY Troubleshooting Guide - Page 15
motherboard components or change any motherboard settings. • Unplug the power cord from the wall socket motherboard component. The illustration below shows the location of the onboard LED. P4V800D-X ® SB_PWR P4V800D-X Onboard LED ON Standby Power OFF Powered Off ASUS P4V800D-X Motherboard - Asus P4V800D-X | Motherboard DIY Troubleshooting Guide - Page 16
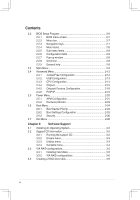
bit,184-pin module) DDR DIMMB2 (64 bit,184-pin module) Socket 478 PARALLEL PORT PRI_IDE COM1 USB12 Bottom: USB3 USB4 Top: RJ-45 Top:Line In Center:Line Out Below:Mic In RTL 8201CL USBPW1 VIA PT880 Ultra P4V800D-X AGP SEC_IDE CD AUX FP_AUDIO AD1888 Super I/O GAME PCIEX16 PCI1 PCI2 PCI3 - Asus P4V800D-X | Motherboard DIY Troubleshooting Guide - Page 17
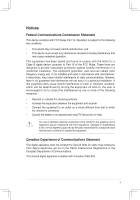
in the image below. 1.5.3 Screw holes Place six screws into the holes indicated by circles to secure the motherboard to the chassis. Do not overtighten the screws! Doing so can damage the motherboard. Place this side towards-the rear of the chassis P4V800D-X ® ASUS P4V800D-X Motherboard 1-7 - Asus P4V800D-X | Motherboard DIY Troubleshooting Guide - Page 18
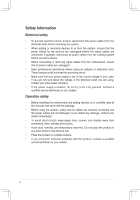
processors with core speeds of less than 1GHz. P4V800D-X ® P4V800D-X Socket 478 Gold Arrow 1.6.2 Installing the CPU Follow these steps to install a CPU: 1. Locate the CPU socket. Open the socket by pulling the lever gently sideways away from the socket, then lift the lever upwards to a 90 to - Asus P4V800D-X | Motherboard DIY Troubleshooting Guide - Page 19
DIMM_B2 80 Pins 104 Pins 1.7 System memory 1.7.1 Overview The motherboard has four Double Data Rate (DDR) DIMM sockets that support up to 4 GB unbuffered non-ECC DDR400/333/266 DDR SDRAM DIMMs. P4V800D-X ® P4V800D-X 184-Pin DDR DIMM Sockets 1.7.2 Memory configurations You may install single or - Asus P4V800D-X | Motherboard DIY Troubleshooting Guide - Page 20
6B 256MB Smart U24256ADSRG6H20 N/A Smart SS D32M8XS60HBX4AMV 512MB BiaoXing BXXC22D-38KT3B N/A BiaoXing DS VM256D328BT-5 A*: Supports one module inserted in any slot as Single-channel memory configuration B*: Supports one pair of modules inserted into either the blue slots or the black slots - Asus P4V800D-X | Motherboard DIY Troubleshooting Guide - Page 21
to remove a DIMM. 1. Simultaneously press the retaining clips outward to unlock the DIMM. Support the DIMM lightly with your fingers when pressing the retaining clips. The DIMM might get damaged when it flips out with extra force. 2. Remove the DIMM from the socket. ASUS P4V800D-X Motherboard 1-11 - Asus P4V800D-X | Motherboard DIY Troubleshooting Guide - Page 22
the expansion cards that they support. Make sure to unplug the injury and damage motherboard components. 1.8.1 Installing Remove the system unit cover (if your motherboard is already installed in a chassis). the necessary BIOS settings, if any. See Chapter 2 for information on BIOS setup. 2. - Asus P4V800D-X | Motherboard DIY Troubleshooting Guide - Page 23
- - - - - - - used When using PCI cards on shared slots, ensure that the drivers support "Share IRQ" or that the cards do not need IRQ assignments; otherwise, conflicts will arise between the two PCI groups, making the system unstable and the card inoperable. ASUS P4V800D-X Motherboard 1-13 - Asus P4V800D-X | Motherboard DIY Troubleshooting Guide - Page 24
P4V800D-X Accelerated Graphics Port (AGP) 1.8.4 PCI slots The PCI slots support cards such as a LAN card, SCSI card, USB card, and other cards that comply with PCI specifications. The figure shows a LAN card installed on a PCI slot. 1.8.5 PCI Express x16 slot This motherboard supports universal PCI - Asus P4V800D-X | Motherboard DIY Troubleshooting Guide - Page 25
RAM in CMOS. You can clear the CMOS memory of date, time, and system setup parameters by the key during the boot process and enter BIOS setup to re-enter data. Please save all data P4V800D-X CLRTC 12 23 ® Normal (Default) P4V800D-X Clear RTC RAM Clear CMOS ASUS P4V800D-X Motherboard 1-15 - Asus P4V800D-X | Motherboard DIY Troubleshooting Guide - Page 26
modes (no power to CPU, DRAM in slow refresh, power supply in reduced power mode). The USBPWR12 and USBPWR34 jumpers are for the rear USB ports. The USBPWR56 and USBPWR78 jumper is for the internal USB connectors that you can connect to additional USB ports. P4V800D-X USBPW1 2 1 +5V (Default - Asus P4V800D-X | Motherboard DIY Troubleshooting Guide - Page 27
a scanner, or other devices. 3. LAN (RJ-45) port. This port allows 10/100 Mbps connection to a Local Area Network (LAN) through a network hub. 4. Line In audio output devices with coaxial cable connectors. 11. PS/2 keyboard port (purple). This port is for a PS/2 keyboard. ASUS P4V800D-X Motherboard - Asus P4V800D-X | Motherboard DIY Troubleshooting Guide - Page 28
ribbon cable to PIN 1. P4V800D-X Floppy disk drive connector 2. IDE connectors (40-1 pin PRI_IDE, SEC_IDE) This connector is for an Ultra DMA 133 signal cable. The Ultra DMA 133 signal cable has three connectors: a blue connector for the IDE connector on the motherboard, a black connector for an - Asus P4V800D-X | Motherboard DIY Troubleshooting Guide - Page 29
GND P4V800D-X SATA connectors Important notes on Serial ATA • You must install Windows® 2000 SP4, Windows® XP SP1, Windows® 2003, or newer OS versions before using Serial ATA hard disk drives. • The Serial ATA interface is not supported when using Windows® 98SE/Me operating system. 4. CPU, power - Asus P4V800D-X | Motherboard DIY Troubleshooting Guide - Page 30
is purchased separately. USB+5V USB_P8USB_P8+ GND NC P4V800D-X ® USB56 1 P4V800D-X USB 2.0 connectors USB+5V USB_P6USB_P6+ GND NC USB78 1 USB+5V USB_P7USB_P7+ GND USB+5V USB_P5USB_P5+ GND Never connect a 1394 cable to the USB connectors. Doing so will damage the motherboard! 6. Internal audio - Asus P4V800D-X | Motherboard DIY Troubleshooting Guide - Page 31
panel audio cable. This connector supports the front panel audio I/O ports. P4V800D-X ® FP_AUDIO BLINE_OUT_L BLINE_OUT_R +5VA AGND Line out_L NC Line out_R MICPWR MIC2 P4V800D-X Front Panel Audio Connector difficulty powering up if the power supply is inadequate. ASUS P4V800D-X Motherboard 1-21 - Asus P4V800D-X | Motherboard DIY Troubleshooting Guide - Page 32
The GAME/MIDI port connects a joystick or game pad for playing games, and MIDI devices for playing or editing audio files. P4V800D-X ® GAME P4V800D-X Game connector The GAME/MIDI port module isi purchased separately. +5V J1B2 J1CY GND GND J1CX J1B1 +5V MIDI_IN J2B2 J2CY MIDI_OUT J2CX J2B1 +5V 1-22 - Asus P4V800D-X | Motherboard DIY Troubleshooting Guide - Page 33
supports several chassis-mounted functions. PLED SPEAKER PLED+ PLED+5V Ground Ground Speaker PANEL IDE_LED+ IDE_LED- PWR Ground Reset Ground P4V800D-X RESET ® IDE_LED PWRSW * Requires an ATX power supply. P4V800D on the BIOS settings. you to manually place the ASUS P4V800D-X Motherboard 1-23 - Asus P4V800D-X | Motherboard DIY Troubleshooting Guide - Page 34
This chapter tells how to change the system settings through the BIOS Setup menus. Detailed descriptions of the BIOS parameters are also provided. 2 BIOS Setup - Asus P4V800D-X | Motherboard DIY Troubleshooting Guide - Page 35
update the motherboard Basic Input/Output System (BIOS) setup. 1. AFUDOS (Updates the BIOS in DOS mode using a bootable floppy disk.) 2. ASUS EZ Flash (Updates the BIOS using a floppy disk during POST.) 3. ASUS CrashFree BIOS 2 - Updates the BIOS using a bootable floppy disk or the mother board support - Asus P4V800D-X | Motherboard DIY Troubleshooting Guide - Page 36
the system builder. Write the BIOS filename on a piece of paper. You need to type the exact BIOS file name at the prompt. 2. Copy the AFUDOS.EXE utility from the support CD to the bootable floppy disk that contains the BIOS file. 3. Boot the system from the floppy disk. ASUS P4V800D-X Motherboard 2-3 - Asus P4V800D-X | Motherboard DIY Troubleshooting Guide - Page 37
file ..... done Erasing flash .... done Writing flash .... 0x0008CC00 (9%) DO NOT shut down or reset the system while updating the BIOS! Doing so can cause system boot failure! When the BIOS update process is complete, the utility returns to the DOS prompt. A:\>afudos /iP4V800D-X.rom AMI Firmware - Asus P4V800D-X | Motherboard DIY Troubleshooting Guide - Page 38
pressing + during the Power-On Self Tests (POST). To update the BIOS using ASUS EZ Flash: 1. Visit the system builder website to download the latest BIOS file for your motherboard and rename it to P4V800D-X.ROM. Save the BIOS file to a floppy disk. 2. Reboot the system. 3. To launch EZ - Asus P4V800D-X | Motherboard DIY Troubleshooting Guide - Page 39
you see on your screen. This motherboard supports a programmable Low Pin Count (LPC) chip that you can update using the provided utility described in section "2.1 Managing and updating your BIOS." Use the BIOS Setup program when you are installing a motherboard, reconfiguring your system, or prompted - Asus P4V800D-X | Motherboard DIY Troubleshooting Guide - Page 40
2.2.1 BIOS menu screen Menu items Menu bar Configuration fields General help System Time System Date Legacy Diskette A Legacy Diskette B Primary IDE to select items in the menu and change the settings. Some of the navigation keys differ from one screen to another. ASUS P4V800D-X Motherboard 2-7 - Asus P4V800D-X | Motherboard DIY Troubleshooting Guide - Page 41
Enter> to display a list of options. Refer to "2.2.7 Pop-up window". 2.2.7 Pop-up window Select a menu item then press to display a pop-up window with the configuration options for that item. 2.2.8 Scroll bar A is a brief description of the selected item. 2-8 Chapter 2: BIOS Information - Asus P4V800D-X | Motherboard DIY Troubleshooting Guide - Page 42
appears, giving you an overview of the basic system information. Refer to section "2.2.1 BIOS menu screen" for information on the menu screen items and how to navigate through them [360K, 5.25 in.] [1.2M , 5.25 in.] [720K , 3.5 in.] [1.44M, 3.5 in.] [2.88M, 3.5 in.] ASUS P4V800D-X Motherboard 2-9 - Asus P4V800D-X | Motherboard DIY Troubleshooting Guide - Page 43
Setup, BIOS automatically detects the presence of IDE devices. There is a separate sub-menu for each IDE device. Select a device item then press to display the IDE device information. Primary IDE Master Device : Hard Disk Vendor : ST340014A Size : 40.0GB LBA Mode : Supported Block - Asus P4V800D-X | Motherboard DIY Troubleshooting Guide - Page 44
BIOS Version : 08.00.12 Build Date : 08/22/05 Processor Type : Intel(R) Pentium(R) 4 CPU 2.40GHz Speed : 2400MHz Count : 1 System Memory Size : 256MB AMI BIOS Displays the auto-detected BIOS information. System Memory Displays the auto-detected system memory. ASUS P4V800D-X Motherboard - Asus P4V800D-X | Motherboard DIY Troubleshooting Guide - Page 45
malfunction. JumperFree Configuration USB Configuration CPU Configuration Chipset Onboard Devices Configuration CPU frequency, and the relevant parameters will be auto-adjusted. Frequencies higher than CPU Overclock Tuner [Standard] Configuration options: [Manual] [Standard] [Overclock 5%] [Overclock 10%] - Asus P4V800D-X | Motherboard DIY Troubleshooting Guide - Page 46
] Allows you to enable or disable the port 64/60 emulation. Configuration options: [Disabled] [Enabled] When you use a USB mass storage device, a USB mass storage device configuration option will display. And this option is hiden if no USB mass storage detected. ASUS P4V800D-X Motherboard 2-13 - Asus P4V800D-X | Motherboard DIY Troubleshooting Guide - Page 47
Configuration The items in this menu show the CPU-related information that the BIOS automatically detects. Configure advanced CPU settings Manufacturer:Intel Brand String:Intel(R)Pentium(R) 4 CPU 2.40GHz Frequency :2400MHz FSB Speed : 533MHz Cache L1 Cache L2 Cache L3 : 8 KB : 512 KB : 0 KB Max - Asus P4V800D-X | Motherboard DIY Troubleshooting Guide - Page 48
] Manual DRAM Frequency DRAM Timing [Maunel] Setting or AUTO by DRAM CAS# Latency [2.5] SPD. Precharge tvo02A.c5t8iv(eC()TCropp)yright 19[855T-]2004, American Megatrends, Inc. Active to Precharge(Tras) [20T] Active to CMD(Trcd) [5T] DRAM BUS Selection [Auto] ASUS P4V800D-X Motherboard - Asus P4V800D-X | Motherboard DIY Troubleshooting Guide - Page 49
] [666MHz] DRAM Timing [Manual] Configuration options: [Manual] [Auto] [Turbo] [ PCI Express] Configuration options: [PCI] [AGP] [PCI Express] Allows you to insert the PCI Express VGA into both AGP slot and PCI Express x 16 slot at the same time, but you cannot use both of them at one time. In BIOS - Asus P4V800D-X | Motherboard DIY Troubleshooting Guide - Page 50
] Configuration options: [Disabled] [Enabled] SouthBridge VIA VT8237R Configuration VIA VT8237R South Chipset Configuration PCI Delay Transaction OnBoard SATA-IDE RAID BIOS Execute Onboard AC'97 Audio OnBoard LAN OnBoard LAN Boot ROM [Disabled] [RAID] [Enabled] [Enabled] [Enabled] [Disabled] Selet - Asus P4V800D-X | Motherboard DIY Troubleshooting Guide - Page 51
Devices Configuration Configure Win627EHF Super IO Chipset Serial Port2 Address Parallel Port Address Parallel Port Mode ECP Mode DMA Channel Parallel Port IRQ Onboard Game/MIDI Port [2F8/IRQ3] [378] [ECP] [DMA3] [IRQ7] [Disabled] Allows BIOS to Select Serial Port2 Base Addresses. ←→ Select - Asus P4V800D-X | Motherboard DIY Troubleshooting Guide - Page 52
correctly. Configuration options: [Disabled] [Enabled] IRQ xx [Available] When set to [Available], the specific IRQ is free for use of PCI/PnP devices. When set to [Reserved], the IRQ is reserved for legacy ISA devices. Configuration options: [PCI Device] [Reserved] ASUS P4V800D-X Motherboard 2-19 - Asus P4V800D-X | Motherboard DIY Troubleshooting Guide - Page 53
figuration options: [S1 (POS) Only] [S3 Only] [Auto] Repost Video on S3 Resume [No] Determines whether to invoke VGA BIOS POST on S3/STR resume. Configuration options: [No] [Yes] ACPI 2.0 Support [Yes] Allows you to add more tables for ACPI 2.0 specifications. Configuration options: [No] [Yes] ACPI APIC - Asus P4V800D-X | Motherboard DIY Troubleshooting Guide - Page 54
Off] [Power On] [Last State] Resume On Ring [Disabled] Allows you to enable or disable Resume On Ring. Configuration options: [Disabled] [Enabled] Resume On Lan [Disabled] Allows you to enable or disable the Resume On Lan. Configuration options: [Disabled] [Enabled] ASUS P4V800D-X Motherboard 2-21 - Asus P4V800D-X | Motherboard DIY Troubleshooting Guide - Page 55
, the items RTC Alarm Date, RTC Alarm Hour, RTC Alarm Minute, and RTC Alarm Second appear with set values. Configuration options: [Disabled] [Enabled] 2-22 Chapter 2: BIOS Information - Asus P4V800D-X | Motherboard DIY Troubleshooting Guide - Page 56
type of CPU fan, you can not reduce the CPU fan speed even if you set the CPU Q-Fan Mode to [PWM]. VCORE Voltage, 3.3V Voltage, 5V Voltage, 12V Voltage The onboard hardware monitor automatically detects the voltage output through the onboard voltage regulators. ASUS P4V800D-X Motherboard 2-23 - Asus P4V800D-X | Motherboard DIY Troubleshooting Guide - Page 57
Boot Device 2nd Boot Device 3rd Boot Device [1st FLOPPY DRIVE] [HDD:PM-ST340014A] [CDROM:SM-ASUS CD-S] Specifies the boot sequence from the available devices. A device enclosed in parenthesis has been the system. Configuration options: [xxxxx Drive] [Disabled] 2-24 Chapter 2: BIOS Information - Asus P4V800D-X | Motherboard DIY Troubleshooting Guide - Page 58
to [Disabled], BIOS performs all the support for PS/2 mouse. Configuration options: [Disabled] [Enabled] [Auto] Wait for ʻF1ʼ If Error [Enabled] When set to [Enabled], the system waits for F1 key to be pressed when error occurs. Configuration options: [Disabled] [Enabled] ASUS P4V800D-X Motherboard - Asus P4V800D-X | Motherboard DIY Troubleshooting Guide - Page 59
password. To clear the supervisor password, select the Change Supervisor Password then press Enter. The message "Password Uninstalled" appears. If you forget your BIOS password, you can clear clear it by erasing the CMOS Real Time Clock (RTC) RAM. See section "2.6 Jumpers" for information on how to - Asus P4V800D-X | Motherboard DIY Troubleshooting Guide - Page 60
user password. Password Check [Setup] When set to [Setup], BIOS checks for user password when accessing the Setup utility. When set to [Always], BIOS checks for user password both when accessing Setup and booting the system. Configuration options: [Setup] [Always] ASUS P4V800D-X Motherboard 2-27 - Asus P4V800D-X | Motherboard DIY Troubleshooting Guide - Page 61
to fields other than system date, system time, and password, the BIOS asks for a confirmation before exiting. Discard Changes This option allows you When you select this option, or if you press , a confirmation window appears. Select [Yes] to load the default values. Select Exit & Save Changes - Asus P4V800D-X | Motherboard DIY Troubleshooting Guide - Page 62
This chapter describes the contents Software Sup3port of the support CD that comes with the motherboard package. - Asus P4V800D-X | Motherboard DIY Troubleshooting Guide - Page 63
without notice. Visit the ASUS website(www.asus.com) for updates. 3.2.1 Running the support CD Place the support CD to the optical drive. The CD automatically displays the Drivers menu if Autorun is enabled in your computer. Click an icon to display support CD/motherboard information Click an item - Asus P4V800D-X | Motherboard DIY Troubleshooting Guide - Page 64
Driver for 32 bit OS LAN Driver for 32 OS. USB 2.0 Driver Install USB 2.0 driver. The screen display and drivers option may not be the same for different operating system versions. 3.2.3 Utilities menu The Utilities menu shows the applications and other software that the motherboard supports. ASUS - Asus P4V800D-X | Motherboard DIY Troubleshooting Guide - Page 65
information. Raid Userʼs Manual Please install first Adobe Acrobat,then open Raid Userʼs Manual. 3.2.4 Contacts menu Click the Contact tab to display the ASUS contact information. You can also find this information on the inside front cover of this user guide. 3-4 Chapter 3: Software Support - Asus P4V800D-X | Motherboard DIY Troubleshooting Guide - Page 66
you use either Windows® XP or Windows® 2000 operating system (OS), copy first the RAID driver from the support CD to a floppy disk before creating RAID configurations. Refer to section "5.5 Creating a RAID driver disk" for details. 3.3.1 Installing hard disks The motherboard supports Ultra DMA 133/100 - Asus P4V800D-X | Motherboard DIY Troubleshooting Guide - Page 67
3.3.2 VIA RAID configurations The motherboard includes a high performance IDE RAID controller integrated in the VIA VT8237R PLUS southbridge chipset. It supports RAID 0 and RAID 1 with two independent Serial ATA channels. Setting the BIOS RAID items After installing the hard disk drives, make sure to - Asus P4V800D-X | Motherboard DIY Troubleshooting Guide - Page 68
used mainly for audio and video editing RAID system. The following confirmation message appears: The data on the selected disks will be destroyed. Continue? (Y/N) 8. Press to confirm or to return to the configuration options. 9. Press to go back to main menu. ASUS P4V800D-X Motherboard - Asus P4V800D-X | Motherboard DIY Troubleshooting Guide - Page 69
supported RAID configurations appear on a pop-up menu. RAID 0 for performance RRAAIIDD 11 ffoorr ddaattaa pprrootteeccttiioonn RAID SPAN for capacity 2. Select RAID you can auto-configure the RAID array by selecting Auto Setup for Data Security or manually configure the RAID array for mirrored sets. If - Asus P4V800D-X | Motherboard DIY Troubleshooting Guide - Page 70
RAID driver disk: 1. Insert the motherboard support CD into the CD-ROM drive. 2. When the Drivers menu appears, click MakeDisk to creat a VIA 8237 RAID Driver Disk Or Browse the contents of the support CD to locate the driver disk utility and go to \Drivers\Chipset\MakeDisk\MakeDisk for the VIA RAID
-
 1
1 -
 2
2 -
 3
3 -
 4
4 -
 5
5 -
 6
6 -
 7
7 -
8
-
9
-
10
-
11
-
12
-
13
-
14
-
15
-
16
-
17
-
18
-
19
-
20
-
21
-
22
-
23
-
24
-
25
-
26
-
27
-
28
-
29
-
30
-
31
-
32
-
33
-
34
-
35
-
36
-
37
-
38
-
39
-
40
-
41
-
42
-
43
-
44
-
45
-
46
-
47
-
48
-
49
-
50
-
51
-
52
-
53
-
54
-
55
-
56
-
57
-
58
-
59
-
60
-
61
-
62
-
63
-
64
-
65
-
66
-
67
-
68
-
69
-
70
 |
 |

Motherboard
P4V800D-X
User Guide