Asus P5AD2-E P5AD2-E User's Manual for English Edition - Page 111
Ratio box.
 |
View all Asus P5AD2-E manuals
Add to My Manuals
Save this manual to your list of manuals |
Page 111 highlights
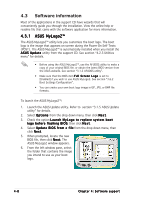
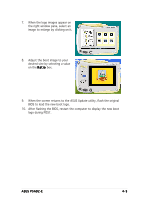
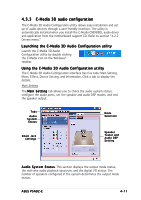
7. When the logo images appear on the right window pane, select an image to enlarge by clicking on it. 8. Adjust the boot image to your desired size by selecting a value on the R a t i o box. 9. When the screen returns to the ASUS Update utility, flash the original BIOS to load the new boot logo. 10. After flashing the BIOS, restart the computer to display the new boot logo during POST. ASUS P5AD2-E 4-9
-
 1
1 -
2
-
3
-
4
-
5
-
6
-
7
-
8
-
9
-
10
-
11
-
12
-
13
-
14
-
15
-
16
-
17
-
18
-
19
-
20
-
21
-
22
-
23
-
24
-
25
-
26
-
27
-
28
-
29
-
30
-
31
-
32
-
33
-
34
-
35
-
36
-
37
-
38
-
39
-
40
-
41
-
42
-
43
-
44
-
45
-
46
-
47
-
48
-
49
-
50
-
51
-
52
-
53
-
54
-
55
-
56
-
57
-
58
-
59
-
60
-
61
-
62
-
63
-
64
-
65
-
66
-
67
-
68
-
69
-
70
-
71
-
72
-
73
-
74
-
75
-
76
-
77
-
78
-
79
-
80
-
81
-
82
-
83
-
84
-
85
-
86
-
87
-
88
-
89
-
90
-
91
-
92
-
93
-
94
-
95
-
96
-
97
-
98
-
99
-
100
-
101
-
102
-
103
-
104
-
105
-
 106
106 -
 107
107 -
 108
108 -
 109
109 -
 110
110 -
 111
111 -
 112
112 -
 113
113 -
 114
114 -
 115
115 -
 116
116 -
117
-
118
-
119
-
120
-
121
-
122
 |
 |

ASUS P5AD2-E
ASUS P5AD2-E
ASUS P5AD2-E
ASUS P5AD2-E
ASUS P5AD2-E
4-9
4-9
4-9
4-9
4-9
9.
When the screen returns to the ASUS Update utility, flash the original
BIOS to load the new boot logo.
10.
After flashing the BIOS, restart the computer to display the new boot
logo during POST.
8.
Adjust the boot image to your
desired size by selecting a value
on the Ratio
Ratio
Ratio
Ratio
Ratio box.
7.
When the logo images appear on
the right window pane, select an
image to enlarge by clicking on it.