Asus P5B SE User Manual - Page 120
RAID Configuration - drivers xp
 |
UPC - 610839154968
View all Asus P5B SE manuals
Add to My Manuals
Save this manual to your list of manuals |
Page 120 highlights
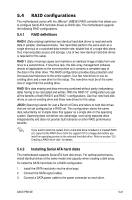
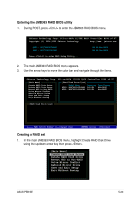
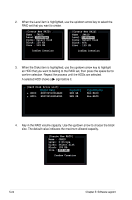
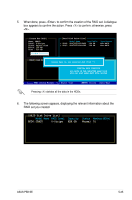
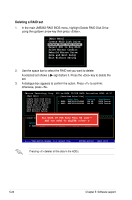
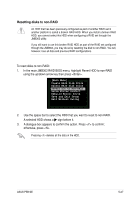
5.4.3 JMicron® RAID Configuration The JMicron® Serial ATA controller allows you to configure RAID 0, RAID 1, and JBOD sets on the external Serial ATA hard disk drives. Before creating a RAID set Prepare the following items: 1. Two SATA HDDs, preferably with the same model and capacity. 2. A write-enabled floppy disk 3. Microsoft® Windows® OS installation disk (Windows 2000/XP) 4. Motherboard support CD with JMB363 driver Complete the following steps before you create a RAID set: 1. Install an internal Serial ATA hard disk drive and an external Serial ATA hard disk drive on your system. Install the internal Serial ATA hard disk drive to the SATA connector labeled SATA_E1. 2. Enable the JMB363 RAID Controller item in the BIOS, and set the JMB363 Mode Select item to [RAID]. See section "4.3.5 IDE Configuration" for details. SATA Configuration SATA Configuraton Configure SATA as Hard Disk Write Protect IDE Detect Time Out (Sec) JMB363 RAID Controller JMB363 Mode Select [Enhanced] [IDE] [Disabled] [35] [Enabled] [RAID] Options Disabled Compatiable Enhanced 3. Enter the JMB363 RAID BIOS utility to set up your RAID configuration. 4. Create a JMB363 RAID driver disk for Windows® OS installation. See section "5.5 Creating a RAID driver disk" for details. 5. Install the JMB363 driver after the Windows® OS had been installed. 5-22 Chapter 5: Software support
-
 1
1 -
2
-
3
-
4
-
5
-
6
-
7
-
8
-
9
-
10
-
11
-
12
-
13
-
14
-
15
-
16
-
17
-
18
-
19
-
20
-
21
-
22
-
23
-
24
-
25
-
26
-
27
-
28
-
29
-
30
-
31
-
32
-
33
-
34
-
35
-
36
-
37
-
38
-
39
-
40
-
41
-
42
-
43
-
44
-
45
-
46
-
47
-
48
-
49
-
50
-
51
-
52
-
53
-
54
-
55
-
56
-
57
-
58
-
59
-
60
-
61
-
62
-
63
-
64
-
65
-
66
-
67
-
68
-
69
-
70
-
71
-
72
-
73
-
74
-
75
-
76
-
77
-
78
-
79
-
80
-
81
-
82
-
83
-
84
-
85
-
86
-
87
-
88
-
89
-
90
-
91
-
92
-
93
-
94
-
95
-
96
-
97
-
98
-
99
-
100
-
101
-
102
-
103
-
104
-
105
-
106
-
107
-
108
-
109
-
110
-
111
-
112
-
113
-
114
-
 115
115 -
 116
116 -
 117
117 -
 118
118 -
 119
119 -
 120
120 -
 121
121 -
 122
122 -
 123
123 -
 124
124 -
 125
125 -
126
-
127
-
128
-
129
-
130
-
131
-
132
-
133
-
134
-
135
-
136
 |
 |