Asus P8B WS User Guide - Page 145
NVIDIA, CUDA™ technology, Requirements, Installing CUDA-ready graphics cards - linux
 |
View all Asus P8B WS manuals
Add to My Manuals
Save this manual to your list of manuals |
Page 145 highlights
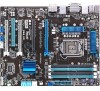
5.2 NVIDIA® CUDA™ technology The motherboard supports the NVIDIA® CUDA™ technology and up to 4 NVIDIA® Telsa™ computing processor cards, providing the optimum multi purpose computing performance. Follow the installation procedures in this section. 5.2.1 Requirements • 32/64-bit Microsoft® Windows XP/ Vista/ Linux RHEL5.X/ Open SuSE11.X OS • The requirements of memory and power supply vary with the Telsa cards you installed. • We recommend that you install additional chassis fans for better thermal environment. • The installation steps might be a little different with the Telsa cards you selected and the VGA output functions. Visit http://www.nvidia.com for more details if needed. • Visit the NVIDIA CUDA Zone website at http://www.nvidia.com/object/ cuda_home.html for the latest driver, list of CUDA-certified graphics card and supported 3D application list. 5.2.2 Installing CUDA-ready graphics cards The following pictures are for reference only. The graphics cards and the motherboard layout may vary with models, but the general installation steps remain the same. 1. Insert four Tesla computing processor card(s) into the PCIe x16_1, PCIe x16_2, PCIe x16_3, and PCIe x16_4 slot. Ensure that the cards are properly seated on the slot. ASUS P8B WS 5-5
-
 1
1 -
2
-
3
-
4
-
5
-
6
-
7
-
8
-
9
-
10
-
11
-
12
-
13
-
14
-
15
-
16
-
17
-
18
-
19
-
20
-
21
-
22
-
23
-
24
-
25
-
26
-
27
-
28
-
29
-
30
-
31
-
32
-
33
-
34
-
35
-
36
-
37
-
38
-
39
-
40
-
41
-
42
-
43
-
44
-
45
-
46
-
47
-
48
-
49
-
50
-
51
-
52
-
53
-
54
-
55
-
56
-
57
-
58
-
59
-
60
-
61
-
62
-
63
-
64
-
65
-
66
-
67
-
68
-
69
-
70
-
71
-
72
-
73
-
74
-
75
-
76
-
77
-
78
-
79
-
80
-
81
-
82
-
83
-
84
-
85
-
86
-
87
-
88
-
89
-
90
-
91
-
92
-
93
-
94
-
95
-
96
-
97
-
98
-
99
-
100
-
101
-
102
-
103
-
104
-
105
-
106
-
107
-
108
-
109
-
110
-
111
-
112
-
113
-
114
-
115
-
116
-
117
-
118
-
119
-
120
-
121
-
122
-
123
-
124
-
125
-
126
-
127
-
128
-
129
-
130
-
131
-
132
-
133
-
134
-
135
-
136
-
137
-
138
-
139
-
 140
140 -
 141
141 -
 142
142 -
 143
143 -
 144
144 -
 145
145 -
 146
146 -
 147
147 -
 148
148
 |
 |
