Asus P8H77-M User Manual - Page 65
Intel, Smart Connect Technology - bios
 |
View all Asus P8H77-M manuals
Add to My Manuals
Save this manual to your list of manuals |
Page 65 highlights
10 Selected Next)】。 11 Finish Intel® Rapid Start Technology 12 13 Intel® Rapid Start Manager Intel® Rapid Start Technology。 1.14.4 Intel® Smart Connect Technology Intel® Smart Connect Technology Intel® Smart Connect Technology •Intel® Smart Connect Technology 支持 Windows® Live Mail、Microsoft Outlook 與 Seesmic Intel® Smart Connect Technology BIOS 程序 的 PCH Configuration Advanced Mode] > [Advanced] > [PCH Configuration],將 Intel® Smart Connect Technology 設置為 [Enabled]。 安裝 Intel® Smart Connect Technology 1 2 Utilities Intel® Smart Connect Technology。 3 Next 4 I accept the terms in the License Agreement Next)】。 1-51
-
 1
1 -
2
-
3
-
4
-
5
-
6
-
7
-
8
-
9
-
10
-
11
-
12
-
13
-
14
-
15
-
16
-
17
-
18
-
19
-
20
-
21
-
22
-
23
-
24
-
25
-
26
-
27
-
28
-
29
-
30
-
31
-
32
-
33
-
34
-
35
-
36
-
37
-
38
-
39
-
40
-
41
-
42
-
43
-
44
-
45
-
46
-
47
-
48
-
49
-
50
-
51
-
52
-
53
-
54
-
55
-
56
-
57
-
58
-
59
-
 60
60 -
 61
61 -
 62
62 -
 63
63 -
 64
64 -
 65
65 -
 66
66 -
 67
67 -
 68
68 -
 69
69 -
 70
70 -
71
-
72
-
73
-
74
-
75
-
76
-
77
-
78
-
79
-
80
-
81
-
82
-
83
-
84
-
85
-
86
-
87
-
88
-
89
-
90
-
91
-
92
-
93
-
94
-
95
-
96
 |
 |

1-51
第一章:產品介紹
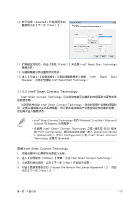
10. 在已選擇(Selected)欄選擇預設的
磁盤後點擊【下一步(Next)】。
安裝 Intel
®
Smart Connect Technology
1. 將驅動程序與公用程序光盤放入光驅。
2. 進入【應用程序(Utilities)】菜單,點擊 Intel
®
Smart Connect Technology。
3. 當設置嚮導出現時,點擊【下一步(Next)開始進行設置。
4.
勾選【我接受授權合約(I accept the terms in the License Agreement)】,然後
點擊【下一步(Next)】。
11. 擴展磁區完成後,點擊【完成(Finish)】來還原 Intel
®
Rapid Start Technology
隱藏分區。
12. 在刪除隱藏分區後重新啟動系統。
13. 進入【開始】>【控制面板】>【添加或刪除程序】移除
Intel
®
Rapid
Start
Manager,才能完全刪除 Intel
®
Rapid Start Technology。
1.14.4 Intel
®
Smart Connect Technology
Intel
®
Smart Connect Technology 可以提供電腦平台最新的內容更新與更有效率
的能源運用。
當您安裝並啟動 Intel
®
Smart Connect Technology,將會依照用戶設置的間隔時
間,定期從睡眠模式中將系統喚醒,執行更新或收集用戶設置應用程序的最新信息,
然後再次進入睡眠狀態。
•
Intel
®
Smart Connect Technology 支持 Windows
®
Live Mail、Microsoft
Outlook 與 Seesmic 應用程序。
• 在使用 Intel
®
Smart Connect Technology 之前,請先至 BIOS 程序
的 PCH Configuration 項目中啟動本功能。進入 [Advanced Mode]
> [Advanced] > [PCH Configuration],將 Intel
®
Smart Connect
Technology 設置為 [Enabled]。