Asus Pro WS W680M-ACE SE Users Manual English - Page 42
M.2 module to., Install your M.2 module to the M.2 slot.
 |
View all Asus Pro WS W680M-ACE SE manuals
Add to My Manuals
Save this manual to your list of manuals |
Page 42 highlights
3. (optional) Install the M.2 Q-Latch to the M.2 length screw hole you wish to install your M.2 module to. You can use a bundled M.2 Q-Latch screw or a pre-installed removable M.2 Q-Latch screw. 4. Rotate and adjust the M.2 Q-Latch so that the handle points away from the M.2 slot. 5. Install your M.2 module to the M.2 slot. Ensure that there is nothing obstructing your M.2 module when installing the M.2 module to the M.2 slot. 6. Rotate the M.2 Q-Latch clockwise to secure the M.2 module in place. Chapter 2 2-8 Chapter 2: Basic Installation
-
 1
1 -
2
-
3
-
4
-
5
-
6
-
7
-
8
-
9
-
10
-
11
-
12
-
13
-
14
-
15
-
16
-
17
-
18
-
19
-
20
-
21
-
22
-
23
-
24
-
25
-
26
-
27
-
28
-
29
-
30
-
31
-
32
-
33
-
34
-
35
-
36
-
 37
37 -
 38
38 -
 39
39 -
 40
40 -
 41
41 -
 42
42 -
 43
43 -
 44
44 -
 45
45 -
 46
46 -
 47
47 -
48
-
49
-
50
-
51
-
52
-
53
-
54
-
55
-
56
-
57
-
58
-
59
-
60
-
61
-
62
 |
 |

2-8
Chapter 2: Basic Installation
Chapter 2
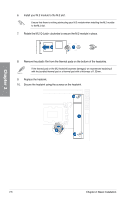
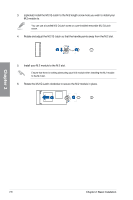
5.
Install your M.2 module to the M.2 slot.
Ensure that there is nothing obstructing your M.2 module when installing the M.2 module
to the M.2 slot.
6.
Rotate the M.2 Q-Latch clockwise to secure the M.2 module in place.
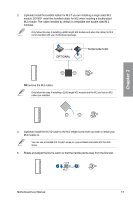
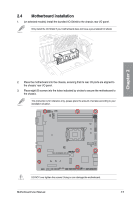
3.
(optional) Install the M.2 Q-Latch to the M.2 length screw hole you wish to install your
M.2 module to.
You can use a bundled M.2 Q-Latch screw or a pre-installed removable M.2 Q-Latch
screw.
4.
Rotate and adjust the M.2 Q-Latch so that the handle points away from the M.2 slot.