Asus ROG GL702VM Users Manual for English Edition - Page 90
Remove the compartment cover., Align and insert the M.2 card into its card module slot.
 |
View all Asus ROG GL702VM manuals
Add to My Manuals
Save this manual to your list of manuals |
Page 90 highlights
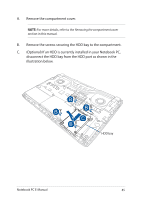
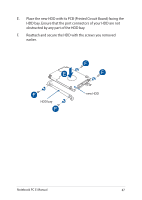
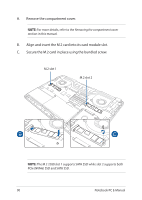
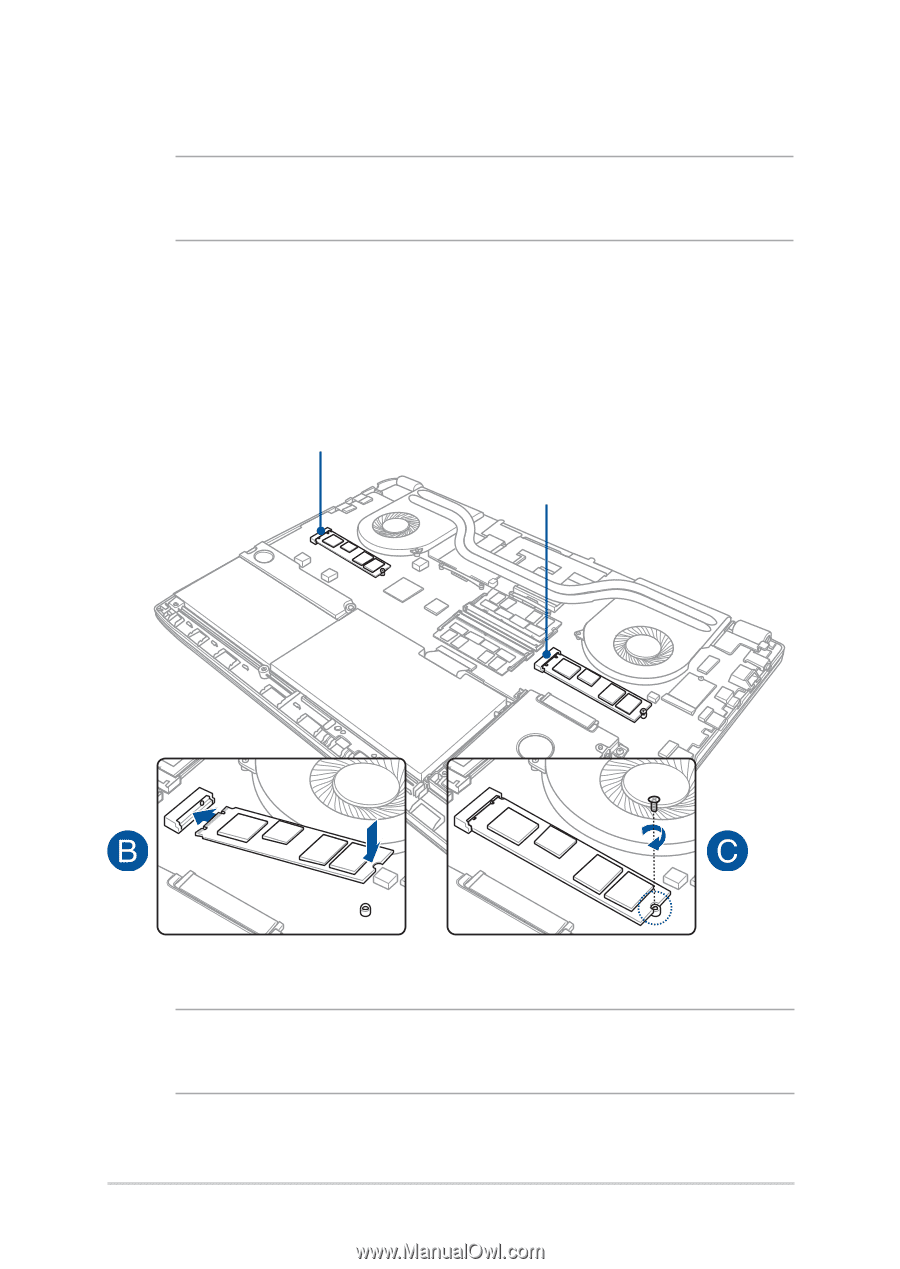
A. Remove the compartment cover. NOTE: For more details, refer to the Removing the compartment cover section in this manual. B. Align and insert the M.2 card into its card module slot. C. Secure the M.2 card in place using the bundled screw. M.2 slot 1 M.2 slot 2 NOTE: The M.2 2280 slot 1 supports SATA SSD while slot 2 supports both PCIe (NVMe) SSD and SATA SSD. 90 Notebook PC E-Manual
-
 1
1 -
2
-
3
-
4
-
5
-
6
-
7
-
8
-
9
-
10
-
11
-
12
-
13
-
14
-
15
-
16
-
17
-
18
-
19
-
20
-
21
-
22
-
23
-
24
-
25
-
26
-
27
-
28
-
29
-
30
-
31
-
32
-
33
-
34
-
35
-
36
-
37
-
38
-
39
-
40
-
41
-
42
-
43
-
44
-
45
-
46
-
47
-
48
-
49
-
50
-
51
-
52
-
53
-
54
-
55
-
56
-
57
-
58
-
59
-
60
-
61
-
62
-
63
-
64
-
65
-
66
-
67
-
68
-
69
-
70
-
71
-
72
-
73
-
74
-
75
-
76
-
77
-
78
-
79
-
80
-
81
-
82
-
83
-
84
-
 85
85 -
 86
86 -
 87
87 -
 88
88 -
 89
89 -
 90
90 -
 91
91 -
 92
92 -
 93
93 -
 94
94 -
 95
95 -
96
-
97
-
98
-
99
-
100
-
101
-
102
-
103
-
104
-
105
-
106
-
107
-
108
-
109
-
110
-
111
-
112
-
113
-
114
-
115
-
116
-
117
-
118
-
119
-
120
-
121
-
122
 |
 |
90
Notebook PC E-Manual
A.
Remove the compartment cover.
NOTE:
For more details, refer to the
Removing the compartment cover
section in this manual.
B.
Align and insert the M.2 card into its card module slot.
C.
Secure the M.2 card in place using the bundled screw.
M.2 slot 1
M.2 slot 2
NOTE:
The M.2 2280 slot 1 supports SATA SSD while slot 2 supports both
PCIe (NVMe) SSD and SATA SSD.