Asus ROG Gladius II Origin Quick Start Guide for Multiple Languages - Page 1
Asus ROG Gladius II Origin Manual
 |
View all Asus ROG Gladius II Origin manuals
Add to My Manuals
Save this manual to your list of manuals |
Page 1 highlights
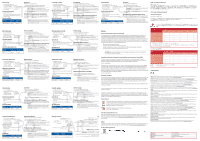
Q16646 Quick Start Guide JP KO) Guide de démarrage rapide (FR) Schnellstartanleitung (DE) Guida rapida (IT) Guia de Início Rápido (BP RU) Guía de inicio rápido (ES) Beknopte handleiding (NL) Hızlı Başlangıç Kılavuzu (TR UA) Przewodnik szybkiego startu (PL) Rychlý průvodce (CS) Ghid de pornire rapidă (RO) Gyors üzembe helyezési útmutató (HU) Snabbstartshandbok (SV) Pikaopas (FI) Hurtigstartveiledning (NO) )AR Stručný návod na používanie (SK) Mouse features JP KO) / Caractéristiques de la souris (FR)/ Mausfunktionen (DE) / Funzioni del mouse (IT) / Recursos do mouse (BP RU) / Características del ratón (ES) / Muisfuncties (NL) / Fare özellikleri (TR UA) / Funkcje myszy (PL) / Popis myši (CS) / Caracteristici mouse (RO) / Mouse features (HU) / Mus funktioner (SV) / Hiiren ominaisuudet (FI) / Musens funksjoner (NO AR) / Funkcie myši (SK) Profile switching Profile switching JP KO) / Sélection de profil (FR) / Umschalten des Profils (DE) / Selezione profilo (IT) / Troca de Perfil (BP RU) / Cambio de perfil (ES) / Profielschakelaar (NL) / Profil Geçişi (TR UA) / Przełączanie profili (PL) / Přepínání mezi profily (CS) / Comutarea între profiluri (RO) / Profilváltás (HU) / Profilbyte (SV) / Profiilin vaihtaminen (FI) / Profilbytte (NO AR) / Prepínanie profilov (SK) Switch to Profile 1 1 1 ファイル1 JP 1로 전환 (KO) / Profil 1 (FR) / Umschalten auf Profil 1 (DE) / Passa + a Profilo 1 (IT) / Alternar para Perfil 1 (BP 1 (RU) Cambiar al perfil 1 (ES) / Schakelen naar profiel 1 (NL) / 1. Profile Geç (TR 1 (UA) / Przełącz na Profil 1 (PL) / Přepnout na profil 1 (CS) / Comutare la Profil 1 (RO) / Váltás az 1. profilra (HU) / Byt till profil 1 (SV) / Vaihda Profiili 1:een (FI) / Bytt til profil 1 (NO) / 1 AR) / Prepnúť na 1. profil (SK) Switch to Profile 2 2 2 イル2 JP 2로 전환 (KO) / Profil 2 (FR) / Umschalten auf Profil 2 (DE) / Passa a + Profilo 2 (IT) / Alternar para Perfil 2 (BP 2 (RU) / Cambiar al perfil 2 (ES) / Schakelen naar profiel 2 (NL) / 2. Profile Geç (TR 2 (UA) / Przełącz na Profil 2 (PL) / Přepnout na profil 2 (CS) / Comutare la Profil 2 (RO) / Váltás az 2. profilra (HU) / Byt till profil 2 (SV) / Vaihda Profiili 2:een (FI) / Bytt til profil 2 (NO) / 2 AR) / Prepnúť na 2. profil (SK) Switch to Profile 3 3 3 イル3 JP 3로 전환 (KO) / Profil 3 (FR) / Umschalten auf Profil 3 (DE) / Passa a + Profilo 3 (IT) / Alternar para Perfil 3 (BP 3 (RU) / Cambiar al perfil 3 (ES) / Schakelen naar profiel 3 (NL) / 3. Profile Geç (TR 3 (UA) / Przełącz na Profil 3 (PL) / Přepnout na profil 3 (CS) / Comutare la Profil 3 (RO) / Váltás az 3. profilra (HU) / Byt till profil 3 (SV) / Vaihda Profiili 3:een (FI) / Bytt til profil 3 (NO) / 3 AR) / Prepnúť na 3. profil (SK) Replacing the switches Replacing the switches JP KO) / Remplacer les interrupteurs (FR) / Austauschen der Schalter (DE) / Sostituzione dei tasti (IT) / Substituindo os interruptores (BP RU) / Cambiar los conmutadores (ES) / Vervang de schakelaars (NL) / Anahtarları değiştirin (TR UA) / Wymień przełączniki (PL) / Vyměňte spínače (CS) / Înlocuiţi comutatoarele (RO) / Cserélje ki a kapcsolókat (HU) / Byt brytare (SV) / Vaihda kytkimet (FI) / Bytt ut bryterne (NO AR) / Vymeňte spínače (SK) 開始使用 • 1 x ROG Gladius II Origin ROG Gladius II Origin • 2 x 1. 將 USB USB 接口。 SC •1 x 2 米 USB 連接線 • 1 x ROG logo • 1 x 1 米 USB 1 x ROG 系統需求 • Windows® 10 / Windows® 7 100MB USB 接口 2. 將 Micro USB ROG Gladius II Origin USB ROG Gladius II Origin ROG Logo 3 https://www.asus.com.cn 使用 ROG Armoury 規格 https://www.asus.com.cn ROG Armoury 分辨率 默認 DPI 1 默認 DPI 2 100 DPI 至 12000 DPI 1600 DPI 400 DPI Micro USB Micro USB • ROG Gladius II 1 手順 2 1 USB付属のUSB JP • USB 2m) ×1 • ROG 1 • USB 1m) × 1 • ROG 1 • Windows® 10 / Windows® 7 • 100 MB USB PC ご参考: USB ROG 2. USB USB 3 ASUS http://www.asus.com). ROG Armoury」 ROG Armoury LED 仕様 ROG ArmouryはASUS www.asus.com) 解像度 100 DPI 〜 12000 DPI DPI1 DPI2 1600 DPI 400 DPI USB Contenuto della confezione Per iniziare IT • 1 x Mouse gaming ROG Gladius II Origin • 2 x Tasti mouse Omron (made in Japan) • 1 x Cavo USB 2 metri • 1 x Cavo USB 1 metro • 1 x Adesivo con logo ROG • 1 x Custodia ROG • Documentazione utente • Certificato di garanzia Requisiti di sistema • Windows® 7 / Windows® 10 Per installare il mouse gaming ROG Gladius II Origin: 1. Collegate il cavo USB alla porta USB del vostro computer. 2. Collegate il cavo micro-USB al mouse gaming ROG Gladius II Origin. NOTA: Assicuratevi che il logo ROG sul cavo micro-USB sia rivolto verso l'alto quando lo collegate al mouse gaming ROG Gladius II Origin. 3. Scaricate i driver da http://www.asus.com quindi installateli sul vostro • 100 MB di spazio libero su hard disk (per installazione di software computer. opzionale) Personalizzazione tramite ROG Armoury • Connessione ad Internet (per il download di software opzionale) Per una migliore personalizzazione dei tasti, ulteriori impostazioni per le • Porta USB prestazioni, effetti di illuminazione e taratura della superficie scaricate e Specifiche installate ROG Armoury dal sito www.asus.com. Risoluzione Da 100 DPI a 12000 DPI DPI 1 standard DPI 2 standard 1600 DPI 400 DPI IMPORTANTE! Se si verificasse un problema durante l'aggiornamento del firmware scollegate il cavo micro USB, tenete premuti i tasti destro, sinistro e rotellina di scorrimento e ricollegate il cavo micro USB per riavviare l'aggiornamento. Conteúdos da embalagem Iniciando • 1 x Mouse para Jogo ROG Gladius II Para configurar sei Mouse para Jogo ROG Gladius II: • 2 x Japanese-made Omron mouse switches 1. Conecte o cabo USB à porta UBS do seu computador. BP • 1xcaboUSB2metros • 1 x cabo USB 1 metros • 1 x etiqueta do logotipo ROG • 1 x bolsa ROG • Documentação do usuário • Cartão de garantia Requerimentos de sistema • Windows® 10 / Windows® 7 • 100 MB de espaço livre no disco rígido (para instalação do software opcional) • Conexão com a Internet (para baixar o software opcional) 2. Conecte o cabo micro USB ao Mouse para Jogo ROG Gladius II. NOTA: Certifique-se o logotipo ROG no cabo micro USB está virado para cima quando o ligar ao mouse de Jogo ROG Gladius II. 3. Baixe o driver de http://www.asus.com e, em seguida, instale-o em seu computador. Personalizando com ROG Armoury Para mais botões programáveis, configurações de desempenho, efeitos de iluminação • Porta USB e calibração de superfície, baixe e instale o ROG Armoury de www.asus.com. Especificações Resolução 100 DPI a 12000 DPI Padrão DPI 1 1600 DPI Padrão DPI 2 400 DPI IMPORTANTE! Quando você encontrar um problema ao atualizar o firmware, desconecte o cabo micro USB, em seguida, pressione e segure o botão esquerdo, direito do mouse e role e reconecte o cabo micro USB para reiniciar a atualização. DPI button / DPI DPI DPI ボタン (JP) / DPI 버튼 (KO) / Bouton DPI (FR) / DPI-Taste (DE) / Pulsante DPI (IT) / Botão de PPP (BP DPI (RU) / Botón PPP (ES) / DPI-knop (NL) / DPI düğmesi (TR DPI (UA) / Przycisk DPI (PL) / Tlačítko DPI (CS) / Buton de reglare a rezoluţiei (RO) / DPI gomb (HU) / DPI-knapp (SV) / DPI-painike (FI) / Ppt-knapp (NO) / (AR) / Tlačidlo DPI (SK) Scroll wheel JP KO) / Molette (FR) / Scrollrad (DE) / Rotellina di scorrimento (IT) / Roda de rolagem (BP RU) / Rueda de desplazamiento (ES) / Scrollwiel (NL) / Kaydırma tekeri (TR UA) / Rolka przewijania (PL) / Rolovací kolečko (CS) / Rotiță de defilare (RO) / Görgetőkerék (HU) / Skrollhjul (SV) / Vierityskiekko (FI) / Rullehjul (NO AR) / Rolovacie koliesko (SK) Right-click button JP KO) / Bouton de clic droit (FR) / Rechte Maustaste (DE) /Tasto destro (IT) / Botão de clique direito (BP RU) / Botón derecho (ES) / Rechtermuisknop (NL) / Sağ tıklama düğmesi (TR UA) / Prawy przycisk klikania (PL) / Pravé klepací tlačítko (CS) / Buton clic dreapta (RO) / Jobb gomb (HU) / Höger musknapp (SV) / Oikea napsautus -painike (FI) / Høyreklikk-knapp (NO AR) / Kliknúť pravým tlačidlom (SK) Micro USB 2.0 connector / Micro USB 2.0 Micro USB 2.0 Micro USB 2.0 JP) / Micro USB 2.0 connector (KO) / Connecteur micro USB 2.0 (FR) / Micro USB 2.0-Anschluss (DE) / Connettore micro-USB 2.0 (IT) / Conector micro USB 2.0 (BP micro-USB 2.0 (RU) / Conector micro-USB 2.0 (ES) / Micro USB 2.0-aansluiting (NL) / Mikro USB 2.0 bağlayıcı (TR Micro USB 2.0 (UA) / Złącze Micro USB 2.0 (PL) / Konektor Micro USB 2.0 (CS) / Conector micro USB 2.0 (RO) / Micro USB 2.0-s csatlakozó (HU) / Micro USB 2.0-anslutning (SV) / Micro-USB 2.0 -liitäntä (FI) / Mikro-USB 2.0-kontakt (NO) / 2.0 Micro USB AR) / Konektor Micro USB 2.0 (SK) Left-click button JP KO) / Bouton de clic gauche (FR) / Linke Maustaste (DE) /Tasto sinistro (IT) / Botão de clique esquerdo (BP RU) / Botón izquierdo (ES) / Linkermuisknop (NL) / Sol tıklama düğmesi (TR UA) / Lewy przycisk klikania (PL) / Levé klepací tlačítko (CS) / Buton clic stânga (RO) / Bal gomb (HU) /Vänster musknapp (SV) / Vasen napsautus -painike (FI) / Venstreklikk-knapp (NO AR) / Kliknúť ľavým tlačidlom (SK) Forward button n (JP) / Forward button (KO) / Bouton Suivant (FR) / Vorwärts-Taste (DE) / Tasto avanti (IT) / Botão avançar (BP RU) / Botón Avanzar (ES) / Knop vooruit (NL) / İleri düğmesi (TR UA) / Przycisk do przodu (PL) / Tlačítko dopředu (CS) / Buton înainte (RO) / Előre gomb (HU) / Framåt-knapp (SV) / Eteenpäin-painike (FI) / Fremoverknapp (NO AR) / Tlačidlo Forward (Vpred) (SK) Backward button JP) / Backward button (KO) / Bouton Précédent (FR) / Rückwärts-Taste (DE) / Tasto indietro (IT) / Botão retroceder (BP RU) / Botón Retroceder (ES) / Knop achteruit (NL) / Geri düğmesi (TR UA) / Przycisk do tyłu (PL) / Tlačítko dozadu (CS) / Buton înapoi (RO) / Vissza gomb (HU) / Bakåt-knapp (SV) / Taaksepäin-painike (FI) / Tilbakeknapp (NO AR) / Tlačidlo Backward (Späť) (SK) Micro USB cable lock / Micro USB Micro USB Micro USB JP USB KO) / Verrou de câble micro USB (FR) / Micro-USB-Kabelverriegelung (DE) / Blocco cavo micro-USB (IT) / Trava do cabo micro USB (BP Micro USB (RU) / Bloqueo para el cable micro-USB (ES) / Micro USB-kabelvergrendeling (NL) / Mikro USB kablosu kilidi (TR Micro USB (UA) / Blokada kabla Micro USB (PL) / Zámek kabelu Micro USB (CS) / Blocare cablu micro USB (RO) / Micro USB-kábel zár (HU) / Mikro USB-kabellås (SV) / Micro-USB-kaapelilukko (FI) / Mikro-USB-kabellås (NO) / Micro USB AR) / Zámok pre kábel Micro USB (SK) Mouse feet JP KO) / Patins de souris (FR) / Mausfüße (DE) /Supporti del mouse (IT) / Pés do mouse (BP RU) / Pies del ratón (ES) / Muisvoetjes (NL) / Fare ayakları (TR UA) / Stopka myszy (PL) / Pata myši (CS) / Piciorușe mouse (RO) / Egér lábak (HU) / Mus fötter (SV) / Hiiri jalat (FI) / Museføtter (NO) / AR) / Pätky pre myš (SK) Rubber cover JP KO) / Cache en caoutchouc (FR) / Gummiabdeckungen (DE) / Cover in gomma (IT) / Tampa de borracha (BP RU) / Tapa de goma (ES) / Rubberen afdekking (NL) / Lastik kapak (TR UA) / Gumowa pokrywa (PL) / Gumový kryt (CS) / Capac din cauciuc (RO) / Gumi borítás (HU) / Gummiskydd (SV) / Kumisuojus (FI) / Gummideksel (NO AR) / Gumený kryt (SK) Optical sensor JP KO) / Capteur optique (FR) / Optischer Sensor (DE) / Sensore ottico (IT) / Sensor óptico (BP RU) / Sensor óptico (ES) / Optische sensor (NL) / Optik sensör (TR UA) / Czujnik optyczny (PL) / Optický senzor (CS) / Senzor optic (RO) / Optikai érzékelő (HU) / Optisk sensor (SV) / Optinen anturi (FI) / Optisk sensor (NO AR) / Optický snímač (SK) 시작하기 • 1 x ROG Gladius II ROG Gladius II • 2 x 일본산 Omron 1. USB USB KO • 1 x 2 미터 USB 케이블 • 1 x ROG • 1 x 1 미터 USB 1 x ROG • Windows® 10 / Windows® 7 100 MB USB 포트 2 USB ROG Gladius II USB ROG Gladius II ROG 3. http://www.asus.com ROG Armoury www.asus.com 에서 ROG Armoury 사양 해상도 기본값 DPI 1 100 DPI ~ 12000 DPI 1600 DPI 기본값 DPI 2 400 DPI USB USB ROG Gladius II Origin • 2 Omron 1 USB USB RU • 2 USB ROG • 1 USB ROG • Windows 10 / Windows 7 • 100 2 micro-USB. microUSB ROG 3 http://www .asus.com ROG Armoury ROG Armoury с USB DPI 1 100 DPI до 12000 DPI 1600 DPI DPI 2 400 DPI www.asus.com. micro-USB micro-USB Package contents Getting started • 1 x ROG Gladius II Origin Gaming Mouse To set up your ROG Gladius II Origin Gaming Mouse: • 2 x Japanese-made Omron mouse switches 1. Connect the USB cable to your computer's USB port. EN • 1x2-meterUSBcable • 1 x ROG logo sticker • User documentation • 1 x 1-meter USB cable • 1 x ROG pouch • Warranty card System requirements • Windows® 10 / Windows® 7 • 100 MB of hard disk space (for optional software installation) • Internet connection (for downloading optional software) • USB port 2. Connect the micro USB cable to your ROG Gladius II Origin Gaming Mouse. NOTE: Ensure the ROG logo on the micro USB cable faces up when connecting it to the ROG Gladius II Origin Gaming mouse. 3. Download the driver from http://www.asus.com then install it in your computer. Customizing with ROG Armoury Specifications For more programmable buttons, performance settings, lighting effects, and surface calibration, download and install the ROG Armoury from www.asus.com. Resolution Default DPI 1 Default DPI 2 100 DPI to 12000 DPI 1600 DPI 400 DPI IMPORTANT! When you encounter a problem while updating the firmware, unplug the micro USB cable, then press and hold down the left, right and scroll button on your mouse and replug the micro USB cable to restart the update. Contenu de la boîte Prise en main • 1 x Souris gaming ROG Gladius II Origin Pour configurer votre souris gaming ROG Gladius II Origin : • 2 x Switches de souris Omron de fabrication japonaise 1. Connectez le câble USB à l'un des ports USB de votre ordinateur. FR • 1xCâbleUSBde2mètres • 1 x Autocollant ROG • Documentation technique • 1 x Câble USB d'1 mètre • 1 x Pochette ROG • Carte de garantie Configuration requise • Windows® 10 / Windows® 7 • Espace disque dur de 100 Mo (pour l'installation de logiciels optionnels) • Connexion internet (pour le téléchargement de logiciels optionnels) 2. Connectez l'extrémité micro USB du câble à la souris gaming ROG Gladius II Origin. REMARQUE : Assurez-vous que le logo ROG de l'extrémité micro USB du câble est orienté vers le haut lors de la connexion du câble à la souris gaming ROG Gladius II Origin. 3. Téléchargez et installez le pilote sur votre ordinateur à partir du site http://www.asus.com. Application ROG Armoury Pour profiter de boutons programmables, de paramètres de performance, d'effets • Port USB Caractéristiques lumineux et de calibrages de surface supplémentaires, téléchargez et installez le logiciel ROG Armoury à partir du site officiel d'ASUS : www.asus.com. Résolution 100 DPI à 12000 DPI DPI 1 par défaut 1600 DPI DPI 2 par défaut 400 DPI IMPORTANT ! Si vous rencontrez un problème lors de la mise à jour du firmware, débranchez le câble micro USB, puis maintenez enfoncés le bouton gauche, le bouton droit et la molette de votre souris et rebranchez le câble micro USB pour recommencer la mise à jour. Contenido del paquete Procedimientos iniciales • 1 x Ratón para juegos ROG Gladius II Para configurar el ratón para juegos ROG Gladius II: • 2 x Conmutadores de ratón Omron fabricados en Japón 1. Conecte el cable USB al puerto USB del equipo. ES • 1xcableUSBde2metros • 1 x Pegatina con el logotipo de ROG • Documentación del usuario • 1 x cable USB de 1 metros • 1 x Funda ROG • Tarjeta de garantía Requisitos del sistema • Windows® 10 / Windows® 7 • 100 MB de espacio en disco duro (para instalación del software opcional) • Conexión a Internet (para descargar el software opcional) • Puerto USB 2. Conecte el cable micro-USB al ratón para juegos ROG Gladius II. NOTA: Asegúrese de que el logotipo de ROG que se encuentra en el cable micro-USB está orientado hacia arriba cuando lo conecte al ratón para juegos ROG Gladius II. 3. Descargue el controlador desde http://www.asus.com y, a continuación, instálelo en el equipo. Personalización con ROG Armoury Para disponer de más botones programables, configuraciones de rendimiento, efectos luminosos y calibración de la superficie, descargue e instale ROG Especificaciones Armoury desde www.asus.com. Resolución PPP 1 PPP 2 predeterminado predeterminado ¡IMPORTANTE! Si tiene algún problema durante la actualización del firmware, desenchufe el cable micro-USB y, a continuación, presione sin soltar el botón izquierdo, derecho y de desplazamiento del ratón y vuelva a enchufar el cable micro-USB para reiniciar la actualización. 100 PPP a 12000 PPP 1600 PPP 400 PPP 開始使用 • 1 x ROG Gladius II Origin ROG Gladius II Origin • 2 x 1. 將 USB USB TC •1 x 2 公尺 USB 連接線 • 1 x ROG logo • 1 x 1 公尺 USB 1 x ROG 系統需求 • Windows® 10 / Windows® 7 100MB USB 連接埠 2. 將 Micro USB ROG Gladius II Origin USB ROG Gladius II Origin ROG Logo 3 https://www.asus.com/tw 使用 ROG Armoury https://www.asus.com/tw ROG Armoury 規格 解析度 預設 DPI 1 預設 DPI 2 100 DPI 至 12000 DPI 1600 DPI 400 DPI Micro USB Micro USB Verpackungsinhalt Erste Schritte DE • 1 x ROG Gladius II Origin Gaming Maus • 2 x Japanische Omron Mausschalter • 1 x 2-Meter-USB-Kabel • 1 x 1-Meter-USB-Kabel • 1 x ROG Logo-Aufkleber • 1 x ROG Beutel • Benutzerhandbuch • Garantiekarte Systemvoraussetzungen • Windows 10 / Windows 7 So richten Sie Ihre ROG Gladius II Origin Gaming Maus ein: 1. Verbinden Sie das USB-Kabel mit dem USB-Anschluss Ihres Computers. 2. Verbinden Sie das Micro-USB-Kabel mit Ihrer ROG Gladius II Origin Gaming Maus. HINWEIS: Achten Sie darauf, dass das ROG Logo auf dem Micro-USBKabel nach oben zeigt, wenn Sie es mit der ROG Gladius II Origin Gaming Maus verbinden. • 100 MB freier Festplattenspeicher (für optionale Software- 3. Laden Sie den Treiber unter http://www.asus.com herunter, installieren Sie ihn Installation) dann auf Ihrem Computer. • Internetverbindung (für optionale Software-Downloads) Weitere Anpassungen mit ROG Armoury • USB-Anschluss Spezifikationen Für weitere programmierbare Tasten, Leistungseinstellungen, Lichteffekte und Oberflächenkalibrierung laden Sie ROG Armoury unter www.asus.com herunter und installieren es. Auflösung 100 DPI bis 12000 DPI Standard DPI 1 Standard DPI 2 1600 DPI 400 DPI WICHTIG! Wenn Sie beim Aktualisieren der Firmware auf ein Problem stoßen, trennen Sie das Micro-USB-Kabel und halten Sie dann die linke, rechte und Scroll-Taste an Ihrer Maus gedrückt. Schließen Sie das Micro-USB-Kabel wieder an und beginnen die Aktualisierung erneut. Inhoud verpakking Aan de slag • 1 x ROG Gladius II gamemuis Uw ROG Gladius II gamemuis instellen: • 2 x in Japan vervaardigde Omron-muisschakelaars 1. Sluit de USB-kabel aan op de USB-poort van de computer. NL • 1USB-kabel2meter • 1 USB-kabel 1 meter • 1 x ROG-logosticker • 1 x ROG-tas • Gebruiksdocumentatie • Garantiekaart Systeemvereisten • Windows® 10 / Windows® 7 • 100 MB harde schijfruimte (voor optionele softwareinstallatie) • Internetverbinding (voor het downloaden van optionele software) 2. Sluit de micro USB-kabel aan op uw ROG Gladius II gamemuis. OPMERKING: Zorg dat het ROG-logo op de micro USB-kabel omhoog is gericht wanneer u het aansluit op de ROG Gladius II gamemuis. 3. Download het stuurprogramma van http://www.asus.com en installeer het vervolgens in uw computer. Aanpassen met ROG Armoury Voor meer programmeerbare knoppen, prestatie-instellingen, verlichtingseffecten en oppervlaktekalibratie, kunt u de ROG Armoury • USB-poort downloaden en installeren van www.asus.com. Specificaties Resolutie Standaard DPI 1 Standaard DPI 2 100 DPI tot 12000 DPI 1600 DPI 400 DPI BELANGRIJK! Als u een probleem ondervindt bij het bijwerken van de firmware, koppelt u de micro-USB-kabel los, houdt u de linker-, rechter- en scrolknop van de muis ingedrukt en sluit u de micro-USBkabel opnieuw aan om de update opnieuw te starten.
-
 1
1 -
 2
2
 |
 |