Asus ROG STRIX B250G GAMING STRIX B250G GAMING Users ManualEnglish - Page 60
Tool menu, 3.9.1 ASUS EZ Flash 3 Utility, 3.9.2 Secure Erase, Secure Boot, Boot Option Priorities
 |
View all Asus ROG STRIX B250G GAMING manuals
Add to My Manuals
Save this manual to your list of manuals |
Page 60 highlights
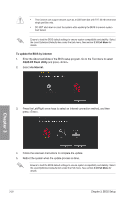
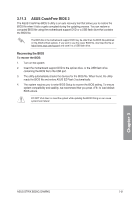
Boot from PCI-E Expansion Devices [Legacy Only] Allows you to select the type of PCI-E expansion devices that you want to launch. Configuration options: [Legacy only] [UEFI driver first] Secure Boot Allows you to configure the Windows® Secure Boot settings and manage its keys to protect the system from unauthorized access and malwares during POST. Boot Option Priorities These items specify the boot device priority sequence from the available devices. The number of device items that appears on the screen depends on the number of devices installed in the system. To select the boot device during system startup, press when ASUS Logo appears. Boot Override These items display the available devices. The number of device items that appears on the screen depends on the number of devices installed in the system. Click an item to start booting from the selected device. 3.9 Tool menu The Tool menu items allow you to configure options for special functions. Select an item then press to display the submenu. 3.9.1 ASUS EZ Flash 3 Utility This item allows you to run ASUS EZ Flash 3. When you press , a confirmation message appears. Use the left/right arrow key to select between [Yes] or [No], then press to confirm your choice. For more details, refer to section 3.11.2 ASUS EZ Flash 3. 3.9.2 Secure Erase SSD speeds may lower over time as with any storage medium due to data processing. Secure Erase completely and safely cleans your SSD, restoring it to factory performance levels. To launch Secure Erase, click Tool > Secure Erase on the Advanced mode menu. Check the ASUS support site for a full list of SSDs tested with Secure Erase. The drive may become unstable if you run Secure Erase on an incompatible SSD. • The time to erase the contents of your SSD may take a while depending on its size. Do not turn off the system during the process. • Secure Erase is only supported on Intel® SATA port. For more information about Intel® SATA ports, refer to section 1.1.2 Motherboard layout of this manual. Chapter 3 3-16 Chapter 3: BIOS Setup
-
 1
1 -
2
-
3
-
4
-
5
-
6
-
7
-
8
-
9
-
10
-
11
-
12
-
13
-
14
-
15
-
16
-
17
-
18
-
19
-
20
-
21
-
22
-
23
-
24
-
25
-
26
-
27
-
28
-
29
-
30
-
31
-
32
-
33
-
34
-
35
-
36
-
37
-
38
-
39
-
40
-
41
-
42
-
43
-
44
-
45
-
46
-
47
-
48
-
49
-
50
-
51
-
52
-
53
-
54
-
 55
55 -
 56
56 -
 57
57 -
 58
58 -
 59
59 -
 60
60 -
 61
61 -
 62
62 -
 63
63 -
 64
64 -
 65
65 -
66
-
67
-
68
-
69
-
70
-
71
-
72
 |
 |