Asus ROG STRIX X670E-I GAMING WIFI Users Manual English - Page 54
ROG STRIX HIVE, 2.2.1 Connecting the ROG STRIX HIVE to the motherboard
 |
View all Asus ROG STRIX X670E-I GAMING WIFI manuals
Add to My Manuals
Save this manual to your list of manuals |
Page 54 highlights
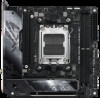
Chapter 2 2.2 ROG STRIX HIVE The ROG STRIX HIVE provides additional functions for your motherboard when connected to your motherboard. • We recommend setting the HYDRANODE Usb (ROG STRIX HIVE) option to [Disabled] in the BIOS by navigating to Advanced > USB Configuration > USB Single Port Control if you do not intend on using the ROG STGRIX HIVE on a regular basis. • Make sure HYDRANODE Usb (ROG STRIX HIVE) is set to [Enabled] in the BIOS when you wish to use all of the ROG STRIX HIVE functions. For more information on the ROG STRIX HIVE IO and buttons, please refer to the manual bundled with the ROG STRIX HIVE package. 2.2.1 Connecting the ROG STRIX HIVE to the motherboard 1. Connect the USB Type-A to Type-C® cable bundled with the ROG STRIX HIVE package to the dedicated USB port on the rear I/O of the motherboard. USB port for ROG STRIX HIVE 2. Connect the Type-C® end of the cable to the ROG STRIX HIVE. The USB Type-C® end of the cable is designed to be connected to the ROG STRIX HIVE in one orientation only. Make sure the USB Type-C® connector is correctly orientated when connecting the ROG STRIX HIVE to the motherboard. 2-20 Chapter 2: Basic Installation
-
 1
1 -
2
-
3
-
4
-
5
-
6
-
7
-
8
-
9
-
10
-
11
-
12
-
13
-
14
-
15
-
16
-
17
-
18
-
19
-
20
-
21
-
22
-
23
-
24
-
25
-
26
-
27
-
28
-
29
-
30
-
31
-
32
-
33
-
34
-
35
-
36
-
37
-
38
-
39
-
40
-
41
-
42
-
43
-
44
-
45
-
46
-
47
-
48
-
 49
49 -
 50
50 -
 51
51 -
 52
52 -
 53
53 -
 54
54 -
 55
55 -
 56
56 -
 57
57 -
 58
58 -
 59
59 -
60
-
61
-
62
-
63
-
64
-
65
-
66
-
67
-
68
-
69
-
70
-
71
-
72
-
73
-
74
-
75
-
76
-
77
-
78
-
79
-
80
 |
 |
