Asus TS300-E7 PS4 TS300-E7/PS4 User Manual - Page 34
Installing the second HDD module cage (optional)
 |
View all Asus TS300-E7 PS4 manuals
Add to My Manuals
Save this manual to your list of manuals |
Page 34 highlights
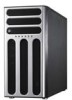
2.6.2 Installing the second HDD module cage (optional) This server supports up to eight SAS hard disk drives by installing a second HDD module cage and an ASUS PIKE RAID card. 1. Release the screw of the front plate and follow the direction of the arrow to remove the front plate from the server chassis. 2. Examine the chassis and ensure the bay space is free of wires and other obstructions. 3. Level the HDD module cage latch counterclockwise. 4. Insert the HDD module cage into the bay. 4 3 5. When the HDD module cage is completed inserted, the cage latch will be pushed back clockwise. 6 6. Lock the cage latch properly. 2-14 Chapter 2: Hardware setup
-
 1
1 -
2
-
3
-
4
-
5
-
6
-
7
-
8
-
9
-
10
-
11
-
12
-
13
-
14
-
15
-
16
-
17
-
18
-
19
-
20
-
21
-
22
-
23
-
24
-
25
-
26
-
27
-
28
-
 29
29 -
 30
30 -
 31
31 -
 32
32 -
 33
33 -
 34
34 -
 35
35 -
 36
36 -
 37
37 -
 38
38 -
 39
39 -
40
-
41
-
42
-
43
-
44
-
45
-
46
-
47
-
48
-
49
-
50
-
51
-
52
-
53
-
54
-
55
-
56
-
57
-
58
-
59
-
60
-
61
-
62
-
63
-
64
-
65
-
66
-
67
-
68
-
69
-
70
-
71
-
72
-
73
-
74
-
75
-
76
-
77
-
78
-
79
-
80
-
81
-
82
-
83
-
84
-
85
-
86
-
87
-
88
-
89
-
90
-
91
-
92
-
93
-
94
-
95
-
96
-
97
-
98
-
99
-
100
-
101
-
102
-
103
-
104
-
105
-
106
-
107
-
108
-
109
-
110
-
111
-
112
-
113
-
114
-
115
-
116
-
117
-
118
-
119
-
120
-
121
-
122
-
123
-
124
-
125
-
126
-
127
-
128
-
129
-
130
-
131
-
132
-
133
-
134
-
135
-
136
-
137
-
138
-
139
-
140
-
141
-
142
-
143
-
144
-
145
-
146
-
147
-
148
-
149
-
150
-
151
-
152
-
153
-
154
-
155
-
156
-
157
-
158
-
159
-
160
 |
 |

Chapter 2:
Hardware setup
2-14
2.
Examine the chassis and ensure the
bay space is free of wires and other
obstructions.
3.
Level the HDD module cage latch
counterclockwise.
4.
Insert the HDD module cage into the
bay.
4
3
5.
When the HDD module cage is
completed inserted, the cage latch
will be pushed back clockwise.
6.
Lock the cage latch properly.
6
2.6.2
Installing the second HDD module cage (optional)
This server supports up to eight SAS hard disk drives by installing a second HDD
module cage and an ASUS PIKE RAID card.
1.
Release the screw of the front plate
and follow the direction of the arrow
to remove the front plate from the
server chassis.