Asus TUF Gaming F15 FX506LHIU FX706LIH Upgrade Guide
Asus TUF Gaming F15 Manual
 |
View all Asus TUF Gaming F15 manuals
Add to My Manuals
Save this manual to your list of manuals |
Asus TUF Gaming F15 manual content summary:
- Asus TUF Gaming F15 | FX506LHIU FX706LIH Upgrade Guide - Page 1
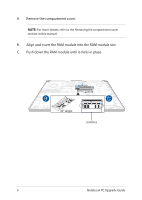
E15754 Upgrade Guide Removing the compartment cover NOTE: The appearance of your Notebook PC's bottom view may vary per model. A. Remove the screw(s) screw from the cover. C. Pull out the compartment cover and remove it completely from your Notebook PC. Notebook PC Upgrade Guide Pop-open Screw 1 - Asus TUF Gaming F15 | FX506LHIU FX706LIH Upgrade Guide - Page 2
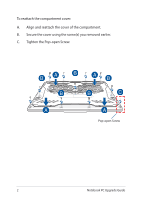
To reattach the compartment cover: A. Align and reattach the cover of the compartment. B. Secure the cover using the screw(s) you removed earlier. C. Tighten the Pop-open Screw. Pop-open Screw 2 Notebook PC Upgrade Guide - Asus TUF Gaming F15 | FX506LHIU FX706LIH Upgrade Guide - Page 3
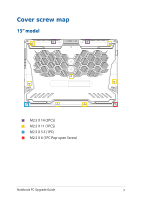
Cover screw map 15" model M2.5 X 14 (2PCS) M2.5 X 11 (7PCS) M2.5 X 5.5 (1PC) M2.5 X 6 (1PC Pop-open Screw) Notebook PC Upgrade Guide 3 - Asus TUF Gaming F15 | FX506LHIU FX706LIH Upgrade Guide - Page 4
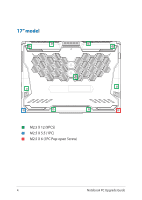
17" model M2.5 X 12 (9PCS) M2.5 X 5.5 (1PC) M2.5 X 6 (1PC Pop-open Screw) 4 Notebook PC Upgrade Guide - Asus TUF Gaming F15 | FX506LHIU FX706LIH Upgrade Guide - Page 5
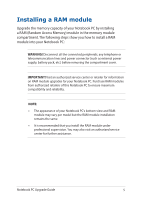
battery pack, etc.) before removing the compartment cover. IMPORTANT! Visit an authorized service center or retailer for information on RAM module upgrades for your Notebook PC. professional supervision. You may also visit an authorized service center for further assistance. Notebook PC Upgrade - Asus TUF Gaming F15 | FX506LHIU FX706LIH Upgrade Guide - Page 6
A. Remove the compartment cover. NOTE: For more details, refer to the Removing the compartment cover section in this manual. B. Align and insert the RAM module into the RAM module slot. C. Push down the RAM module until it clicks in place. 30° angle notches 6 Notebook PC Upgrade Guide - Asus TUF Gaming F15 | FX506LHIU FX706LIH Upgrade Guide - Page 7
model but the HDD installation remains the same. • It is recommended that you replace the HDD under professional supervision. You may also visit an authorized service center for further assistance. Notebook PC Upgrade - Asus TUF Gaming F15 | FX506LHIU FX706LIH Upgrade Guide - Page 8
the compartment cover. NOTE: For more details, refer to the Removing the compartment cover section in this manual. B. Slightly lift the flap on the connector, then disconnect the cable from the motherboard. C. Remove cable as shown in the illustration below. HDD bay 8 Notebook PC Upgrade Guide - Asus TUF Gaming F15 | FX506LHIU FX706LIH Upgrade Guide - Page 9
on a flat dry surface with its PCB (Printed Circuit Board) facing up, as shown in the illustration below. old HDD HDD bay Notebook PC Upgrade Guide 9 - Asus TUF Gaming F15 | FX506LHIU FX706LIH Upgrade Guide - Page 10
G. Place the new HDD with its PCB (Printed Circuit Board) facing the HDD bay. Ensure that the port connectors of your HDD are not obstructed by any part of the HDD bay. H. Reattach and secure the HDD with the screw(s) you removed earlier. new HDD HDD bay 10 Notebook PC Upgrade Guide - Asus TUF Gaming F15 | FX506LHIU FX706LIH Upgrade Guide - Page 11
screw(s) you removed earlier. L. Connect the cable to the motherboard, then push down the flap on the connector to secure the cable. Notebook PC Upgrade Guide 11 - Asus TUF Gaming F15 | FX506LHIU FX706LIH Upgrade Guide - Page 12
model but the module installation remains the same. • It is recommended that you install the M.2 card under professional supervision. You may also visit an authorized service center for further assistance. • The M.2 2280 slot does not support M.2 SATA SSD. 12 Notebook PC Upgrade Guide - Asus TUF Gaming F15 | FX506LHIU FX706LIH Upgrade Guide - Page 13
A. Remove the compartment cover. NOTE: For more details, refer to the Removing the compartment cover section in this manual. B. Align and insert the M.2 card into the module slot. C. Secure the M.2 card in place using the bundled screw(s). Notebook PC Upgrade Guide 13 - Asus TUF Gaming F15 | FX506LHIU FX706LIH Upgrade Guide - Page 14
14 Notebook PC Upgrade Guide
-
 1
1 -
 2
2 -
 3
3 -
 4
4 -
 5
5 -
 6
6 -
 7
7 -
8
-
9
-
10
-
11
-
12
-
13
-
14
 |
 |
Notebook PC Upgrade Guide
1
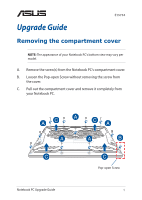
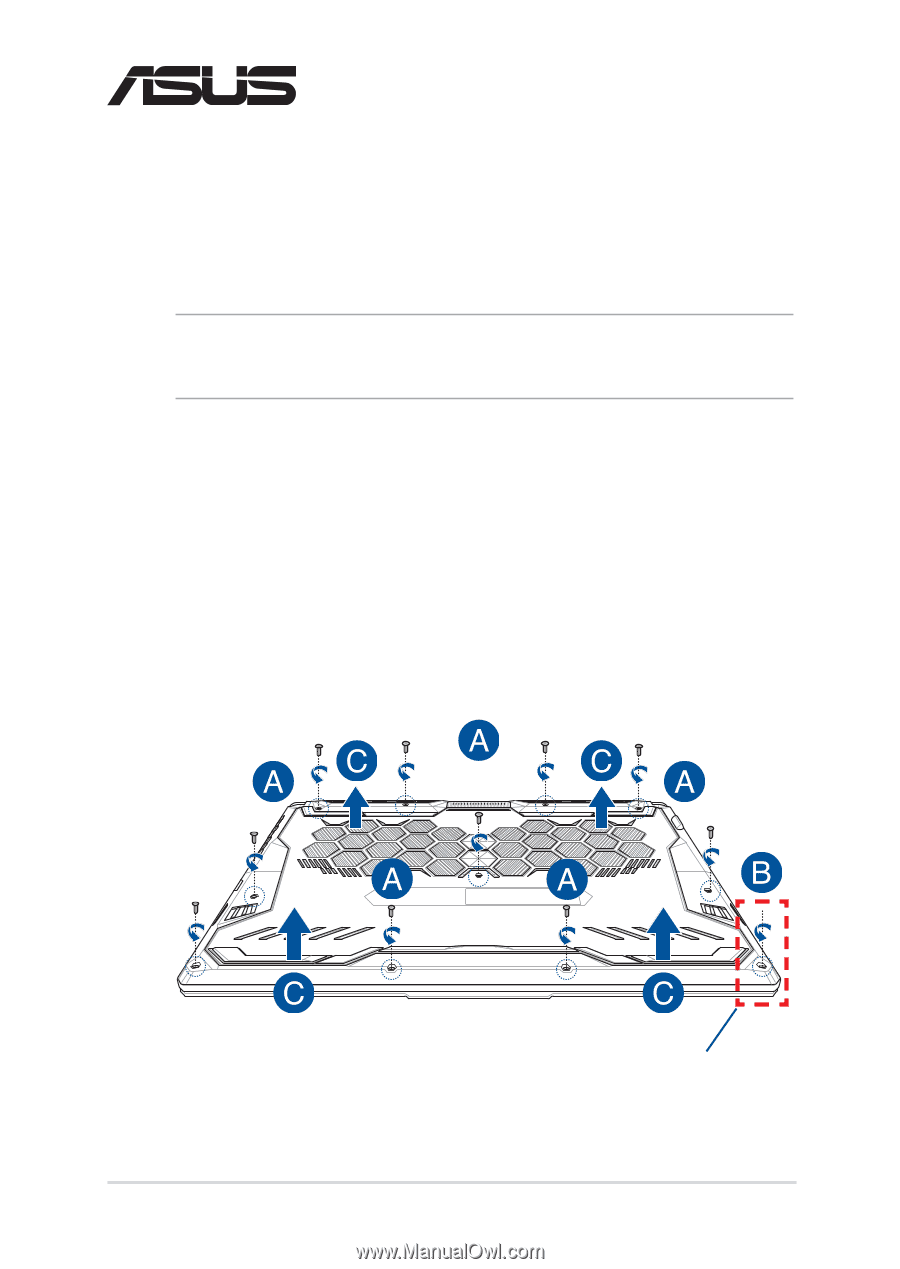
Removing the compartment cover
NOTE:
The appearance of your Notebook PC’s bottom view may vary per
model.
A.
Remove the screw(s) from the Notebook PC’s compartment cover.
B.
Loosen the Pop-open Screw without removing the screw from
the cover.
C.
Pull out the compartment cover and remove it completely from
your Notebook PC.
E15754
Upgrade Guide
Pop-open Screw