Asus VivoMini VC66 E12343_VC66_Series Users ManualEnglish - Page 22
Upgrading memory modules, Place the VivoMini on a flat stable surface, with its bottom side
 |
View all Asus VivoMini VC66 manuals
Add to My Manuals
Save this manual to your list of manuals |
Page 22 highlights
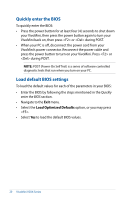
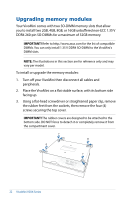
Upgrading memory modules Your VivoMini comes with two SO-DIMM memory slots that allow you to install two 2GB, 4GB, 8GB, or 16GB unbuffered non-ECC 1.35 V DDR4 260-pin SO-DIMMs for a maximum of 32GB memory. IMPORTANT! Refer to http://www.asus.com for the list of compatible DIMMs. You can only install 1.35 V DDR4 SO-DIMM to the VivoMini's DIMM slots. NOTE: The illustrations in this section are for reference only and may vary per model. To install or upgrade the memory modules: 1. Turn off your VivoMini then disconnect all cables and peripherals. 2. Place the VivoMini on a flat stable surface, with its bottom side facing up. 3. Using a flat-head screwdriver or straightened paper clip, remove the rubber feet from the sockets, then remove the four (4) screws securing the top cover. IMPORTANT! The rubber covers are designed to be attached to the bottom side. DO NOT force to detach it or completely remove it from the compartment cover. 22 VivoMini VC66 Series
-
 1
1 -
2
-
3
-
4
-
5
-
6
-
7
-
8
-
9
-
10
-
11
-
12
-
13
-
14
-
15
-
16
-
 17
17 -
 18
18 -
 19
19 -
 20
20 -
 21
21 -
 22
22 -
 23
23 -
 24
24 -
 25
25 -
 26
26 -
 27
27 -
28
-
29
-
30
-
31
-
32
-
33
-
34
-
35
-
36
-
37
-
38
-
39
-
40
 |
 |