Asus VivoMini VC68V VC68Series Users ManualEnglish
Asus VivoMini VC68V Manual
 |
View all Asus VivoMini VC68V manuals
Add to My Manuals
Save this manual to your list of manuals |
Asus VivoMini VC68V manual content summary:
- Asus VivoMini VC68V | VC68Series Users ManualEnglish - Page 1
VivoMini VC68 Series User Manual - Asus VivoMini VC68V | VC68Series Users ManualEnglish - Page 2
permission of ASUSTeK COMPUTER INC. ("ASUS"). ASUS PROVIDES THIS MANUAL "AS IS"WITHOUT WARRANTY OF ANY , up to the listed contract price of each product. ASUS will only be responsible for or EVEN IF ASUS, ITS SUPPLIERS OR YOUR RESELLER IS INFORMED OF THEIR POSSIBILITY. SERVICE AND SUPPORT Visit our - Asus VivoMini VC68V | VC68Series Users ManualEnglish - Page 3
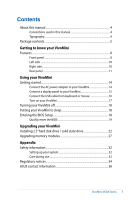
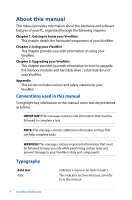
About this manual 4 Conventions used in this manual 4 Typography...4 Package contents 5 Getting to know your VivoMini Features...8 Front panel...8 Left side ...10 Right side...10 Rear panel...11 Using your VivoMini Getting started 14 Connect the AC power adapter to your VivoMini 14 Connect - Asus VivoMini VC68V | VC68Series Users ManualEnglish - Page 4
memory modules and hard disk drive / solid state drive of your VivoMini. Appendix This section includes notices and safety statements your VivoMini. Conventions used in this manual To highlight key information in this manual, some text are presented as follows: IMPORTANT! This message contains vital - Asus VivoMini VC68V | VC68Series Users ManualEnglish - Page 5
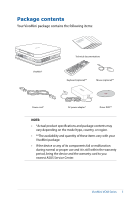
Package contents Your VivoMini package contains the following items: VivoMini* Technical documentations Keyboard (optional)** Mouse ( or region. • **The availability and quantity of these items vary with your VivoMini package. • If the device or any of its components fail or malfunction during - Asus VivoMini VC68V | VC68Series Users ManualEnglish - Page 6
6 VivoMini VC68 Series - Asus VivoMini VC68V | VC68Series Users ManualEnglish - Page 7
1 Getting to know your VivoMini - Asus VivoMini VC68V | VC68Series Users ManualEnglish - Page 8
Features Front panel Optical Drive (on selected models) Your VivoMini's optical drive may support several disc formats such as CDs, DVDs, recordable discs, or rewritable discs. Top cover The removable top cover allows you access to the hard disk - Asus VivoMini VC68V | VC68Series Users ManualEnglish - Page 9
Skype call. End call button This button allows you to end an ongoing Skype call. Power button The power button allows you to turn the VivoMini on or off. You can also press the power button once to put your - Asus VivoMini VC68V | VC68Series Users ManualEnglish - Page 10
! For optimum air flow, ensure that the air vents are free from obstructions. Right side Air vents The air vents allow air to exit your VivoMini chassis. IMPORTANT! For optimum heat dissipation and air ventilation, ensure that the air vents are free from obstructions. Memory card slot This built-in - Asus VivoMini VC68V | VC68Series Users ManualEnglish - Page 11
you to secure your VivoMini using Kensington® compatible VivoMini security products. DisplayPort The DisplayPort sends high-performance digital output from your VivoMini to a display device such as an LCD TV or HD monitor. LAN port The 8-pin RJ-45 LAN port supports a standard Ethernet cable for - Asus VivoMini VC68V | VC68Series Users ManualEnglish - Page 12
. Power supplied through this jack supplies power to the VivoMini. To prevent damage to the VivoMini, always use the bundled power adapter. WARNING! The power audio recordings. HDMI port The HDMI (High Definition Multimedia Interface) port supports a Full-HD device such as an LCD TV or monitor to - Asus VivoMini VC68V | VC68Series Users ManualEnglish - Page 13
2 Using your VivoMini - Asus VivoMini VC68V | VC68Series Users ManualEnglish - Page 14
recommend that you use a grounded wall socket while using your VivoMini. • The socket outlet must be easily accessible and near your VivoMini. • To disconnect your VivoMini from its main power supply, unplug your VivoMini from the power socket. • Power adapter information: - Input voltage: 100 - Asus VivoMini VC68V | VC68Series Users ManualEnglish - Page 15
You can connect a display panel or projector to your VivoMini that has the following connectors: • HDMI connector • DisplayPort adapter are each sold separately. To connect a display panel to your VivoMini: Connect a display cable either to the HDMI, or DisplayPort. Connecting display via - Asus VivoMini VC68V | VC68Series Users ManualEnglish - Page 16
cable from keyboard or mouse You can connect generally any USB keyboard and mouse to your VivoMini. You can also connect a USB dongle for a wireless keyboard and mouse set. To connect a keyboard and mouse to your VivoMini: Connect the USB cable from your keyboard and mouse to any of the USB ports - Asus VivoMini VC68V | VC68Series Users ManualEnglish - Page 17
Turn on your VivoMini Press the power button to turn on your VivoMini. VivoMini VC68 Series 17 - Asus VivoMini VC68V | VC68Series Users ManualEnglish - Page 18
and Output System) stores system hardware settings that are needed for system startup in the VivoMini. In normal circumstances, the default BIOS settings apply to most conditions to ensure optimal the BIOS settings only with the help of a trained service personnel. 18 VivoMini VC68 Series - Asus VivoMini VC68V | VC68Series Users ManualEnglish - Page 19
Quickly enter the BIOS To quickly enter the BIOS: • Press the power button for at least four (4) seconds to shut down your VivoMini, then press the power button again to turn your VivoMini back on, then press or during POST. • When your PC is off, disconnect the power cord from your - Asus VivoMini VC68V | VC68Series Users ManualEnglish - Page 20
20 VivoMini VC68 Series - Asus VivoMini VC68V | VC68Series Users ManualEnglish - Page 21
3 Upgrading your VivoMini - Asus VivoMini VC68V | VC68Series Users ManualEnglish - Page 22
disk drive / solid state drive To install or upgrade the hard disk drives / solid state drives: 1. Turn off your VivoMini then disconnect all cables and peripherals. 2. Place the VivoMini on a flat stable surface, with its top side facing up. 3. Remove the screw from the top cover lock latch and - Asus VivoMini VC68V | VC68Series Users ManualEnglish - Page 23
5. Remove four (4) screws from the HDD/SSD bracket. HDD1R HDD1L 6. (optional) To upgrade your HDD/SDD, first remove the four (4) screws on the bracket, then remove the bracket. VivoMini VC68 Series 23 - Asus VivoMini VC68V | VC68Series Users ManualEnglish - Page 24
may vary depending on the model type, country, or region. 8. Connect the cable to the HDD1L, HDD1R and PWR1 connectors in your VivoMini. HDD1L HDD1R SATA LS HDD1L HDD1L PWR1, HDD1R 24 VivoMini VC68 Series HDD1R Connect Connect to HDD1L to PWR1 connector connector Connect to HDD1R connector - Asus VivoMini VC68V | VC68Series Users ManualEnglish - Page 25
the cable to the HDD/SSD, then align the bracket to the HDD/SSD compartment of your VivoMini and secure the bracket with the screws previously removed. HDD1L HDD1R NOTE: Ensure to organize the cables to prevent any damage to your VivoMini and to ensure the top cover can be replaced successfully - Asus VivoMini VC68V | VC68Series Users ManualEnglish - Page 26
10. Replace the top cover (A) your VivoMini and slide it towards the front of the VivoMini to re-attach (B), then push the latch up and secure it using a screw (C and D). 26 VivoMini VC68 Series - Asus VivoMini VC68V | VC68Series Users ManualEnglish - Page 27
1.2V DDR4 260-pin SO-DIMMs for a maximum of 16GB memory. IMPORTANT! Refer to http://www.asus.com for the list of compatible DIMMs. You can only install 1.2V DDR4 260-pin SO-DIMM to the VivoMini's DIMM slots. To install or upgrade the memory modules: 1. Follow steps 1-4 under the Installing 2.5" hard - Asus VivoMini VC68V | VC68Series Users ManualEnglish - Page 28
3. Pry the SO-DIMM slot cover open, then set it aside. NOTE: If you want to remove the SO-DIMM slot cover, use a flathead screwdriver. 28 VivoMini VC68 Series - Asus VivoMini VC68V | VC68Series Users ManualEnglish - Page 29
4. Align and insert the memory module into the slot (A) and press it down (B) until it is securely seated in place. Repeat the same steps to install the other memory module. IMPORTANT! Always install into the lower slot first. 5. Replace the SO-DIMM slot cover. VivoMini VC68 Series 29 - Asus VivoMini VC68V | VC68Series Users ManualEnglish - Page 30
HDD1L bracket and secure it using the screws removed previously. HDD1R HDD1L NOTE: Ensure to organize the cables to prevent any damage to your VivoMini and to ensure the top cover can be replaced successfully. 7. Follow step 10 under the Installing 2.5" hard disk drive / solid state drive section to - Asus VivoMini VC68V | VC68Series Users ManualEnglish - Page 31
Appendix - Asus VivoMini VC68V | VC68Series Users ManualEnglish - Page 32
Safety information Your VivoMini is designed and tested to meet the latest standards of safety for information technology equipment. However, to ensure your safety, it is important that you read the following safety instructions. Setting up your system • Read and follow all instructions in the - Asus VivoMini VC68V | VC68Series Users ManualEnglish - Page 33
technical problems with the product, unplug the power cord and contact a qualified service technician or your retailer. - The power cord or plug is damaged. - Liquid has been spilled into the system. - The system does not function properly even if you follow the operating instructions. - The - Asus VivoMini VC68V | VC68Series Users ManualEnglish - Page 34
ASUS REACH website at http://csr.asus.com/english/REACH.htm ASUS Recycling/Takeback Services ASUS packaging materials. Please go to http://csr.asus.com/english/Takeback.htm for the detailed recycling and used in accordance with manufacturer's instructions, may cause harmful interference to radio - Asus VivoMini VC68V | VC68Series Users ManualEnglish - Page 35
must be installed and operated in accordance with provided instructions and the antenna(s) used for this transmitter must be be provide with antenna installation instructions and transmitter operating conditions for must follow the specific operating instructions for satisfying RF exposure compliance - Asus VivoMini VC68V | VC68Series Users ManualEnglish - Page 36
Ch01 through CH11 Japan 2.412-2.484 GHz Ch01 through Ch14 Europe ETSI 2.412-2.472 GHz Ch01 through Ch13 Regional notice for Singapore Complies with This ASUS product complies with IMDA IMDA Standards DB103778 Standards. 36 VivoMini VC68 Series - Asus VivoMini VC68V | VC68Series Users ManualEnglish - Page 37
all save money and protect the environment through energy efficient products and practices. All ASUS products with the ENERGY STAR logo comply with the ENERGY STAR standard, and the STAR joint program. NOTE: Energy Star is NOT supported on FreeDOS and Linux-based products. VivoMini VC68 Series 37 - Asus VivoMini VC68V | VC68Series Users ManualEnglish - Page 38
Online support http://qr.asus.com/techserv Manufacturer ASUSTeK Computer Inc. Tel: +886-2-2894-3447 Address: 4F, No. 150, LI-TE RD., PEITOU, TAIPEI 112, TAIWAN Authorised ASUSTeK Computer GmbH representative in Address: HARKORT STR. 21-23, 40880 RATINGEN, Europe GERMANY 38 VivoMini VC68 - Asus VivoMini VC68V | VC68Series Users ManualEnglish - Page 39
Part 2 Section 2. 1077(a) Responsible Party Name: Asus Computer International Address: 800 Corporate Way, Fremont, CA 94539. Phone/Fax No: (510)739-3777/(510)608-4555 hereby declares that the product Product Name : VivoMini Model Number : VC68V, VC68R Conforms to the following specifications: FCC - Asus VivoMini VC68V | VC68Series Users ManualEnglish - Page 40
40 VivoMini VC68 Series
-
 1
1 -
 2
2 -
 3
3 -
 4
4 -
 5
5 -
 6
6 -
 7
7 -
8
-
9
-
10
-
11
-
12
-
13
-
14
-
15
-
16
-
17
-
18
-
19
-
20
-
21
-
22
-
23
-
24
-
25
-
26
-
27
-
28
-
29
-
30
-
31
-
32
-
33
-
34
-
35
-
36
-
37
-
38
-
39
-
40
 |
 |

VivoMini
VC68 Series
User Manual