Asus X99-A USB 3.1 User Guide - Page 141
Updating in GUI environment, bupdater /g
 |
View all Asus X99-A USB 3.1 manuals
Add to My Manuals
Save this manual to your list of manuals |
Page 141 highlights
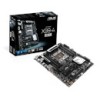
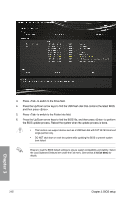
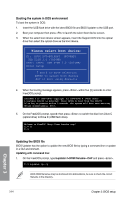
2. BIOS Updater will automatically check the selected BIOS file and enter ASUS EZ Flash 2 Updater to continue the BIOS update process. 3. When BIOS update is done, select OK or press to restart your computer. Updating in GUI environment: 1. On the FreeDOS prompt, type bupdater /g and press . D:/> bupdater /pc /g 2. On the BIOS Updater screen, press to switch from Files panel to Drives panel then select D:. ASUSTeK BIOS Updater for DOS V1.30 [2014/01/01] Current ROM BOARD: X99-A/USB 3.1 VER: 0211 (H :00 B :00) DATE: 07/31/2014 PATH: C:\ Update ROM BOARD: Unknown VER: Unknown DATE: Unknown C: D: Drives panel FORMAN~1 X99A.CAP 8390626 2014-07-31 21:14:34 Files panel Note [Enter] Select or Load [Up/Down/Home/End] Move [Tab] Switch [Esc] Exit [V] Drive Info 3. Press to switch from Drives panel to Files panel then press or keys to select the BIOS file and press . 4. After the BIOS Updater checks the selected BIOS file, select Yes to confirm the BIOS update. Are you sure you want to update the BIOS? Yes No The BIOS Backup feature is not supported due to security regulations. Chapter 3 ASUS X99-A/USB 3.1 3-65
-
 1
1 -
2
-
3
-
4
-
5
-
6
-
7
-
8
-
9
-
10
-
11
-
12
-
13
-
14
-
15
-
16
-
17
-
18
-
19
-
20
-
21
-
22
-
23
-
24
-
25
-
26
-
27
-
28
-
29
-
30
-
31
-
32
-
33
-
34
-
35
-
36
-
37
-
38
-
39
-
40
-
41
-
42
-
43
-
44
-
45
-
46
-
47
-
48
-
49
-
50
-
51
-
52
-
53
-
54
-
55
-
56
-
57
-
58
-
59
-
60
-
61
-
62
-
63
-
64
-
65
-
66
-
67
-
68
-
69
-
70
-
71
-
72
-
73
-
74
-
75
-
76
-
77
-
78
-
79
-
80
-
81
-
82
-
83
-
84
-
85
-
86
-
87
-
88
-
89
-
90
-
91
-
92
-
93
-
94
-
95
-
96
-
97
-
98
-
99
-
100
-
101
-
102
-
103
-
104
-
105
-
106
-
107
-
108
-
109
-
110
-
111
-
112
-
113
-
114
-
115
-
116
-
117
-
118
-
119
-
120
-
121
-
122
-
123
-
124
-
125
-
126
-
127
-
128
-
129
-
130
-
131
-
132
-
133
-
134
-
135
-
 136
136 -
 137
137 -
 138
138 -
 139
139 -
 140
140 -
 141
141 -
 142
142 -
 143
143 -
 144
144 -
 145
145 -
 146
146 -
147
-
148
 |
 |