Asus Z87-A Z87-A User's Manual - Page 34
Onboard buttons, IRQ assignments for this motherboard - overclock
 |
View all Asus Z87-A manuals
Add to My Manuals
Save this manual to your list of manuals |
Page 34 highlights
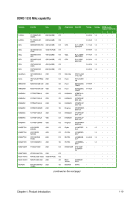
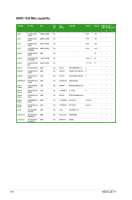
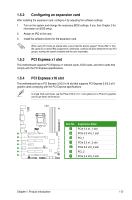
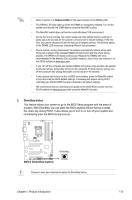
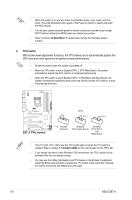
IRQ assignments for this motherboard A B C D E F G H Intel PCH SATA controller #0 - - - shared - - - - Intel PCH SATA controller #1 - - - shared - - - - SMBUS Controller - - shared - - - - - Thermal Controller - - shared - - - - - XHCI - - - - - shared - - EHCI #0 - - - - - - - shared EHCI #1 - - - - shared - - - PCIE x16_1 shared - - - - - - - PCIE x16_2 shared - - - - - - - PCIE x16_3 - shared - - - - - - PCIE x1_1 - - - shared - - - - PCIE x1_2 - - - shared - - - - PCI1 - - shared - - - - - PCI2 - - - shared - - - - Realtek 8111GR LAN - - shared - - - - - ASMedia 1083 - - shared - - - - - 1.6 Onboard buttons Onboard switches allow you to fine-tune performance when working on a bare or opencase system. This is ideal for overclockers and gamers who continually change settings to enhance system performance. 1. MemOK! button Installing DIMMs that are not compatible with the motherboard may cause system boot failure, and the DRAM_LED near the MemOK! switch lights continuously. Press and hold the MemOK! button until the DRAM_LED starts blinking to begin automatic memory compatibility tuning for successful boot. 1-24 ASUS Z87-A
-
 1
1 -
2
-
3
-
4
-
5
-
6
-
7
-
8
-
9
-
10
-
11
-
12
-
13
-
14
-
15
-
16
-
17
-
18
-
19
-
20
-
21
-
22
-
23
-
24
-
25
-
26
-
27
-
28
-
 29
29 -
 30
30 -
 31
31 -
 32
32 -
 33
33 -
 34
34 -
 35
35 -
 36
36 -
 37
37 -
 38
38 -
 39
39 -
40
-
41
-
42
-
43
-
44
-
45
-
46
-
47
-
48
-
49
-
50
-
51
-
52
-
53
-
54
-
55
-
56
-
57
-
58
-
59
-
60
-
61
-
62
-
63
-
64
-
65
-
66
-
67
-
68
-
69
-
70
-
71
-
72
-
73
-
74
-
75
-
76
-
77
-
78
-
79
-
80
-
81
-
82
-
83
-
84
-
85
-
86
-
87
-
88
-
89
-
90
-
91
-
92
-
93
-
94
-
95
-
96
-
97
-
98
-
99
-
100
 |
 |
