Asus Z9NH-D12 FDR Z9NH-D12 Series User Manual - Page 136
Enabling WriteCache, Management Menu, Adapter, Disk WC, Virtual Drive, View/Update Parameters
 |
View all Asus Z9NH-D12 FDR manuals
Add to My Manuals
Save this manual to your list of manuals |
Page 136 highlights
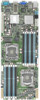
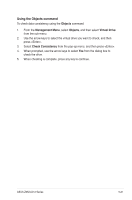
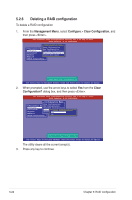
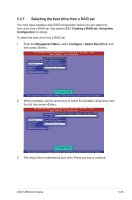
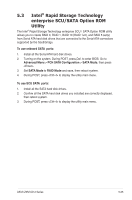
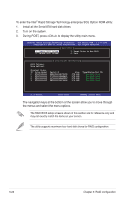
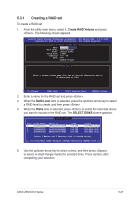
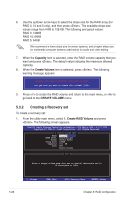
5.2.8 Enabling WriteCache You may manually enable the RAID controller's WriteCache option after creating a RAID set to improve the data transmission performance. When you enable WriteCache, you may lose data when a power interruption occurs while transmitting or exchanging data among the drives. The WriteCache function is recommended for RAID 1 and RAID 10 sets. To enable WriteCache 1. From the Management Menu, select Objects > Adapter, select an existing adapter, and then press to display the adapter properties. 2. Select Disk WC, and then press to turn on the option. LSI Software RAID Configuration Utility Ver C.05 Sep 17,2010 BIOS Version A.10.09231523R Adapter 0 Management Configure Initialize Objects Objects MAednaupter Virtual Drive Physical Drive Rebuild Rate Chk Const Rate FGI Rate BGI Rate Disk WC = = = = = 30 30 30 30 Off Rebuild Check Consistency Read Ahead = On Bios State = Enable Cont On Error = Yes Fast Init = Enable Auto Rebuild = On Auto Resume = Enable Disk Coercion = 1GB Factory Default Disk Write Cache - Off(Write Through or On(Write Back) Use Cursor Keys To Navigate Between Items And Press Enter To Select An Option 3. From the Management Menu, select Objects > Virtual Drive, select an existing adapter and press . Select View/Update Parameters and press to display the adapter properties. 4. Select Disk WC, and then press to turn on the option. LSI Software RAID Configuration Utility Ver C.05 Sep 17,2010 BIOS Version A.10.09231523R Virtual Drive Management Configure Initialize Objects MAednauptOebrjects Virtual Drive Physical Drive RAID Size Stripe Size #Stripes State Rebuild Check Consistency Spans Disk WC Read Ahead = 0 = 148.580GB = 64KB = 2 = OPTIMAL = 1 = On = On Disk Write Cache Setting of VD Use Cursor Keys To Navigate Between Items And Press Enter To Select An Option 5. When finished, press any key to continue. 5-24 Chapter 5: RAID configuration
-
 1
1 -
2
-
3
-
4
-
5
-
6
-
7
-
8
-
9
-
10
-
11
-
12
-
13
-
14
-
15
-
16
-
17
-
18
-
19
-
20
-
21
-
22
-
23
-
24
-
25
-
26
-
27
-
28
-
29
-
30
-
31
-
32
-
33
-
34
-
35
-
36
-
37
-
38
-
39
-
40
-
41
-
42
-
43
-
44
-
45
-
46
-
47
-
48
-
49
-
50
-
51
-
52
-
53
-
54
-
55
-
56
-
57
-
58
-
59
-
60
-
61
-
62
-
63
-
64
-
65
-
66
-
67
-
68
-
69
-
70
-
71
-
72
-
73
-
74
-
75
-
76
-
77
-
78
-
79
-
80
-
81
-
82
-
83
-
84
-
85
-
86
-
87
-
88
-
89
-
90
-
91
-
92
-
93
-
94
-
95
-
96
-
97
-
98
-
99
-
100
-
101
-
102
-
103
-
104
-
105
-
106
-
107
-
108
-
109
-
110
-
111
-
112
-
113
-
114
-
115
-
116
-
117
-
118
-
119
-
120
-
121
-
122
-
123
-
124
-
125
-
126
-
127
-
128
-
129
-
130
-
 131
131 -
 132
132 -
 133
133 -
 134
134 -
 135
135 -
 136
136 -
 137
137 -
 138
138 -
 139
139 -
 140
140 -
 141
141 -
142
-
143
-
144
-
145
-
146
-
147
-
148
-
149
-
150
-
151
-
152
-
153
-
154
-
155
-
156
-
157
-
158
-
159
-
160
-
161
-
162
-
163
-
164
-
165
-
166
-
167
-
168
-
169
-
170
-
171
-
172
-
173
-
174
-
175
-
176
-
177
-
178
-
179
-
180
-
181
-
182
-
183
-
184
-
185
-
186
-
187
-
188
-
189
-
190
-
191
-
192
-
193
-
194
-
195
-
196
 |
 |