Audiovox AVXMTG10U Operation Manual - Page 6
Controls And Indicators Diagram, Front View - remote
 |
View all Audiovox AVXMTG10U manuals
Add to My Manuals
Save this manual to your list of manuals |
Page 6 highlights
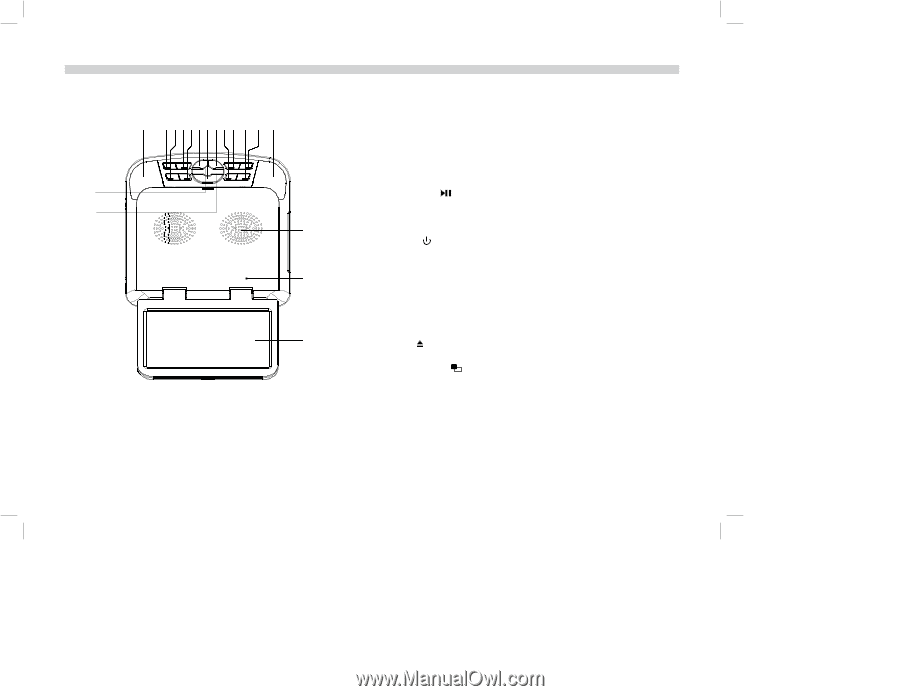
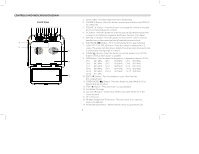
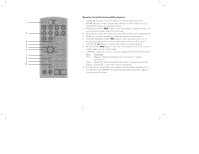
CONTROLS AND INDICATORS DIAGRAM Front View 1 2 3 4 5 6 7 8 9 10 11 12 1 17 16 13 14 15 1. Dome Lights - Provides additional interior illumination. 2. SOURCE (S) Button - Press this button to select one of the sources: DVD, AV IN, CARD, USB. 3. VOLUME ( + ) Button - Press this button to increase the volume or increase the level of selected picture controls. 4. PIC Button - Press this button to enter the picture adjustment mode. Press to adjust in the following sequence: Brightness, Contrast, Color, Reset. 5. VOLUME ( - ) Button - Press this button to decrease the volume of wired headphones and decrease the level of selected picture controls. 6. PLAY/PAUSE ( ) Button - Press to start playback or to pause playing. 7. SCREEN RELEASE (PRESS) Button - Press this button to release the LCD screen. The screen will drop down slightly. Pivot the screen downward until a comfortable viewing angle is reached. 8. POWER ( ) Button - Press this button to turn the system on or off. The button is lit blue when power is available. 9. FMM Button - Used to select the frequentcy in sequence rotaion: FM OFF, CH 1 88.1 MHz, CH 2 88.3 MHz, CH 3 88.5 MHz, CH 4 88.7 MHz, CH 5 88.9 MHz, CH 6 89.1 MHz, CH 7 89.3 MHz, CH 8 89.5 MHz, CH 9 89.7 MHz, CH10 89.9 MHz, CH 11 90.1 MHz, CH 12 90.3 MHz, CH 13 90.5 MHz, CH 14 90.7 MHz, CH 15 90.9 MHz, CH 16 91.1 MHz 10. EJECT ( ) Button - Press this button to eject a disc from the disc compartment. 11. SCREEN MODE ( ) Button - Press this button to select Wide (16:9) or Normal (4:3) aspect ratios. 12. STOP ( ) Button - Press this button to stop playback. 13. Ventilation Openings 14. LCD Cut Off Switch - Used to turn off the LCD screen when it is in the closed position. 15. 10 " LCD Screen 16. Wireless Headphones Transmitter - Transmits audio to an optional wireless headphone. 17. Infrared Remote Sensor - Allows remote control to operate the unit. 4
-
 1
1 -
 2
2 -
 3
3 -
 4
4 -
 5
5 -
 6
6 -
 7
7 -
 8
8 -
 9
9 -
 10
10 -
 11
11 -
 12
12 -
13
-
14
-
15
-
16
-
17
-
18
-
19
-
20
-
21
-
22
-
23
-
24
-
25
-
26
-
27
-
28
 |
 |