Audiovox CCDFR Installation Instructions - Page 7
Flush Mount Installation
 |
View all Audiovox CCDFR manuals
Add to My Manuals
Save this manual to your list of manuals |
Page 7 highlights
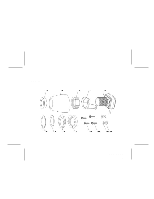
Flush Mount Installation: 1. Select a suitable mounting location in the rear center of vehicle. Check behind panel for wire routing access and confirm that the drill will not damage any existing components. Use a 7/8" hole saw to drill the mount ing hole. 2. Screw the lock nut with the threaded side toward the camera body in the showed direction, then put the camera neck through the mounting hole with the lens exposed and wire cable facing down. 3. Place the flat washer 1 (# 6) and top cover (# 5); tighten the top cover (# 5) to the further location along the camera neck. 4. Hold the top cover by hand and tighten the lock nut in towards the top cover (# 5) with the camera cable downwards. 5. Route the camera cable thru an existing grommet into the vehicle. 6. Connect the camera cable to the extension cable and route towards the monitor. 6 128-6951 7 of 12
-
 1
1 -
 2
2 -
 3
3 -
 4
4 -
 5
5 -
 6
6 -
 7
7 -
 8
8 -
 9
9 -
 10
10 -
 11
11 -
 12
12
 |
 |
