Audiovox DV1201 Owners Manual - Page 9
Rear Panel, Front and Top Panel - remote
 |
UPC - 044476012532
View all Audiovox DV1201 manuals
Add to My Manuals
Save this manual to your list of manuals |
Page 9 highlights
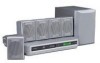
Parts and Functions Front and Top Panel 1 2 3 4 5 6 7 8 9 10 1) Disc tray Open or close tray by pushing OPEN/CLOSE button. Place a disc on the disc tray, label side up. 2) STANDBY indicator When the Unit is turned on by pressing the STANDBY/ON button. If you press theI / STANDBY/ ON button on the remote control, the Unit will turn off and go into standby mode. The light will continue to illuminate. 3) Display window Display system information. 4) OPEN/CLOSE button Use to open and close the disc tray. 5) PLAY button Press to start or resume playback 6) STOP button Stop playing a disc. 7) FUNCTION button Select the source. 8) VOLUME controls Change the loudness of the sound from the speakers connected to the Unit. 9) STANDBY/ON button Turn the power on or off. 10) Remote sensor Receive the remote control unit signals. Note: Screen saver - If no button is pressed within 2 minutes, the function will active. If you want to return the normal screen, press any button. Rear Panel 1112 13 1415 16 17 18 FM ANT. 300Ω 19 20 212223 24 25 26 11) Right FRONT speaker terminals 12) SUBWOOFER terminals 13) Left REAR speaker terminals 14) FM ANTENNA jack 15) DIGITAL AUDIO OUT jack 16) COMPONENT VIDEO jacks (Y, PB/CB, PR/CR) 17) VIDEO OUT jack 18) Left/Right AUDIO IN jacks 19) Right REAR speaker terminals 20) CENTER speaker terminals 21) Left FRONT speaker terminals 22) AM(MW) LOOP ANTENNA terminal 23) S-VIDEO OUT jack 24) Left/Right AUDIO OUT jacks 25) VIDEO IN (VCR) jack 26) Power cord E - 8 E-5-9.pmd 8 4/24/2004, 12:19 PM
-
 1
1 -
2
-
3
-
 4
4 -
 5
5 -
 6
6 -
 7
7 -
 8
8 -
 9
9 -
 10
10 -
 11
11 -
 12
12 -
 13
13 -
 14
14 -
15
-
16
-
17
-
18
-
19
-
20
-
21
-
22
-
23
-
24
-
25
-
26
-
27
-
28
-
29
-
30
-
31
-
32
-
33
-
34
-
35
-
36
-
37
-
38
-
39
 |
 |
