Audiovox VDS102T Operation Manual - Page 11
Audiovox VDS102T - Deluxe Overhead Docking Station Manual
 |
UPC - 044476027529
View all Audiovox VDS102T manuals
Add to My Manuals
Save this manual to your list of manuals |
Page 11 highlights
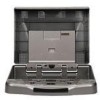
Over-Head Docking Station Storage Installation The over-head docking station makes it easy to take along your DT102 shuttle and play a movie in your car. Simply place your shuttle unit into the overhead docking station. (Figure 1) Installing the DT102 into the VDS102T 1. Push the screen release button in the direction of the arrow to release the shuttle housing. Note: Confirm that the Lock/Unlock latch is in the unlock position. 2. Open the shuttle housing until it is at a right angle to the main unit. 3. Place the bottom of the DT102 into the shuttle housing and then carefully push the upper edge of The DT102 into the housing until the unit locks in with a click. 4. Slide the lock/unlock latch to the lock position to prevent accidentally releasing the shuttle Dome Light Switch Infrared Transmitter / Remote Sensor Eye Figure 1 Removing the DT102 from the VDS102T 1. Slide the lock/unlock latch to the unlock position. 2. Push the release button to release the DT102 from the shuttle housing. 3. Using the finger tip openings at the top, pull the top portion of the DT102 forward and then lift the DT102 up and remove it from the shuttle housing. Note: Ensure that the VDS102T is OFF when installing or removing the DT102. Operating the VDS102T with the DT102 Sliding the screen release lock forward will unlock the LCD screen and it will drop down slightly. Pivot the screen downward until a comfortable viewing angle is reached. The hinge friction will hold the screen in position while the system is in use. Pressing the power button on the unit or the remote control will turn the system on or off alternately. When in use the internal backlighting will illuminate the controls. Press the source button on the unit or the remote control to select the desired source. Adjust the viewing angle by pivoting the screen to optimize the picture quality. Remember to turn the unit off and pivot the LCD to the locked position when not in use. Note: Please refer to the Operation Manual supplied with your shuttle product (DT102, DT85, DT7) for complete operating instructions. 11
-
 1
1 -
2
-
3
-
4
-
5
-
 6
6 -
 7
7 -
 8
8 -
 9
9 -
 10
10 -
 11
11 -
 12
12 -
 13
13 -
 14
14 -
 15
15 -
 16
16
 |
 |
