Audiovox XSN1V1 User Guide - Page 24
Options 1 & 2: Aux In Cable Or Cassette Adapter Installation Instructions - xm snap
 |
View all Audiovox XSN1V1 manuals
Add to My Manuals
Save this manual to your list of manuals |
Page 24 highlights
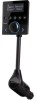
Installation and Setup Options 1 & 2: Aux In Cable Or Cassette Adapter Installation Instructions 1 Plug one end of the Aux In Cable (or Cassette Adapter) into the AUDIO connector on the Base of Snap. Optional Cassette Adapter 2 Plug the other end into the auxiliary input jack of your vehicle's stereo system (or insert the Cassette Adapter into the cassette deck; you may need to turn on the stereo system first). Audio Connector 3 Turn on your vehicle's stereo system. Set it to play from the auxiliary input source (or cassette source if using a Cassette Adapter). You should hear XM channel 1 through your vehicle's stereo system. The installation is complete. Proceed to "Step 5: Tune to Other Channels, Explore and Enjoy" on page 27. AUDIO FM Aux In Cable 4 The audio level output of Snap can be increased or decreased as necessary to match the audio levels of other sources in your vehicle. Refer to "Set Audio Level" on page 39. Aux In If the signal reception is good, showing at least one bar in the upper left corner of the display, but there is no XM audio, be sure the vehicle's stereo system is set to the correct source (step 3). Also be sure that the audio level is set high enough to be heard (step 4). Refer to "Troubleshooting" on page 42 for additional help. 24
-
 1
1 -
2
-
3
-
4
-
5
-
6
-
7
-
8
-
9
-
10
-
11
-
12
-
13
-
14
-
15
-
16
-
17
-
18
-
 19
19 -
 20
20 -
 21
21 -
 22
22 -
 23
23 -
 24
24 -
 25
25 -
 26
26 -
 27
27 -
 28
28 -
 29
29 -
30
-
31
-
32
-
33
-
34
-
35
-
36
-
37
-
38
-
39
-
40
-
41
-
42
-
43
-
44
-
45
-
46
-
47
-
48
-
49
-
50
-
51
-
52
 |
 |
