Avanti D110-1IS Instruction Manual - Page 11
Unplug the power cord prior to any cleaning
 |
View all Avanti D110-1IS manuals
Add to My Manuals
Save this manual to your list of manuals |
Page 11 highlights
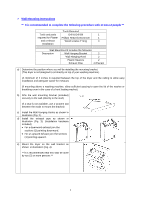
CARE AND MAINTENANCE Cleaning the Exterior • Wipe the dryer surfaces, including the control panel, with a soft cloth and non-abrasive household detergents. • Use a soft cloth to dry the surfaces. • Do not pour water on the dryer. Cleaning the Filters Unplug the power cord prior to any cleaning. Cleaning the Lint Filter: a) Removing the Lint Filters: ALL FILTERS MUST BE IN PLACE WHEN DRYING Remove by pulling outward using the four (4) grip holes in the filter assembly. FILTERS MUST BE CLEANED BEFORE AND AFTER EACH USE. b) The filter assembly consists of three (3) parts (See illustration) a) Exhaust Vent Shroud b) Lint Filter c) Exhaust Filter c) Separate each of the above parts and clean the individual pieces using a SOFT brush or vacuum cleaner. DO NOT damage the filters d) Re-install the filter assembly Reassemble the filter assembly in order Exhaust Filter - Lint Filter - Exhaust Shroud Align the entire assembly with the recessed position in the back of the drum and press firmly until the entire assembly is secure. Cleaning the Air Intake Filter a) Removing the Air Intake Filter: Remove by pulling outward holding the filter housing by the top and bottom. b) Remove the filter inside the housing and clean using a SOFT brush or vacuum cleaner. c) Replace the filter housing by pushing upwards with your thumb until the latch is secure. 11
-
 1
1 -
2
-
3
-
4
-
5
-
 6
6 -
 7
7 -
 8
8 -
 9
9 -
 10
10 -
 11
11 -
 12
12 -
 13
13 -
 14
14 -
 15
15 -
 16
16
 |
 |
