Behringer BASS V-AMP PRO Quick Start Guide - Page 6
Controls - presets
 |
View all Behringer BASS V-AMP PRO manuals
Add to My Manuals
Save this manual to your list of manuals |
Page 6 highlights
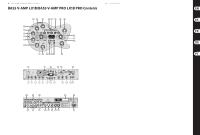
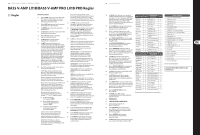
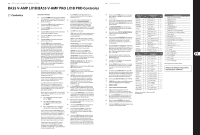
10 BASS V-AMP LX1B/BASS V-AMP PRO LX1B PRO BASS V-AMP LX1B/BASS V-AMP PRO LX1B PRO Controls (EN) Controls CONTROL ELEMENTS (9) The TUNER key engages the tuner. Additionally, you can exit the EDIT mode by pressing this key. (1) Turn your BASS V-AMP PRO on using the POWER switch. The POWER switch should always be in the "Off" position (10) Both arrow keys are used to select the next preset (depressed) whenever you first connect the unit to bank (BANK DOWN und BANK UP). Keeping the keys the mains. pressed lets you quickly jump through the preset banks. Pressing both arrow keys at the same time engages the (2) The GAIN control determines level and saturation EDIT mode. When you press one of the A - E buttons ((8)) charac-teristics of the amp simulation. afterwards, each arrow key takes over an edit function. (3) The VOLUME control governs the volume of the selected preset. (4) The BASS control on the EQ section lowers or elevates bass frequencies. (11) The TAP key has eight functions: "Tap": Tap the TAP key in the rhythm of a tune, and the selected effect adjusts automatically to the appropriate speed. (5) The MID control lowers or elevates the mid frequencies. (6) The TREBLE control regulates the upper frequency range of an activated preset. "Deep": By keeping the TAP key pressed, the BASS control assumes the function of a DEEP control, so that it regulates the sound in the deep bass end of the spectrum. (7) The AMPS control lets you select one of the 32 amp simulations. 16 LEDs surround this control, whereby 1 LED is assigned to 2 amp types. You select one of the first 16 amp types (white lettering) by simply turning the control. To select the next 16 amps (17 - 32, grey lettering), keep the TAP button pressed as you turn the AMPS control. Additionally, you have the option to activate a PREAMP BYPASS via the TUNER (9) and TAP (11) key combi-nation. When PREAMP BYPASS feature is activated, no AMPS control LED is on. To disengage the PREAMP BYPASS feature, either select an amp model of your choice or press the TUNER and TAP keys again. "Mid-Shift/Shape": When an amp simulation is selected using the AMPS control, keep the TAP key pressed and use the MID control to regulate the middle portion of the frequency range (SHIFT). "Presence": Keep the TAP key pressed to use the TREBLE control to regulate PRESENCE in a particular amp simulation. "2nd parameter": The second effect parameter (regulated by the EFFECTS control) is accessed by keeping the TAP button pressed. (8) These five keys are used (among other things) for preset selection of the presets bank shown in the display. "Amp models 17 - 32": Keep the TAP key pressed and select the desired simulation by using the AMPS control. In EDIT mode (activated by simultaneously pressing the arrow keys described under (10)), the function of individual keys is indicated by the print located directly above the respective button: "MIDI Thru": The MIDI Out connector can be set to MIDI Thru (see (8) A). "Compressor": The compressor control regulates the attack time when the TAP key is kept pressed (see (14)). A: Activates the MIDI function. By utilizing the arrow keys, the MIDI channel used for sending and receiving (1 to 16) can be set up. After selecting a MIDI function via the A key, pressing the TAP key relays the MIDI out connector to MIDI Thru. When in this mode, the unit sends no MIDI information of its own; instead, it merely passes on the data received at the MIDI In. B: Switches the DRIVE function on and off. When DRIVE is enabled, the controls (2), (3) and (5) take up the following functions: • GAIN regulates the distortion degree ("DRIVE"). • The VOLUME control regulates an additional volume control ("BOOST"). (12) DISPLAY shows the selected effects bank and gives information about the changes occurring while editing. When the tuner is enabled, the display shows the tuning of the connected instrument. When one of the amp simulations numbered 17 - 32 is selected, the LED located in the lower left corner of the DISPLAY lights up. (13) The EFFECTS control lets you select an effects preset or a combination of several effects. This continuously turnable control is surrounded by a circle of 16 LEDs. Each effect has a corresponding LED. (14) The COMPRESSOR control lets you compress or limit your sound. When you turn the COMPRESSOR control as far left as possible without triggering off a LED, the dynamic characteristics of the signal are not changed. • Use the MID control like the tone control on a simulated distortion pedal ("TONE"). C: This key activates the CABINETS mode. Use the arrow keys to select a type of loudspeaker or a combination of loudspeakers. You can also completely switch off the speaker simulation ("-"). D: Activates the X-OVER function. Use the arrows to regulate the cut-off frequency between high-pass and low-pass filter. This is done in 50 gradients. (15) When an effect is selected using the EFFECTS control (13), the proportion with which this effect influences the entire sound is regulated using the EFFECTS MIX control. (16) The MASTER control regulates the overall volume of your BASS V-AMP/BASS V-AMP PRO. (17) The connector labeled INPUT is the 1/4" TS jack input of the BASS V-AMP/BASS V-AMP PRO, which is where an electric bass, an acoustic guitar, a keyboard etc. can be connected. E: Activates the DENOISER function. You may change the threshold of the expander by using the arrow keys. The EFFECTS control regulates the sensitivity of the noise reduction system, while pressing TAP changes the function of the EFFECTS control so that it regulates the frequency range of the noise reduction system. (18) The LINE IN switch regulates which signal source of the BASS V-AMP PRO is processed. When the switch is not pressed, this refers to the the signal connected to the input connector (e.g. electric bass). When the switch is depressed, the line signal connected to the PRE DSP INSERT (LINE IN, (20)) is routed to the processor (particularly useful for keyboards). 11 Quick Start Guide (19) You can connect standard headphones to the PHONES connector of your BASS V-AMP/BASS V-AMP PRO. (20) You can insert external effects into the serial insert loop featured on the BASS V-AMP PRO. The SEND/LINE OUT connector is connected to the input of your effects unit for this purpose. (21) The stereo signal of the BASS V-AMP PRO without analog speaker simulations can be taken at the ANALOG LINE OUTPUTS. (22) The POST DSP INSERT RETURN (IN) stereo jack pair is used for connecting to the outputs of your external stereo effects processor. (23) The ground connection on the DI OUT outputs (24) can be interrupted with the GROUND LIFT switch. This way, rumble noise and ground loops can be avoided. The ground connection is interrupted when the switch is depressed (LIFT). (24) The balanced stereo signal of your BASS V-AMP PRO can be taken at the DI OUT. This output should be connected to two balanced channel inputs on your mixing console. The signal level is set at +4 dBu in studio modes and at -10 dBu for live modes. (25) The connection to the inputs of an external stereo effects unit can be made using the POST DSP SEND (OUT) stereo output. (26) BASS V-AMP PRO's signal can be digitally taken at the S/PDIF output. (27) The digital output signal of the BASS V-AMP PRO in AES/EBU format is found at the AES/EBU output (XLR connector), provided AES/EBU has been selected as output signal format (please adhere to the second note under (8) E). (28) Devices used to externally synchronize your BASS V-AMP PRO should be connected at the WORDCLOCK connector. This is a high-impedance connector, meaning that it has no internal terminal resistor (75 Ohm). (29) This is the MIDI OUT/THRU connector of the BASS V-AMP PRO. (30) A MIDI foot pedal, for example the BEHRINGER MIDI FOOT CONTROLLER FCB1010, can be connected at the MIDI IN connector. (31) SERIAL NUMBER. (32) FUSE RETAINER/VOLTAGE SELECTOR. (33) Power is supplied via an IEC connector. Amps 1 - 16 (white) Amp # Cabinet simulation (default setting) BRITISH '60s 0 68 Marshall 4 x 12" BRITISH '70s 1 68 Marshall 4 x 12" BRITISH '80s 2 Trace Elliot 4 x 10" BRITISH POP 3 Voc AC100 2 x 15" THUNDERBIRD 4 1 x 8" Tweed MOSOUND 5 Ampeg B15 1 x 15" Closed Back Combo ROCK CLASSIC 6 Ampeg SVT 8 x 10" '79 ROCK 2 7 Ampeg SVT 8 x 10" '79 SILVER PANEL 8 Fender Bassman 2 x 15" with JBLs WHITE PANEL 9 6 x 10" SWR Goliath Senior RED PANEL 10 6 x 10" SWR Goliath Senior GOLD PANEL 11 Ampeg 4 x 10" CALIFORNIAN 12 Mesa/Boogie 2 x 15" JAZZ TONE 13 Polytone A101, 1 x 15" Closed Back Combo BOTTOM END 14 Ampeg SVT 18E, 1 x 18" TUBE PREAMP 15 No Cabinet-Simulation Amps 17 - 32 (grey) Amp # Cabinet simulation (default setting) BRITISH CLASS A 16 2 x 12" Twin Combo MODERN HI GAIN 17 4 x 12" V-AMP Custom RECTIFIED HIGH GAIN 18 4 x 12" Vintage 30 CUSTOM HI GAIN 19 4 x 12" '78 Std. ULTIMATE PLUS 20 4 x 12" V-AMP Custom CRUNCH V-AMP 21 4 x 12" '78 Std. DRIVE V-AMP 22 4 x 12" Vintage 30 BRIT. HIGH GAIN 23 4 x 12" '78 Std. PIEZO SIM. 24 No Cabinet-Simulation MIC. SIM. 25 No Cabinet-Simulation MAGNETIC EQ 26 No Cabinet-Simulation PIEZO EQ 27 No Cabinet-Simulation BLACK TWIN 28 2 x 12" Twin Combo ORGAN CLASSIC 29 Leslie 760 Cabinet, 1 x 15" + HF Horn BRITISH CLASSIC 30 4 x 12" '78 Std. CLASSIC CLEAN 31 2 x 12" V-AMP Custom PREAMP BYPASS 32 No Cabinet-Simulation Cab # 6 6 2 9 16 7 1 1 11 3 3 4 10 8 14 - Cab # 18 23 20 21 23 21 20 21 - - - - 18 12 21 19 - (34) Connect the stereo jack of your footswitch FS112V to the FOOTSWITCH connector. This will enable you to alternate between different presets within a preset bank. Assignment of cabinet simulations to amp models (35) The volume of the signal fed into the AUX IN input is adjusted by using the AUX LEVEL control. (36) By using the AUX IN jack input, you can feed an additional stereo signal into your BASS V-AMP. Cabinet simulations - BYPASS (NO SPEAKER SIMULATION) 1 AMPEG SVT 8 x 10" '97 2 TRACE ELLIOT 4 x 10" 3 SWR GOLIATH 4 x 10" 4 AMPEG 4 x 10" 5 GALLIEN KRUEGER B120 6 68 MARSHALL 4 x 12" 7 AMPEG B15 1 x 15" CLOSED BACK COMBO 8 POLYTONE A101 1 x 15" CLOSED BACK COMBO 9 VOX AC100 2 x 15" 10 MESA/BOOGIE 2 x 15" 11 FENDER BASSMAN 2 x 15" WITH JBLs 12 LESLIE 760 CABINET, 1 x 15" + HF-DRIVER 13 SWR 1 x 18" 14 AMPEG SVT 18E, 1 x 18" 15 SUNN COLISEUM 1 x 18" + 1 x 12" 16 1 x 8" TWEED 17 1x 12" MID 18 2 x 12" TWIN COMBO 19 2 x 12" V-AMP CUSTOM 20 4 x 12" VINTAGE 30 21 4 x 12" '78 STD. 22 4 x 12" OFF AXIS 23 4 x 12" V-AMP CUSTOM Overview of cabinet simulations Check Out behringer.com for Full Manual
-
 1
1 -
 2
2 -
 3
3 -
 4
4 -
 5
5 -
 6
6 -
 7
7 -
 8
8 -
 9
9 -
 10
10 -
 11
11 -
 12
12 -
13
-
14
-
15
 |
 |