Behringer FBQ800 Manual - Page 6
About sounds and their frequency bands
 |
View all Behringer FBQ800 manuals
Add to My Manuals
Save this manual to your list of manuals |
Page 6 highlights
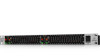
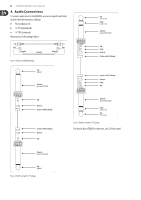
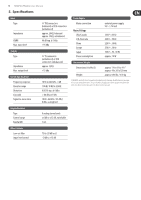
6 MINIFBQ FBQ800 User Manual A. B. To monitor the output level of the FBQ800, use the METER SELECT button (5) together with the IN/OUT meter (6), as described in this documentation. B. While you monitor the output level of the FBQ800, use the LEVEL knob (3) to adjust the output level of the FBQ800 to 0 dB. 4. If the frequency-band faders and all other control elements are not already activated, use the IN/OUT button (2) to activate them. 5. To EQ the signal, use the EQ section (9), as described in this documentation. 6. To monitor the output level, use the METER SELECT button (5) together with the IN/OUT meter (6), as described in this documentation. If the output level is higher or, alternatively lower than 0 dB, use the LEVEL control (3) to adjust the output level to 0 dB. ◊ Most of the time, 0 dB is the optimal output level. However, the optimal level for some output targets can be greater or less than 0 dB. 7. Periodically monitor and, if necessary, adjust the input level and output level, as described previously in steps 3 and 6. If you activated all control elements (2), you can use control elements through to EQ the input signal, as follows: (7) RANGE button: To select a range for the EQ faders, use this button, which can appear: • pushed in and illuminated: The fader range extends from -6 dB to +6 dB. • not pushed in and not illuminated: The fader range extends from -12 dB to +12 dB. (8) FBQ IN button: To manage the FBQ Feedback Detection System, use this button, which can appear: • pushed in and illuminated: The FBQ Feedback Detection System is activated. If the signal level is high in a frequency band, the relevant fader LED illuminates brightly. In addition, all other fader LEDs are dimmed. To reduce the potential for feedback, cut the signal in the relevant frequency band (9). • not pushed in and not illuminated: The FBQ Feedback Detection System is not activated. Fader LEDs illuminate with identical brightness. They do not identify possible feedback frequencies. (9) EQ SECTION: If you activated all control elements (2), the input signal travels to the EQ section. In this section, you EQ (EQualize) the input signal. This means that you emphasize and de-emphasize specific frequencies, many of which are associated with specific sounds. For details, see About sounds and their frequency bands, which follows. About the frequency-band faders The EQ section includes 9 frequency bands. For each of these frequency bands, the EQ section includes a single fader. The center frequency of each frequency band is displayed directly above the relevant fader, as follows: • 63 • 500 • 4 k • 125 • 1 k • 8 k • 250 • 2 k • 16 k These center frequencies are expressed in hertz. The letter k is the abbreviation for kilo (kilohertz). Notice that the center frequencies increase in one-octave steps. This means that equal intervals of pitch separate the frequency bands. About sounds and their frequency bands To help you EQ, the following table lists some typical sounds and identifies the frequency bands in which they occur. The table also describes what happens to some sounds when you overemphasize them: Sounds AC mains hum; the fundamentals of instruments that add power to music, which include bass drums, tubas, double bass, and organs. Overemphasis sounds muddy. the vocal power of bass singers mains hum; the fundamentals of lower tympani. Overemphasis produces excessive boom. third harmonic mains hum; voice fundamentals; drums and lower bass. Overemphasis produces excessive boom. Vocal quality; the fundamentals of strings and percussion instruments natural vocals; the fundamentals and harmonics of string, keyboard, and percussion instruments voice fricatives; strings, drums, quitars, and bass. Overemphasis between 1 k and 4 k can cause fatigue. Overemphasis between 2 k and 4 k can mask some vocal sounds, for example m, b, and v. overall clarity and definition tape hiss and system noise; cymbals, snare drums, and percussion instruments; distant and transparent sounds tape hiss and system noise; cymbals and overall brightness. Overemphasis causes sibilance. Frequencies (Hz) 31 - 63 40 - 125 80 - 125 160 - 250 315 - 500 630 - 1 k 1.25 k - 4 k 1.25 k - 8 k 5 k - 8 k 10 k - 16 k How to emphasize and de-emphasize sounds To emphasize or, alternatively to de-emphasize a sound, do the following: 1) Identify the frequency band in which the sound occurs, and then identify the relevant fader.
-
 1
1 -
 2
2 -
 3
3 -
 4
4 -
 5
5 -
 6
6 -
 7
7 -
 8
8 -
 9
9 -
 10
10
 |
 |