Behringer FBQ800 Manual - Page 7
Setup Example - mini
 |
View all Behringer FBQ800 manuals
Add to My Manuals
Save this manual to your list of manuals |
Page 7 highlights
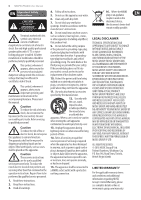
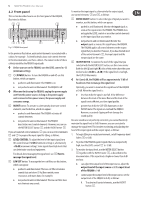
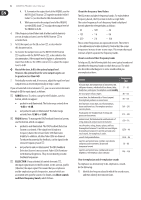
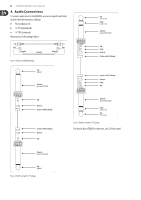
7 MINIFBQ FBQ800 User Manual 2) If you want to: • emphasize the sound, do one of the following: • Slide the relevant fader up. The FBQ800 boosts the signal level in the relevant frequency band. • Slide the faders for the surrounding frequency bands down. The FBQ800 cuts the signal level in the surrounding frequency bands. • de-emphasize a sound, do one of the following: • Slide the relevant fader down. The FBQ800 cuts the signal level in the relevant frequency band. • Slide the faders for the surrounding frequency bands up. The FBQ800 boosts the signal level in the surrounding frequency bands. ◊ When you choose to cut rather than boost the signal level, you protect audio equipment from high signal levels (clipping) and preserve valuable headroom. 2.3 Rear panel This chapter describes what you need to know about setting up the FBQ800. (15) To send the output signal from the FBQ800, you can use the following types of outputs: (13) ¼" TS OUTPUT, L (left) and R (right): for TS (unbalanced) plugs (14) RCA OUTPUT, L (left) and R (right): for RCA plugs You can simultaneously use both TS and RCA OUTPUTs. Whether or not you use both the L and the R connectors depends on the type of input signal the FBQ800 receives. When the FBQ800 receives: • a stereo signal, use both L and R OUTPUT connectors. The output signal is also a stereo signal. • a mono signal via an L INPUT connector, use only L OUTPUT connectors. The output signal is also a mono signal. • a mono signal via an R INPUT connector, use only R OUTPUT connectors. The output signal is also a mono signal. (15) SERIAL NUMBER: To register your FBQ800, use this unique serial number. For details about audio plugs, see 4. Audio Connections. 3. Setup Example The following graphically highlights the role of the FBQ800 in your audio setups: (10) (13) (14) (11) (12) Fig. 2.2: FBQ800 rear panel ◊ Before you plug the power supply unit in the FBQ800, turn off the � (power) button. (10) POWER connector: To power the FBQ800, plug the power supply unit in this connector. The power supply unit is delivered with the FBQ800. To send the input signal to the FBQ800, use one of the following inputs: (11) RCA INPUT, L (left) and R (right): for RCA plugs (12) ¼" TRS INPUT, L (left) and R (right): for TRS (balanced) or, alternatively TS (unbalanced) plugs If you simultaneously use both RCA and TRS INPUTs, the FBQ800 receives the input signal only via the TRS INPUT (12). To work with: • a stereo signal, use both the L and R connectors • a mono signal, use only the L or, alternatively the R connector L & R Input EUROPOWER EP2000 XENYX 1204FX MINIFBQ FBQ800 L & R Output Fig. 3.1: Setup example Keep in mind that the previous illustration provides only a single example of how you can use the FBQ800. You can also set the FBQ800 up in the insertion paths of mixers. About setting up with other MINI products The FBQ800 belongs to the MINI suite of BEHRINGER products. You can set up the FBQ800 with these products, which is both convenient and attractive. For details, see 6. Other Mini Products.
-
 1
1 -
 2
2 -
 3
3 -
 4
4 -
 5
5 -
 6
6 -
 7
7 -
 8
8 -
 9
9 -
 10
10
 |
 |