Behringer MIC800 Manual - Page 6
LOW CUT control - preamp
 |
View all Behringer MIC800 manuals
Add to My Manuals
Save this manual to your list of manuals |
Page 6 highlights
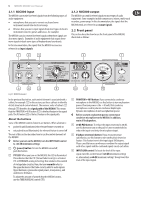
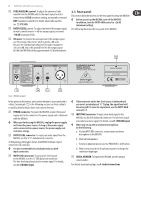
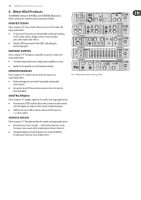
6 MINIMIC MIC800 User Manual (7) SIGNAL/CLIP meter: To monitor the status of the input signal, use this meter. At any given time, one of the following LEDs illuminate on this meter: • SIGNAL: The MIC800 receives the input signal. • CLIP: The MIC800 clips the input signal. If this LED: • occasionally illuminates, the MIC800 clips only some peaks in the input signal • constantly illuminates, the MIC800 clips a large part of the input signal. The level of the input signal is too high. ◊ To lower the level of the input signal, use the INPUT GAIN control. If this control is set to + 26 dB (minimum setting) and clipping still occurs, use the 20 dB PAD button to turn on the pad. (8) LOW CUT control: To filter floor rumble and other low-frequency sounds, turn this control toward 15 Hz (minimum filtering) or, alternatively 360 Hz (maximum filtering). (9) PREAMP MODELING control: To select a preamp model, turn this control, which includes several groups of preamp models. About the preamp models Sometimes an audio signal lacks characteristics that you need. For example, vocals lack consistency or bass lacks fullness. The shape of the audio signal is not correct. On the MIC800, you select the preamp model that describes the characteristics you need. The MIC800 reshapes the audio signal for you. BEHRINGER created many of the preamp models for specific input sources (guitars, vocals, and so on). However, these models might not meet your needs for a specific environment or for a specific application. Consider the preamp models a starting point in the sound shaping process. Experiment with them. Create your own, unique sound. Details about each group of preamp models follow. Preamp models 1-4: NEUTRAL To output pure, natural sounds, use the NEUTRAL settings, described in the following table: Preamp Model 1 NEUTRAL 2 VOCAL 3 GUITAR 4 BASS Description Pure, natural sound Natural but crisp sound, which is ideal for vocals Natural but bright sound, which is ideal for guitars Natural but full sound, which is ideal for bass guitars Preamp models 5-8: WARM To output warm, analog sound, use the WARM settings, described in the following table: Preamp Model 5 KEYBOARD 6 E-GUITAR 7 VOCAL 8 VALVE Description Warm, round sound, which is ideal for keyboards Warm, acoustic sound, which is ideal for electric guitars Warm, consistent sound that has presence and is ideal for vocals Warm, vacuum tube sound for any kind of signal Preamp models 9-12: WARM-LIMITER Use the WARM-LIMITER settings that are described in the following table to: • output warm, analog sound that gives low tones fullness and presence • limit high volumes and signal peaks Preamp Model 9 MULTI 10 VOCAL 11 A-GUITAR 12 PIANO Description Warm analog sound for any kind of signal Warm, full sound that is consistent and ideal for vocals Warm, soft sound that is lively and ideal for acoustic guitars Warm, soft sound that sparkles and is ideal for pianos Preamp models 13-16: LIMITER Use the LIMITER settings that are described in the following table to: • output smooth, consistent sound that gives low tones fullness and presence • limit high volumes and signal peaks Preamp Model 13 BASS 14 A-GUITAR 15 PERCUSSION 16 LIMITER Description Round, rich bass sound, which is ideal for bass guitars Full, soft sound, which is ideal for acoustic guitars Precise, punchy sound, which is ideal for percussion instruments Compact sound for vocals and all other types of signals
-
 1
1 -
 2
2 -
 3
3 -
 4
4 -
 5
5 -
 6
6 -
 7
7 -
 8
8 -
 9
9 -
 10
10 -
 11
11 -
 12
12
 |
 |