Behringer MINIMIX MIX800 Quick Start Guide - Page 5
MINIMIX MIX800 Controls - minimix manual
 |
View all Behringer MINIMIX MIX800 manuals
Add to My Manuals
Save this manual to your list of manuals |
Page 5 highlights
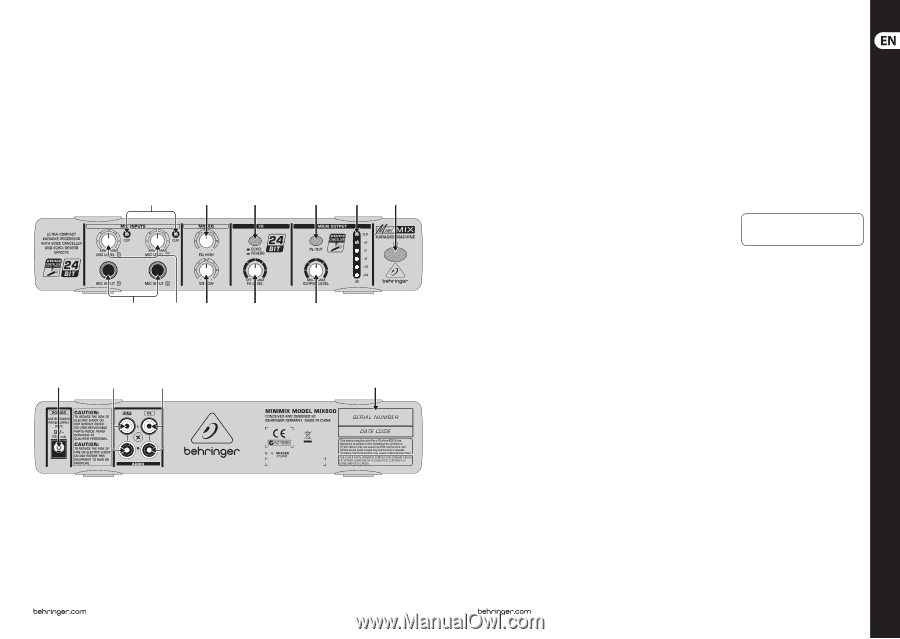
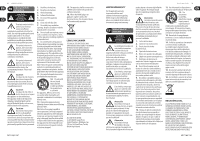
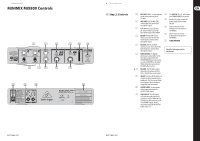
MINIMIX MIX800 MINIMIX MIX800 Controls (3) (5) (6) (8) (10) (11) (1) (2) (4) (7) (9) (12) (13) (14) (15) 9 Quick Start Guide (EN) Step 2: Controls (1) MIC INPUT 1/2. 1 or 2 microphones (11) � SWITCH. The � switch turns can be connected using these your MINIMIX MIX800 on and off. 1/4" jacks. (12) Use the 9 V jack to connect the (2) MIC LEVEL 1/2. The MIC LEVEL power supply delivered with control adjusts the level of the the unit. microphone signal. (13) These connectors are the (3) CLIP. When the Clip LED lights unbalanced cinch outputs of up, distortion may occur in the the MIX800. microphone input of the MIX800. (14) These connectors are the (4) EQ LOW. The EQ LOW control unbalanced cinch inputs of allows you to raise or lower the the MIX800. low-frequency content of the microphone signal. (15) SERIAL NUMBER. (5) EQ HIGH. With the EQ HIGH control, you can raise or lower the high-frequency content of the microphone signal. (6) ECHO/REVERB. The MIX800 allows you to add an effect to the microphone signal. When the ECHO/REVERB button is pressed in, you can add REVERB to the signal. When the button is pressed out, the ECHO effect is active. Check Out behringer.com for Full Manual 8 (7) FX LEVEL. The FX LEVEL control determines the amount of effect that is added to the master signal. (8) IN/OUT. Press the IN/OUT button to activate the Voice Canceller in the signal path. This filter circuit allows you to remove the vocals almost completely from a recording. (9) OUTPUT LEVEL. Set the volume of the output signal with the OUTPUT LEVEL control. (10) LED DISPLAY. The LED display is for monitoring the input level. It comprises 6 LEDs. When the Clip LED lights up, distortion may occur in the MIX800 output. Reduce the output level with the OUTPUT LEVEL control (9).
-
 1
1 -
 2
2 -
 3
3 -
 4
4 -
 5
5 -
 6
6 -
 7
7 -
 8
8 -
 9
9 -
 10
10 -
 11
11 -
12
-
13
 |
 |