Behringer MONITOR2USB Quick Start Guide - Page 6
MONITOR2USB Controls - crossfeed
 |
View all Behringer MONITOR2USB manuals
Add to My Manuals
Save this manual to your list of manuals |
Page 6 highlights
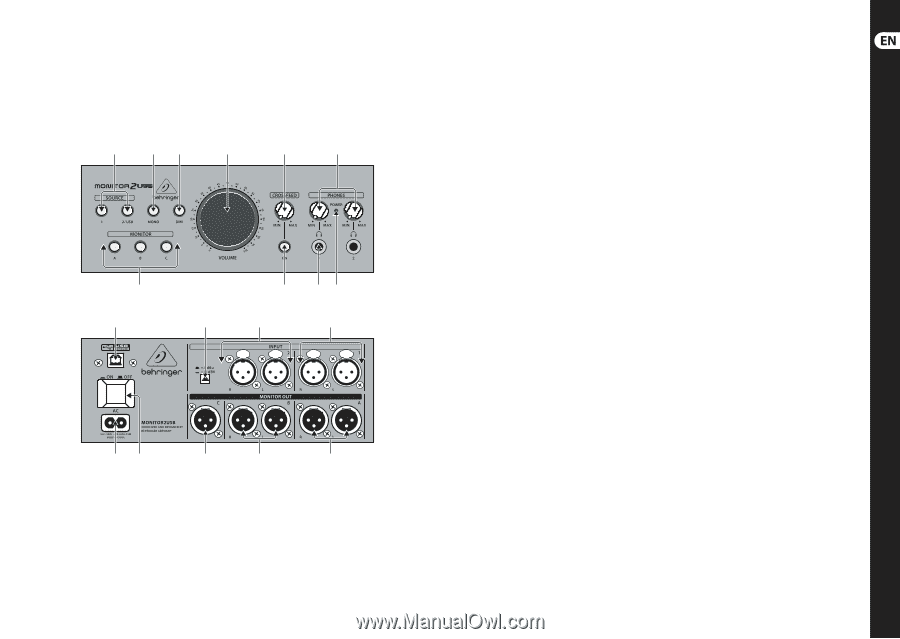
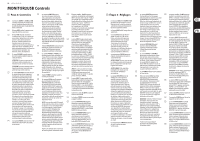
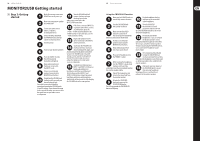
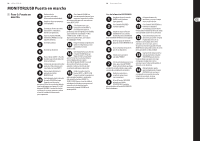
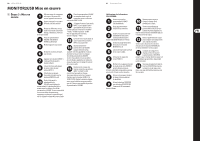
10 MONITOR2USB MONITOR2USB Controls (1) (2) (3) (4) (5) (6) (7) (11) (8) (9) (10) (12) (13) (14) (15) (16) (17) (18) (19) 11 Quick Start Guide (EN) Step 2: Controls (7) MONITOR buttons activate and deactivate the A, B and C speaker (12) +4 dBu / -10 dBV button allows you to change the level sensitivity of the INPUT groups connected to the related 2 group of XLR jacks. The +4 dBu setting (1) SOURCE 1 and SOURCE 2/USB buttons control which input sources are active. MONITOR OUT XLR jacks. By using these buttons, you can compare mixes on different sets of stereo speakers matches the line-level standard for pro audio gear, while the -10 dBV setting matches the sensitivity standard for When a source is active, the LED ring (groups A and B), or you can activate a consumer audio (e.g., CD/DVD players). around the button lights up. single fullrange speaker for an additional By properly matching the input (2) MONO button collapses the left-right stereo image down to mono. option to monitor in mono (group C, which has only a single output). The group C output can also be used to sensitivity, you can more easily match levels between the two groups of stereo inputs, and therefore avoid large volume (3) DIM button reduces the listening volume connect a separate subwoofer to check differences at the outputs. by about 15 dB. Use this function to switch quickly between loud and quiet volume levels when mixing. You can also use this function when plugging in, removing or switching between headphones to protect your hearing from loud clicks, pops or damaging volume differences between two sets of headphones with differing impedance values. (4) VOLUME control adjusts the overall volume level for all speaker outputs. WARNING! Make sure all volume and level controls are turned fully counterclockwise before powering on the unit. the extreme low frequencies in your mix. When a particular MONITOR group is active, the LED ring around the related button will light up. (13) INPUT 2 accepts balanced audio signals from devices using XLR cables. To activate INPUT 2, press the SOURCE 2/USB button on the front panel. (8) CROSSFEED ON button activates the The sensitivity for these inputs can be CROSSFEED function. When CROSSFEED changed to match pro audio gear is active the LED ring around the button (+4 dBu) or consumer electronics will light up. (-10 dBV) by using the +4 dBu / -10 dBV (9) PHONES 1 and PHONES 2 outputs accept headphone connections over ¼" TRS stereo connectors. Each output has a dedicated knob for individual volume control. Whenever you change headphones, press the DIM button to protect your hearing from clicks, pops or unexpected volume differences button. The INPUT 2 analog connections remain active when the USB audio connection is being used, and the audio from both connections will be summed together. In this summed USB/INPUT 2 signal, the relative signal levels will need to be matched by using the level controls on the source equipment. WARNING! Excessive, sustained volume levels can cause hearing damage. (5) CROSSFEED control blends the left and right headphone channels to simulate between headphones with differing impedance ratings. (10) POWER LED lights up when the unit is powered on. NOTE! If you are using only the INPUT 2 analog inputs, disconnect the USB cable from the back panel to avoid additional noise that may be introduced by the USB D/A converters. the characteristic stereo panorama produced by monitor speakers in an open acoustic space. In an open room, the sound from each monitor speaker enters both ears and gives the brain additional timing information about the sound, which then affects the (11) USB type B connection allows you to stream audio into the MONITOR2USB directly from your computer. The USB connection is activated by the SOURCE 2/USB button. When the USB connection is in use, the INPUT 2 analog connections will still be active, (14) INPUT 1 accepts balanced audio signals from devices using XLR cables. To activate INPUT 1, press the SOURCE 1 button. INPUT 1 is set to the +4 dBu sensitivity standard for use with pro audio gear. listener's perception of the stereo field. and the audio from both connections will (15) AC INPUT jack is where you connect the In contrast, headphones feed each ear be summed together. In this summed included power cable. a starkly separated stereo channel, with no crossover to the opposite ear. This lack of crossover can cause mixes USB/INPUT 2 signal, the relative signal levels will need to be matched by using the level controls on the (16) POWER buttons switches the unit on and off. to sound very different on headphones, source equipment. (17) MONITOR OUT C section has a single as well as being a more fatiguing listening experience. By using the CROSSFEED function, you can more closely simulate the stereo sound of monitors while mixing on headphones, which means your headphone mixes will more closely match the mixes you produce on monitors, and you will experience less ear fatigue from long sessions wearing headphones. (6) PHONES knobs control the volume level NOTE! The USB audio interface is class-compliant, so no special software drivers are required, and low latency ASIO* drivers can also be used (such as ASIO4ALL). However, depending XLR output jack for use with a single fullrange speaker or a subwoofer. To activate the MONITOR OUT C connection, press the MONITOR C button on the front panel. on host software used, the default USB (18) MONITOR OUT B section has dual left input may be set in software as a mono and right XLR outputs for use with microphone with excessive software a stereo pair of monitor speakers. gain available, the user may need To activate the MONITOR OUT B to reconfigure USB input as a stereo connections, press the MONITOR B source and reduce software gain to an button on the front panel. for each of the two headphone outputs. appropriate level. *ASIO is a trademark and software of Steinberg Media Technologies GmbH. (19) MONITOR OUT A section has dual left and right XLR outputs for use with a stereo pair of monitor speakers. To activate the MONITOR OUT A connections, press the MONITOR A button on the front panel.
-
 1
1 -
 2
2 -
 3
3 -
 4
4 -
 5
5 -
 6
6 -
 7
7 -
 8
8 -
 9
9 -
 10
10 -
 11
11 -
 12
12 -
13
-
14
-
15
-
16
 |
 |