Behringer RD-8 Manual - Page 11
Playing a Pattern Pattern Mode, Creating a Song Pattern, Chaining Mode
 |
View all Behringer RD-8 manuals
Add to My Manuals
Save this manual to your list of manuals |
Page 11 highlights
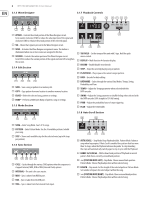
11 RHYTHM DESIGNER RD-8 User Manual 32 1 17 32 2 18 32 3 19 32 4 20 32 5 21 32 6 22 32 7 23 32 8 24 32 9 25 32 10 26 32 11 27 32 12 28 32 13 29 32 14 30 32 15 31 32 16 32 64 1 49 64 2 50 64 3 51 64 4 52 64 5 53 64 6 54 64 7 55 64 8 56 64 9 57 64 10 58 64 11 59 64 12 60 64 13 61 64 14 62 64 15 63 64 16 64 Pattern Length Quick Double Push LENGTH, then hold TAP/HOLD and push >> (right double arrow beside LENGTH) to immediately duplicate the contents of the current length, this is very useful when you are working with for 3/4 pattern with 12 steps. 6. Playing a Pattern (Pattern Mode) Track Mute This function lets you mute any voice(s) within a pattern, song or globally. To mute a voice(s): 1. While a pattern is playing select track MUTE. 2. Select the voice(s) you wish to mute. 3. The muted voice(s) will be illuminated in red. 4. Press track MUTE to exit. NOTE: Hold the HOLD/TAP button and press MUTE to clear all mutes. Solo functions. This function gives you the ability to solo a voice or voices within a pattern, song or globally. To Solo a voice(s): 1. While a pattern is playing select track SOLO. 2. Select the voice(s) you wish to solo. 3. The soloed voice(s) will be illuminated in white. 4. Press track SOLO to exit. NOTE: SOLO will always take priority over MUTE. Soloing a voice that is muted will cause that voice to sound. Hold TAP/HOLD and press SOLO to clear all solos. Press the PATTERN button and select the pattern that you wish to play. Step Repeat 7. Creating a Song (Pattern Chaining Mode) This function can be used for changing patterns during a live performance. When STEP REPEAT is triggered the current step or steps (depending on the step settings) will be repeated until the TRIGGER button is released. The number of steps repeated are 1,2, 4 or 8. This is a very powerful feature that can, for example be used to loop the end of a pattern creating a fill. To use: 1. Press STEP REPEAT. 2. Select how many repeats you require (1,2,4 or 8) 3. While a pattern is playing press and hold the TRIGGER button to repeat steps. 4. The step number can be changed while the TRIGGER button is held to create different loops effects. 5. Press STEP REPEAT to exit. Note Repeat This feature can be used for transforming patterns during a live performance. When Note Repeat is triggered the currently selected voice will be repeated until the TRIGGER button is released. The number of notes repeated are 1,2, 4 or 8. This creative feature can be used to create drum roll and ratchet style effects on the fly by repeating the current note while the rhythm continues to run. To use: 1. Press NOTE REPEAT. 2. Select how many repeats you require (1,2,4 or 8). 3. While a pattern is playing press and hold the TRIGGER button to repeat notes. 4. The note number can be changed while the TRIGGER button is held to create different fill effects. 5. Press NOTE REPEAT to exit. NOTE: Note repeats can be recored in STEP RECORD mode. To remove a NOTE REPEAT from a step, remove the programmed step from the pattern. The red LEDs above indicate if the selected step has a repeat of 1,2,4 or 8 programmed. Pattern mode can be used to trigger any of the 16 patterns available when playing back. Patterns can be chained together to form a song by the following steps: 1. Select song via 16 step keys. 2. Press PATTERN to enter Pattern mode. 3. In Pattern Mode press the RECORD button. 4. Press the STEP BUTTON to select the first pattern in your song. 5. Press the AUTO SCROLL button on and the LENGTH button will be flashing. 6. Press the LENGTH button (lights solid), 7. Use the DATA knob to select number of repeats. 8. Press any of the STEP BUTTONS to add next step pattern to the song. 9. Repeat steps 7-8 until all desired patterns have been entered. 10. At any time use the > keys with the AUTO SCROLL button lit to move forward and backward through the song to check programming. If the LENGTH button is lit, the display will show number of repeats; if the LENGTH button is flashing, the display will show the pattern number of that step. 11. Save the song (with Auto Scroll on). To save the song that you have just created: 1. Press SAVE. 2. Press SONG. 3. Select destination via step key (current song highlighted with a white LED) 4. Press SAVE to execute operation. To Erase a selected pattern in the chain, move to the pattern you wish to remove (by using the > buttons) and press Erase. Note: Make sure you store the song with the Auto Scroll on otherwise your song will not playback as programmed.
-
 1
1 -
2
-
3
-
4
-
5
-
 6
6 -
 7
7 -
 8
8 -
 9
9 -
 10
10 -
 11
11 -
 12
12 -
 13
13 -
 14
14 -
 15
15 -
 16
16 -
17
-
18
-
19
-
20
-
21
-
22
-
23
-
24
-
25
-
26
-
27
-
28
 |
 |
