Behringer U-PHONO UFO202 Manual - Page 10
Software Installation, 5. Hookup Diagram, Hooking up a record player - usb
 |
View all Behringer U-PHONO UFO202 manuals
Add to My Manuals
Save this manual to your list of manuals |
Page 10 highlights
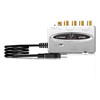
10 U-PHONO UFO202 User Manual (4) LINE/PHONO SWITCH: Move the switch on the top left 5. Hookup Diagram to PHONO if transferring from a record player. For all other sources, select LINE. ◊ Note: The PHONO inputs only support moving magnet cartridges. These are the most common type, so unless you know your player uses a moving coil cartridge, assume that your system will work. (5) HEADPHONES OUTPUT: Plug your headphones into the PHONES output using a �" mini plug. (6) HEADPHONES VOLUME: Adjust the headphones volume with the adjacent control. (7) USB CABLE: Plug the USB cable into a free USB port on your computer. (8) POWER INDICATOR: Upon connection, the UFO's power indicator will light up and the computer should automatically recognize the connection. 4. Software Installation • This device requires no special setup or drivers, just plug it into a free USB port on a PC or Mac computer • The UFO202 comes with a free version of Audacity editing software. This will help make the transfer process quick and simple. Simply insert the install CD into your CD-ROM drive and follow the instructions. The CD also contains VST plug-ins, ASIO drivers and various freeware Ground Line/Phono RCA Ins RCA Outputs Computer USB Headphone Out 5.1 Hooking up a record player 1. To transfer music from a record player, a special preamplification process must take place in order to boost the low signal level coming from the player. To do this, simply move the LINE/PHONO switch on the UFO202 to the right (PHONO selected). 2. Connect a stereo RCA cable from the record player outputs to the RCA inputs on the UFO202. The player will also likely have a ground cable that needs to be attached to the ground terminal on the UFO202.
-
 1
1 -
2
-
3
-
4
-
 5
5 -
 6
6 -
 7
7 -
 8
8 -
 9
9 -
 10
10 -
 11
11 -
 12
12 -
 13
13 -
 14
14 -
 15
15 -
16
 |
 |
