Behringer ULTRACOUSTIC AT108 Quick Start Guide - Page 7
ULTRACOUSTIC AT108 Controls
 |
View all Behringer ULTRACOUSTIC AT108 manuals
Add to My Manuals
Save this manual to your list of manuals |
Page 7 highlights
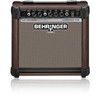
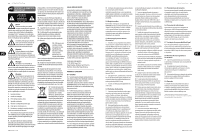
12 ULTRACOUSTIC AT108 ULTRACOUSTIC AT108 Controls (1) (2) (3) (4) (5) (6) (7) (8) (9) (10) 13 Quick Start Guide (EN) Controls (1) The MIC INPUT connector is a balanced XLR microphone input. (2) Connect your instrument to the INSTR(UMENT) INPUT jack, using a standard instrument cable equipped with ¼" TS connectors. (3) The MIC VOL(UME) control determines the volume level of the microphone channel. (4) The INSTR(UMENT) VOL(UME) control determines the volume level of the instrument channel. (5) Use the CD INPUT to connect the output of your CD player, tape deck, CD or MD walkman. (6) The LOW control allows you to boost or cut the lowfrequency range. (7) With the MID control you can boost/cut the mid-range frequencies. (8) The HIGH control adjusts the high-frequency range to give your instrument a more "cutting" sound. (9) The HEADPHONES jack is for headphones. When you plug in your headphones, the built-in loudspeaker is muted. (10) Use the POWER switch to switch on your AT108. For more details on the full functionality of this product, see the product page on behringer.com and download the full manual. (ES) Controles (1) MIC INPUT: entrada balanceada con conector XLR para micrófono. (2) Conecta tu instrumento en la entrada INSTR INPUT mediante un cable estándar de instrumento con jack mono de 6,3 mm. (3) El control MIC VOL(UMEN) determina el nivel de volumen del micrófono. (4) El control INSTR(UMENTO) VOL(UMEN) determina el nivel de volumen del canal de instrumento. (5) Usa la entrada CD INPUT para conectar la salida de tu reproductor de CD o MD, y tocar simultáneamente con tu música favorita o algún curso de guitarra en CD. (6) El control LOW te permite aumentar o reducir el nivel del rango bajo de frecuencias. (7) Con el control MID puedes aumentar/ disminuir el nivel del rango medio de frecuencias. (8) El control HIGH ajusta el nivel del rango alto de frecuencias, permitiéndote darle un sonido más cortante a la señal. (9) HEADPHONES: entrada para auriculares. (10) Con el interruptor POWER se enciende el AT108. Este interruptor debe estar en la posición de apagado al conectar el aparato a la red de corriente eléctrica. Si quiere ver más detalles acerca de todas las funciones de este aparato, vaya a la página de este producto en nuestra web behringer.com y descárguese el manual completo.
-
 1
1 -
 2
2 -
 3
3 -
 4
4 -
 5
5 -
 6
6 -
 7
7 -
 8
8 -
 9
9 -
 10
10 -
 11
11
 |
 |
