Behringer ULTRATONE K900FX Manual - Page 5
Introduction, Control Elements - keyboard amp pa system
 |
View all Behringer ULTRATONE K900FX manuals
Add to My Manuals
Save this manual to your list of manuals |
Page 5 highlights
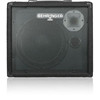
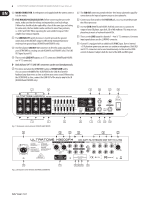
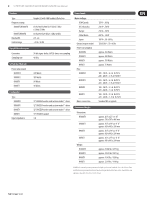
5 ULTRATONE K3000FX/K1800FX/K900FX/K450FX User Manual 1. Introduction Congratulations! The ULTRATONE is a modern, powerful keyboard amplifier with the qualities of a complete PA system. It combines a whole lot of features, huge power reserves and extreme flexibility in one device, and thanks to its comprehensive connection and extension options-for example Stereo Link facility for true stereo operation and additional Line Out for direct connection to a mixing console-you will always be able to achieve the best possible performance in every situation. 1.1 Before you get started 1.1.1 Shipment Your ULTRATONE was carefully packed at the factory, and the packaging was designed to protect the unit from rough handling. Nevertheless, we recommend that you carefully examine the packaging and its contents for any signs of physical damage that may have occurred during transit. ◊ If the unit is damaged, please do NOT return it to BEHRINGER. Instead, notify your dealer and the shipping company immediately. Otherwise, claims for damage or replacement may not be honored. ◊ Always use the original packing carton to prevent damage during storage or transport. ◊ Make sure that no children are left unsupervised with the ULTRATONE or its packaging. ◊ Please ensure proper disposal of all packing materials. 1.1.2 Initial operation Be sure that there is enough space around the unit for cooling and please do not place the ULTRATONE on high temperature devices such as radiators etc. to avoid overheating. ◊ Blown fuses must be replaced by fuses of the same type and rating! Please refer to the "Specifications" for details. The mains connection of the ULTRATONE is made by using the enclosed mains cable and a standard IEC receptacle. It meets all of the international safety certification requirements. ◊ Please make sure that all units have a proper ground connection. For your own safety, never remove or disable the ground conductor from the unit or of the AC power cord. 1.1.3 Online registration Please register your new BEHRINGER equipment right after your purchase by visiting http://behringer.com and read the terms and conditions of our warranty carefully. Should your BEHRINGER product malfunction, it is our intention to have it repaired as quickly as possible. To arrange for warranty service, please contact the BEHRINGER retailer from whom the equipment was purchased. Should your BEHRINGER dealer not be located in your vicinity, you may directly contact one of our subsidiaries. Corresponding contact information is included in the original equipment packaging (Global Contact Information/European Contact Information). Should your country not be listed, please contact the distributor nearest you. A list of distributors can be found in the support area of our website (http://behringer.com). Registering your purchase and equipment with us helps us process your repair claims more quickly and efficiently. Thank you for your cooperation! ATTENTION! ◊ High volume levels can damage your hearing or your headphones. Please turn down the VOLUME control to zero (all the way to the left) before you power up the amp. Always make sure you use appropriate volume levels. 2. Control Elements (1) The LEVEL controls adjust the signal level of channels 1 - 4 (K900FX and K450FX: channels 1 - 3). (2) The four FX controls adjust the channel 1 - 4 signal level at the input of the integrated effects processor (K900FX and K450FX: three controls for channels 1 - 3). (3) The channel 4 signal (K3000FX and K1800FX only) is normally routed just to the PHONES output without effects. This way you can practice without being heard, or you can connect a metronome that you need on headphones but not on speakers. By pressing the TO MAIN button the signal will be additionally routed to the speakers without effects. (4) By pressing the TO LINE OUT button the channel 4 signal will be additionally routed to the LINE OUT output without effects (K3000FX and K1800FX only). ◊ If you press both the TO MAIN and TO LINE button, channel 4 will be equal to channels 1 - 3. The signal will be routed to the speakers and the LINE OUT output including effects. (5) The ULTRATONE is equipped with a 7-band graphic equalizer (K900FX and K450FX: 5-band graphic equalizer). Use the EQ to adapt the sound to the room acoustics. (6) Press the FBQ switch to activate the FBQ Feedback Detection System. The frequencies causing feedback are shown by the brightly lit fader LEDs. Simply lower the level of the respective frequency range until feedback disappears and the LED goes out. (7) The FX display shows the currently selected preset. The SIG LED lights up when the effects processor receives an input signal. When the CLIP LED lights up please reduce the effects input signal by using the respective FX control(s) (2). (8) Turn the FX control to select an effects preset (preset number starts flashing). Push the control briefly to confirm your selection. (9) The LEVEL control in the master section is used to adjust the main output volume. (10) Turn the FX RET control to add the effect signal to the main mix. (11) Pressing the SHAPE button will add the Shape effect to the main signal. The Shape function on your ULTRATONE provides a revolutionary type of filter that you can use to modify your keyboard sound (K3000FX and K1800FX only). (12) Use the PHONES jack to plug in your headphones. (13) The PHONES LEVEL control adjusts the headphones output level (K3000FX and K1800FX only). (14) Use the POWER switch to switch the ULTRATONE on or off. You should always make sure that the POWER switch is in the "Off" position when initially connecting the unit to the mains. To disconnect the unit from the mains, pull out the main cord plug. When installing the product, ensure that the plug is easily accessible. ◊ Please note: Merely switching the unit off does not mean that it is fully disconnected from the mains. When not using the unit for prolonged periods of time, please unplug the unit's power cord from the power outlet.
-
 1
1 -
 2
2 -
 3
3 -
 4
4 -
 5
5 -
 6
6 -
 7
7 -
 8
8 -
 9
9 -
 10
10 -
 11
11
 |
 |