Behringer XENYX QX1622USB Quick Start Guide - Page 7
XENYX QX2222USB/QX1622USB Controls - mixer
 |
View all Behringer XENYX QX1622USB manuals
Add to My Manuals
Save this manual to your list of manuals |
Page 7 highlights
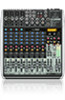
12 XENYX QX2222USB/QX1622USB XENYX QX2222USB/QX1622USB Controls (EN) Step 2: Controls (13) (1) (2) (3) (14) (15) (4) (17) (16) (19) (18) (5) (20) (6) (7) (8) (21) (22) (9) (10) (11) (12) 13 Quick Start Guide (1) USB wireless input accepts a USB receiver for use with Behringer ULM wireless microphones. (2) GAIN knob adjusts the sensitivity of the MIC and/or LINE inputs. (3) COMP knob adjusts the amount of compression effect on the channel. (4) EQ knobs adjust the high, mid and low frequencies of the channel. Adjust the FREQ knob to select the specific frequency adjusted by the MID knob. (5) AUX knobs adjust how much of the channel's signal routes to the AUX SEND jacks. Press the PRE button when routing the signal to a stage monitor. Use the FX knob to send the channel's signal to the internal multi-FX processor. (6) PAN/BAL knob positions the channel in the stereo field. (7) MUTE button mutes the channel. (8) CLIP LED lights when the channel signal overloads. (9) CHANNEL FADER adjusts the channel volume. (13) MULTI-FX PROCESSOR adds a selected sound effect to any channels whose FX knob is turned up. See the Multi-FX Processor section for details. (14) AUX SENDS adjust the amount of signal sent to a monitor speaker or external effects processor via the AUX SEND jacks. (15) AUX RETURNS adjust the amount of signal returning from an external effects processor that is included in the main mix. Use the TO AUX SEND knob(s) to include the effects signal in your monitor mix as well. (16) SOURCE buttons route the USB/2-TR, SUB, and MAIN MIX to the PHONES and CONTROL ROOM jacks. (17) USB/2-TR TO MAIN button routes the USB and 2-TRACK signal to the MAIN MIX. (18) PHONES/CTRL ROOM knob adjusts the headphone or studio monitor volume. (19) VU METER displays the MAIN OUTPUT signal level. (20) MODE button determines whether the channel's SOLO button operates as 'Solo in Place' (button out) or 'Pre-Fader Listen' (button in). PFL is preferred for gain setting purposes. (21) SUB faders adjust the output of the SUB OUTPUT jacks. Use the LEFT/RIGHT buttons to assign the SUB signal to the left and/or right MAIN MIX. (22) MAIN MIX faders adjust the overall output of the mixer. (10) AC IN accepts the included power cable for connection to a mains outlet. (11) POWER ON switch turns the mixer on and off. (12) PHANTOM ON switch sends 48 V to the XLR inputs for use with condenser microphones.
-
 1
1 -
 2
2 -
 3
3 -
 4
4 -
 5
5 -
 6
6 -
 7
7 -
 8
8 -
 9
9 -
 10
10 -
 11
11 -
 12
12 -
13
-
14
-
15
-
16
-
17
-
18
 |
 |
