Beko CSG4571 Owners Manual - Page 7
Installation Instructions
 |
View all Beko CSG4571 manuals
Add to My Manuals
Save this manual to your list of manuals |
Page 7 highlights
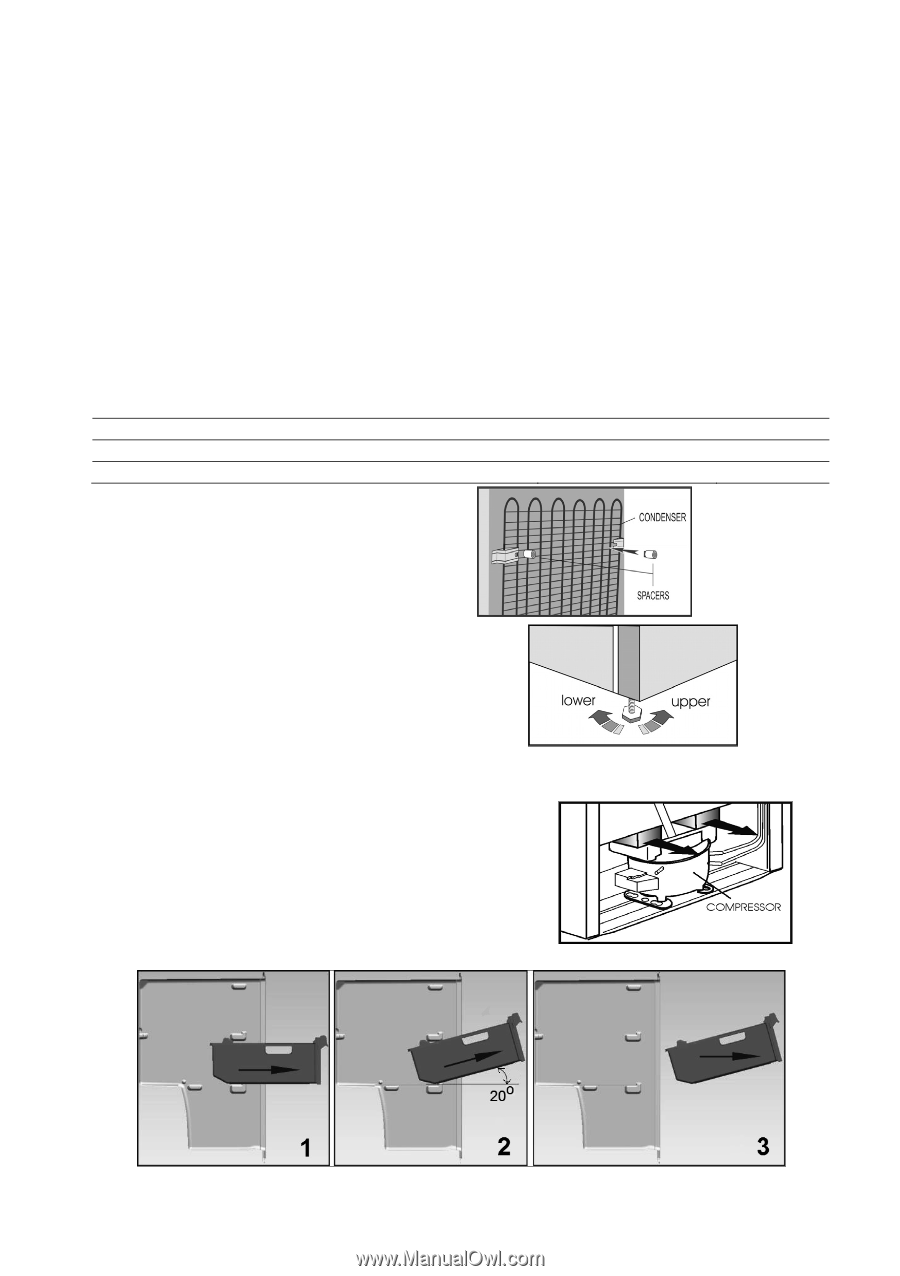
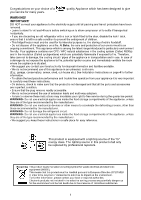
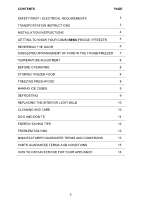
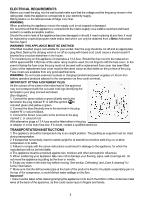
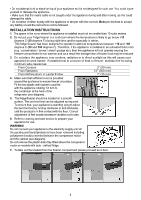
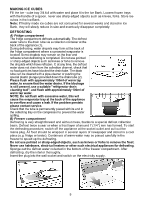
• Do not attempt to sit or stand on top of your appliance as it is not designed for such use. You could injure yourself or damage the appliance. • Make sure that the mains cable is not caught under the appliance during and after moving, as this could damage the cable. • Do not allow children to play with the appliance or tamper with the controls. Beko plc declines to accept any liability should the instructions not be followed. INSTALLATION INSTRUCTIONS 1. The space in the room where the appliance is installed must not be smaller than 10 cubic metres. 2. Do not put your fridge freezer in a cold room where the temperature is likely to go below +10 degrees C (50 degrees F) during night-time and/or especially in winter. This fridge freezer has been designed to operate in ambient temperatures between +10 and +38 degrees C (50 and 100 degrees F). Therefore, if the appliance is installed in an unheated/cold room (e.g.: conservatory / annex / shed / garage etc.) then the appliance will not operate causing the freezer compartment to run warmer and as a result the storage time of frozen food may be reduced. 3. Do not place the appliance near cookers, radiators or in direct sunlight as this will cause your appliance to work harder. If installed next to a source of heat or freezer, maintain the following minimum side clearances: From Cookers 2" (50 mm) From Radiators 12" (300 mm) From Refrigerators or Larder Fridge 1" (25 mm) 4. Make sure that sufficient room is provided around the appliance to ensure free air circulation. Fit the two plastic wall spacers supplied with the appliance rotating 1/4 turn to the condenser at the back of the refrigerator (see diagram). 5. The fridge/freezer should be located on a smooth surface. The two front feet can be adjusted as required. To ensure that, your appliance is standing upright adjust the two front feet by turning clockwise or anti-clockwise, until the product is in firm contact with the floor. Correct adjustment of feet avoids excessive vibration and noise. 6. Refer to cleaning and care section to prepare your appliance for use. WARNING! Do not connect your appliance to the electricity supply until all the packing and transit protectors have been removed including polystyrene block(s) inserted between the compressor motor and the cabinet (see diagram). Do not remove the plastic drain tray fitted above the compressor motor on models with auto - defrost fridge. 7. To take out the baskets from the freezer compartment please proceed as in item: 4
-
 1
1 -
 2
2 -
 3
3 -
 4
4 -
 5
5 -
 6
6 -
 7
7 -
 8
8 -
 9
9 -
 10
10 -
 11
11 -
 12
12 -
13
-
14
-
15
-
16
-
17
-
18
-
19
-
20
 |
 |