Beko CSG4571 Owners Manual - Page 9
Reversing The Doors
 |
View all Beko CSG4571 manuals
Add to My Manuals
Save this manual to your list of manuals |
Page 9 highlights
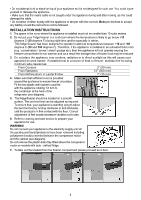
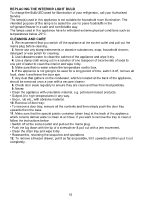
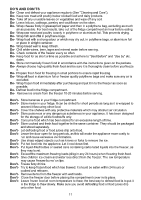
REVERSING THE DOORS (You may need somebody to help you.) 1- Switch off the appliance at the socket outlet and pull out the mains plug. 2- Remove all loose items and fittings and food, if any, from inside the appliance and door racks. 3- Remove the plastic cover of the top hinge and the two plastic ornaments on top of the cabinet. (1 & 1a) 4- Unscrew the bolts and remove the top hinge while holding fridge door. (2) 5- Remove the fridge door from the middle hinge. (3) 6- Unscrew the bolts and remove the middle hinge while holding freezer door. (4) 7- Remove the freezer door from the lower hinge. (5) 8- Reposition plugs on the opposite side. (6) 9- Reposition the hinge bushing and the tap on the fridge door. (7) 10- Unscrew and reposition the middle hinge bushing from fridge door. (8) 11- Reposition the hinge bushing and the tap on the freezer door. (9) 12- Unscrew and reposition the bottom hinge bushing from freezer door. (10) 13- Carefully tilt the appliance on its back. (11) (You may need somebody to help you.) 14- Take off lower hinge. (12) 15- Unscrew the screw level. (13) 16- Screw the screw level. (14) 17- Reposition the lower hinge pin. (15) 18- Take on lower hinge. (16) 19- Locate the freezer door to the lower hinge and attach to the cabinet. (17) 20- Locate the middle hinge on the freezer door. (18) 21- Fit the middle hinge. (19) 22- Locate the fridge door to the middle hinge and attach to the cabinet. (20) 23- Reposition the two plastic ornaments on top of the cabinet. (21) 24- Locate the top hinge on the fridge door, fit on top of the cabinet and screw the bolts. (22) 25- Fit the plastic cover of the top hinge. (23) 26- Carefully stand your appliance (you may need somebody to help you) adjust the front feet. 27- Put back all, loose items and fittings. 28- Wait for at least 4 hours to allow the system to settle before switching on. 29- Once the correct storage temperatures have been reached in the appliance, put back all the food. 6
-
 1
1 -
2
-
3
-
 4
4 -
 5
5 -
 6
6 -
 7
7 -
 8
8 -
 9
9 -
 10
10 -
 11
11 -
 12
12 -
 13
13 -
 14
14 -
15
-
16
-
17
-
18
-
19
-
20
 |
 |
