Beko HNT61210 Owners Manual - Page 12
Outlet, Grille, Closing Element, Optional, 4 X 4,2, X 44,4 Screws, 2 X 4,2, X 12,7 Screws, 2 X 2,9 X
 |
View all Beko HNT61210 manuals
Add to My Manuals
Save this manual to your list of manuals |
Page 12 highlights
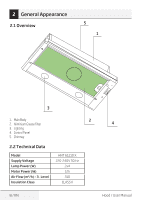
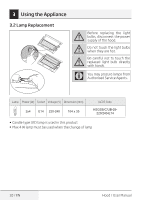
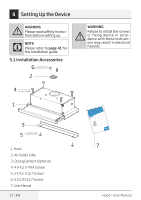
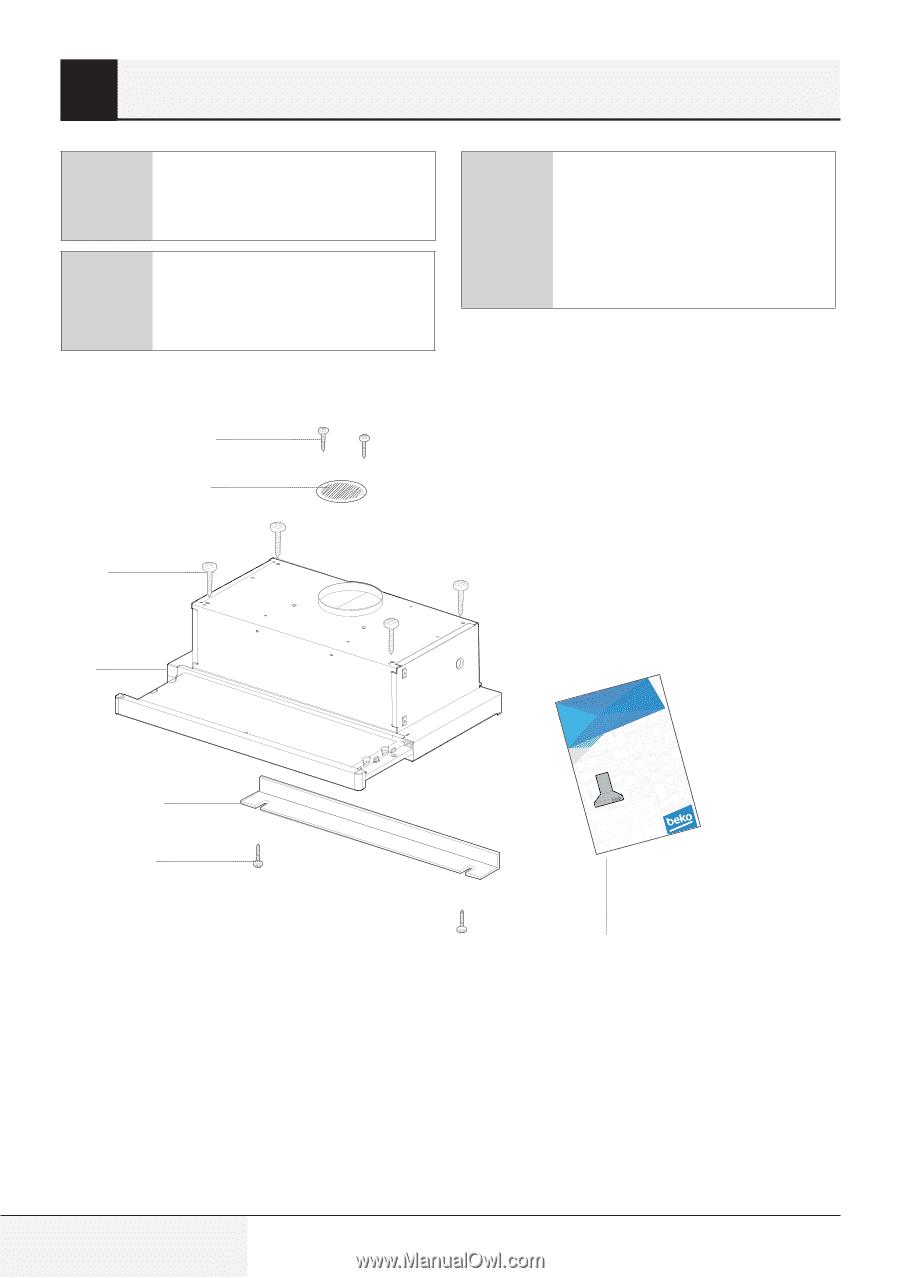
5 Setting Up the Device A WARNING Please read saffety instructions before setting up. C NOTE Please refer to page 41 for the installation guide 5.1 Installation Accessories 6 ( 2 X 2,9 X 12,7 ) 2 WARNING A Failure to install the screws or fixing device in accordance with these instructions may result in electrical hazards. 4 (4 X 4,2 X 44,4 ) 1 3 5 ( 2 X 4,2 X 12,7 ) 1- Hood 2- Air Outlet Grille 3- Closing Element (Optional) 4- 4 X 4,2 X 44,4 Screws 5- 2 X 4,2 X 12,7 Screws 6- 2 X 2,9 X 12,7 Screws 7- User Manual 12 / EN HUsoeor mdanual www.beko.com 7 Hood / User Manual
-
 1
1 -
2
-
3
-
4
-
5
-
6
-
 7
7 -
 8
8 -
 9
9 -
 10
10 -
 11
11 -
 12
12 -
 13
13 -
 14
14 -
 15
15 -
 16
16 -
 17
17 -
18
-
19
-
20
-
21
-
22
-
23
-
24
-
25
-
26
-
27
-
28
-
29
-
30
-
31
-
32
-
33
-
34
-
35
-
36
-
37
-
38
-
39
-
40
-
41
-
42
-
43
-
44
-
45
-
46
-
47
-
48
-
49
 |
 |
12 / EN
Hood / User Manual
5
Sett±ng Up the Dev±ce
A
WARNING
Please read saffety ±nstruc-
t±ons before sett±ng up.
C
NOTE
Please refer to
page 41
for
the ±nstallat±on gu±de
5.1 Installat±on Accessor±es
1- Hood
2- Air
Outlet
Grille
3- Closing Element
(Optional)
4- 4 X 4,2
X 44,4 Screws
5- 2 X 4,2
X 12,7 Screws
6- 2 X 2,9 X 12,7 Screws
7- User Manual
1
2
3
4
5
6
( 2 X 4,2
X 12,7 )
(4 X 4,2
X 44,4 )
( 2 X 2,9 X 12,7 )
Hood
User manual
7
A
WARNING
Fa±lure to ±nstall the screws
or f±x±ng dev±ce ±n accor-
dance w±th these ±nstruct±-
ons may result ±n electr±cal
hazards.