Beko HQI64400AT User Manual - Page 16
Using, Control, panel
 |
View all Beko HQI64400AT manuals
Add to My Manuals
Save this manual to your list of manuals |
Page 16 highlights
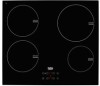
Selecting cooking zone suitable to the vessel Large cooking zone Normal cooking zone cz)2Fi cn 018 cm Small cooking zone 014,5 cm Large cooking zone • (loose the correct tan size for the Normal cooking zone Small cooking zone • Choose the correct pan • Choose the correct pan st.Aaue cooki€gig area. The diameter d size for the surface size for the surface th€ pan's bas€ srould correspond to cooking area. The cooking area. The the size of the surfaue uooking area. diameter of the pan's diameter of the pan's Distributes the power ideally. base should correspond base should correspond Provides perfect heat distribution. Used to the size of the to the size of the to cook dishes such as large crepes or surface cooking area. surface cooking area. large fishes rare or very rare. Distributes the power Used for slow cookings ideally. (sauces, creams) Provides perfect heat Used to prepare small distribution. Used for all portions or portions kinds of cookings. based on number of persons. Using the hobs DANGER: Do not allow any object to drop on the hob. Temperature setting/Decreasing timer Keylock V Enable/disable timer Even small objects such as a saltshaker may Front Left Cooking Zone Selection key damage the hob. Do not use cracked hobs. Water may leak through these cracks and cause short circuit. In case of any kind of damage on the surface Rear Left Cooking Zone Selection key Rear Right Cooking Zone Selection key Front Right Cooking Zone Selection key (eg., visible cracks), switch off the product immediately to minimize the risk of electric shock. Control panel Graphics and figures are for informational purposes only. Actual displays and functions may vary according to the model of your hob. o- e r O1O 0 0 0 Specifications On / Off key Temperature setting/Increasing timer This product is controlled with a touch control panel. Each operation you make on your touch control panel will be confirmed by an audible signal. always keep the control panel clean and dry. Having damp and soiled surface may cause problems in the functions. Turning on the hob 1. Touch the "@" key on the control panel. "0" icon appears on all cooking zone displays. 1 6/EN
-
 1
1 -
2
-
3
-
4
-
5
-
6
-
7
-
8
-
9
-
10
-
 11
11 -
 12
12 -
 13
13 -
 14
14 -
 15
15 -
 16
16 -
 17
17 -
 18
18 -
 19
19 -
 20
20 -
 21
21 -
22
-
23
-
24
-
25
-
26
-
27
-
28
 |
 |
