Beko TBN7400 Owners Manual - Page 9
Awarning: Awarning: Awarning: Awarning: Awarning: Awarning: Awarning: Awarning: Awarning
 |
View all Beko TBN7400 manuals
Add to My Manuals
Save this manual to your list of manuals |
Page 9 highlights
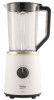
3 Operation A WARNING: To process crushed ice, we suggest you to start with three quarters of ice in the jug and add 15 ml of cold potable water. A WARNING: Don´t try to crush ice without adding water to the jug. A WARNING: Never let the jug blender operate while empty (without food). If ingredients are to be added during C the blending process, then add them through the opening in the lid (2). To do this, take out the cap/measuring cup (1). 10. After the desired consistency of the blended food has been reached, turn the control dial (9) to 0 to switch off the blender A WARNING: Never run the blender for longer than 1 minute, otherwise it would overheat. A WARNING: Never let the jug blender operate without the jug on the motor housing. 6. Close the lid (3). Make sure that the cap/ measuring cup (1) is inside the lid opening and is secured. 7. Place the jug (4) upright onto the motor housing (8). A WARNING: Never move or turn the jug after it is properly seated in the place. 8. Connect the power plug to a suitable power outlet. 9. The cutting speed can be variably adjusted with the control dial (9). C To operate the blender at the low speed, turn the control dial (9) to "1". A WARNING: After running the appliance for 1 minute, let it cool down before using it again. A WARNING: Be sure the motor is switched off and has completely stopped before removing the jug (4) from the motor housing (8). A WARNING: Do not place any utensil (scraper, fork, etc.) in the jug while blender is operating. 11. Pull the power plug out of the power outlet. 12. To remove the reservoir (4) from the motor unit (8), rotate it anti-clockwise and lift it, and then remove the measuring beaker (1). 13. Take off the lid and pour the mixture into glasses or other containers. C If you want to blend with a higher speed, turn the control dial (9) to the desired speed level (2-3). For short pulses of blending with a C high speed, turn the control dial (9) to "P". When you release the control dial (9), the blender will stop and return to "0" automatically. Table Blender / User Manual 9 / EN
-
 1
1 -
2
-
3
-
 4
4 -
 5
5 -
 6
6 -
 7
7 -
 8
8 -
 9
9 -
 10
10 -
 11
11 -
 12
12 -
 13
13 -
 14
14 -
15
-
16
 |
 |
