Belkin F5D6020_ver2 F5D6020 Version 2 Manual - Page 7
Using The Belkin Wireless Lan Monitor Utility
 |
View all Belkin F5D6020_ver2 manuals
Add to My Manuals
Save this manual to your list of manuals |
Page 7 highlights
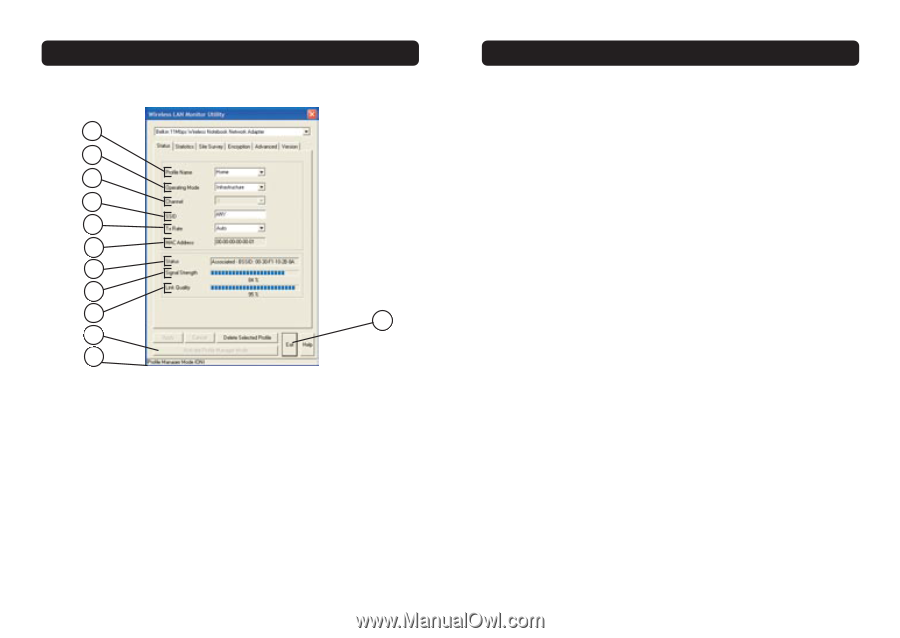
USING THE BELKIN WIRELESS LAN MONITOR UTILITY The Status Tab a b c d e f g h i l j k (a) Profile Name The first thing you will notice is the "Profile Name". Initially this will say "default" and be grayed out until you have set up a profile. Also, the Profile Manager Mode (k) will be "OFF". Using Profiles allows you to save configurations for different wireless networks. For instance, if you use your Card at your place of work and also at your home, your wireless network settings may be different for each location. Profiles let you store settings for each location and name them for easy identification. The "default" profile will contain the initial configuration setting when you install the Card. To learn how to use Profiles, see the section of this manual called "Using Profile Manager Mode". (b) Operating Mode Shows the current wireless mode the Card is operating in. There are two operating modes: "Infrastructure" and "802.11 Ad-Hoc". Infrastructure is the most common mode to operate in and is the factory default setting. Use Infrastructure mode when connecting your PC to a wireless access point or to a wireless router. Ad-Hoc mode is used to connect two or more computers 10 USING THE BELKIN WIRELESS LAN MONITOR UTILITY together without the use of an access point or wireless router. To change the mode, click the down-facing arrow next to the Operating Mode field. Select the mode you wish to use, then click "Apply". For more information about operating in Ad-Hoc mode, see "Operating in Ad-Hoc Mode". (c) Channel Shows the current channel the Card is operating on. When operating in Infrastructure mode, the channel is set automatically by the access point or wireless router that the Card is connected to. You cannot change the channels in Infrastructure mode. In Ad-Hoc mode, the channel can be set manually. For more information about operating in Ad-Hoc mode, see "Operating in Ad-Hoc Mode". (d) SSID The SSID is the wireless network name. This field shows the current SSID with which the Card is associated. The default (factory) setting is "ANY", which will cause the Card to automatically look for any wireless network in the area. To connect to a specific wireless network, you can manually enter the SSID of the known wireless network. Note that the SSID is case-sensitive, so, capital letters do make a difference. To change the SSID, click in the SSID field, type the SSID you want, then click "Apply". (e) TxRate Displays the current rate of data transmission. There are five Tx rates possible: Fixed 11Mbps-Always transmit and receive at 11Mbps data rate regardless of signal quality. Fixed 5.5Mbps-Always transmit and receive at 5.5Mbps data rate regardless of signal quality. Fixed 2Mbps-Always transmit and receive at 2Mbps data rate regardless of signal quality. Fixed 1Mbps-Always transmit and receive at 1Mbps data rate regardless of signal quality. Auto-Adjust speed according to signal strength. This mode is the recommended setting. It will decrease the amount of transmit and receive errors by reducing the speed of transmission in favor of receiving error-free data. Note that data being sent at Fixed 11Mbps with low signal quality will not necessarily get the data to the computer faster. This is because when errors occur, the data must be resent. When the signal quality is low, the chances for errors to occur at high speeds are greatly increased. Sending the data at lower speeds when the signal quality is poor will reduce the chances of errors, and thus data will get to the computer in the shortest possible time. 11
-
 1
1 -
 2
2 -
 3
3 -
 4
4 -
 5
5 -
 6
6 -
 7
7 -
 8
8 -
 9
9 -
 10
10 -
 11
11 -
 12
12 -
13
-
14
-
15
 |
 |