Belkin F5D9630uk4A F5D9630-4A Quick Install Guide - United Kingdom - Page 1
Belkin F5D9630uk4A Manual
 |
View all Belkin F5D9630uk4A manuals
Add to My Manuals
Save this manual to your list of manuals |
Page 1 highlights
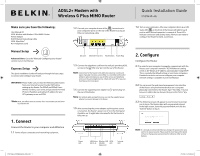
ADSL2+ Modem with Wireless G Plus MIMO Router Quick Installation Guide F5D9630-4A Make sure you have the following: User Manual CD ADSL Modem with Wireless G Plus MIMO Router Power Adatper RJ45 Ethernet Networking Cable ADSL Microfilter* RJ11 Telephone Cord Manual Setup Advanced Users: Go to the "Manually Configuring your Router" section in your User Manual. Express Setup This Quick Installation Guide will lead you through the basic steps to connect and configure your Router. IMPORTANT: Please make sure you have the following information from your Internet Service Provider (ISP) before setting up the Router: For PPPoE and PPPoA Users: VPI/VCI numbers, user name, and password. For Fixed IP Users: IP address and subnet, IP address for your ISP's gateway server and DNS. *Note: ADSL microfilter varies by country. If it's not included, you will need to purchase one. 1. Connect Connect the Router to your computer and ADSL line 1.1 Power off your computers and networking equipment. P75126ec_F5D9630uk4A_QIG.indd 1 1.2 Connect your computer to one of the "connections to your computers" ports on the rear of the Router by using an Ethernet networking cable. 1.6 Turn on your computers. After your computers boot up, a LAN status LED on the front of the Router will light for each port to which a wired computer is connecte d. These LEDs indicate connection and activity status. Now you are ready to configure the Router for ADSL connection. DSL Line Ethernet Ports (4-1) Reset Button Power Plug 1.3 Connect the telephone cord from the wall jack providing ADSL service to the "DSL Line" port on the rear of the Router. Note: Connection for the Router to the ADSL line varies by country and region. Typically it involves a microfilter or a microfilter with built-in splitter to allow simultaneous use of ADSL service and telephone service on the same telephone line. Check with your ISP or see your User Manual for more detail. 1.4 Connect the supplied power adapter to "power plug" on the rear of the Router. Note: For optimal safety and performance, use only the supplied power adapter to prevent damage to the Router. 1.5 After connecting the power adapter and the power source is turned on, the Router's power icon on the front panel should be on. It might take a few minutes for the Router to fully start up. 2. Configure Configure the Router 2.1 In order for your computer to properly communicate with the Router, your computer's network "TCP/IP/Ethernet" setting needs to be "Obtain an IP address automatically/ Using DHCP". This is normally the default setting in most home computers. Detailed instruction on how to configure your computer network settings is available in your User Manual. 2.2 You can access the web-based management user interface of the Router using the Internet browser on a computer physically connected to the Router. Type "192.168.2.1" in your browser's address bar (as shown), then press the "Enter" key. 2.3 The following screen will appear in your browser to prompt you to log in. The Router ships with no password entered. In the login screen, leave the password blank and click the "Submit" button to log in. Power LED LAN Status Wireless LAN ADSL LED (1-4) (WLAN) LED Status LED Internet LED Note: It is strongly recommended that you change the password to your own for increased security. Please read the User Manual for details on how to change your password and to reference other security features. 27/2/06 5:23:40 pm
-
 1
1 -
 2
2
 |
 |
