BenQ Ceiling Mount-CM00G2 Universal Ceiling Mount Manual - Page 5
Ceiling-mounted Projector hanger installation steps
 |
View all BenQ Ceiling Mount-CM00G2 manuals
Add to My Manuals
Save this manual to your list of manuals |
Page 5 highlights
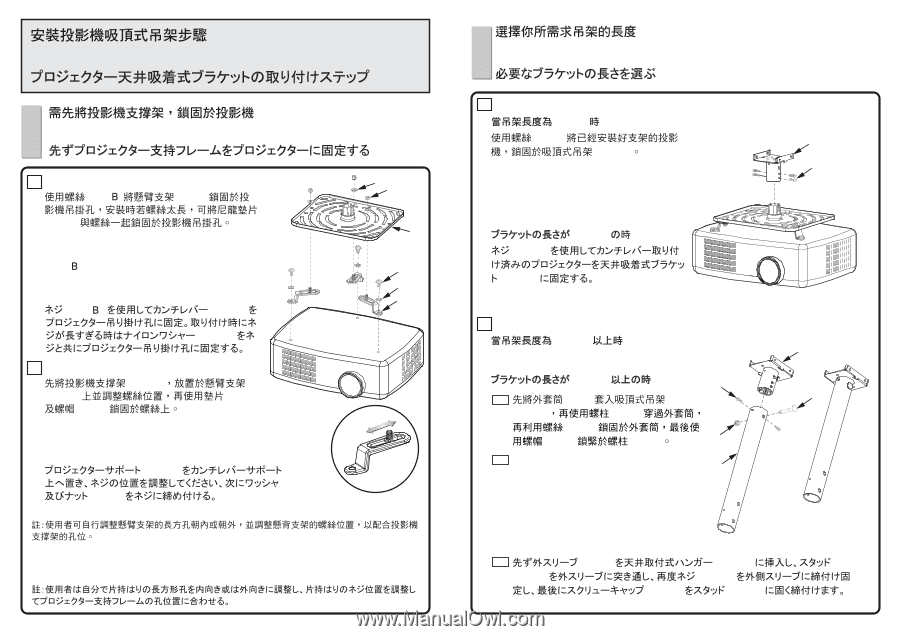
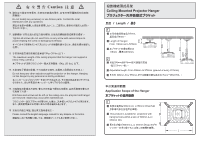
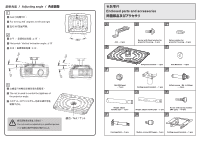
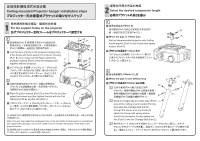
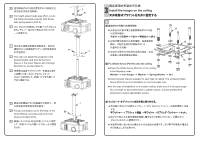
Ceiling-mounted Projector hanger installation steps 1 Fix the support frame on the projector 1 I պᒳ൛(Part Part A Part C I Lock the Arm (Part A) in the projector hanging hole. If the Screw with fixed washer for projector housing (Part ̌) is too long, lock the Nylon washer for projector housing (Part C) into the hanging hole together with the projector. I 䊈䉳 (Part Part A Part C 2 I Part D Part A Part E) ̅ᒳ౾(Part F I Place Projector bracket (Part D) to Arm (Part A) and then adjust the screws and then tighten the bolt with the Flat Washers (Part E) and the Nut (Part F). I Part D Part A Part E Part F EF D B C A Note: The user may adjust the rectangular hole on the arm holder to face inward or outward and also adjust the bolt position on the arm holder to be in line with the position of the hole on the projector bracke. 2 Select the desired suspension length 1 I 116mm ਢ պᒳ൛(Part K G Part G) Ą I When the pipe is 116mm long K Fix the frame-mounted projector onto Ceiling mount bracket (Part G) with Screw with spring washer (Part K). I 116mm 䈱ᤨ 䊈䉳㩷(Part K Part G 2 I 398mm оΰਢ G I When the pipe is over 398mm long I 398mm K 2-1 Part I L (Part G Part L Part K Part F Part L)Ą F 2-1 Wrap the Height adjust outside pipe (Part I) I around the Ceiling mount bracket (Part G), then pass the Carriage Bolt (Part L) through the sleeve and use screws to attach the Screw with spring washer (Part K) to the sleeve. Finally tighten the Nut (Part F) onto the Carriage Bolt (Part L). 2-1 Part I Part G Part L Part K Part F Part L
-
 1
1 -
 2
2 -
 3
3 -
 4
4 -
 5
5 -
 6
6
 |
 |