BenQ Ceiling Mount-CM00G2 Universal Ceiling Mount Manual - Page 6
Install the hanger on the ceiling
 |
View all BenQ Ceiling Mount-CM00G2 manuals
Add to My Manuals
Save this manual to your list of manuals |
Page 6 highlights
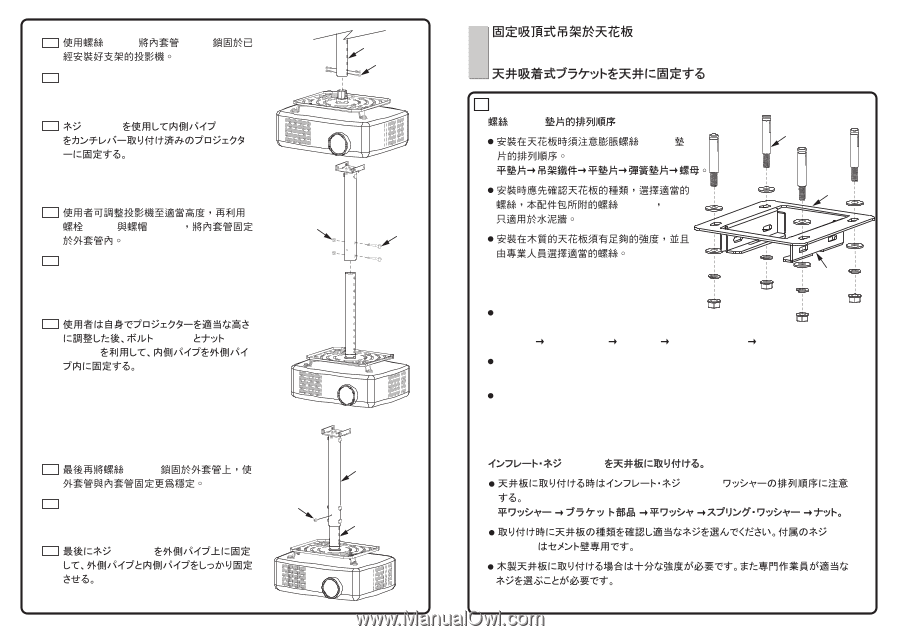
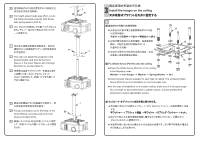
2-2 պᒳ൛(Part K Part J 2-2 Fix Height adjust Inside pipe (Part J) onto the frame-mounted projector with Screw with spring washer (Part K). 2-2 䊈䉳㩷(Part K Part J 2-3 Part L)Ⴤᒳ౾(Part F 2-3 The user can adjust the projector to the desired height, and then fix the Inner Sleeve in the Outer Sleeve with Carriage Bolt (Part L) and Nut (Part F). 2-3 Part L Part F J K F L 2-4 Part M I 2-4 Finally, lock Button screw (Part M) on the M Outer Sleeve, securing outer and inner J sleeves in place firmly. 2-4 Part M 3 Install the hanger on the ceiling 1 I ᖳ๛(Part H Part H Part H H N G I Fix Inflate Screw (Part H) onto the ceiling œ Place the Inflate Screw (Part H) on the ceiling, in the following order: Washer Ɩ Iron Hanger Ɩ Washer Ɩ Spring Washer Ɩ Nut. œ Select screws that are suitable for each type of ceiling. The enclosed Inflate Screw (Part H) are for installation on concrete walls only. œ In the case of installation on a wooden ceiling, make sure it is strong enough. Do not install on decorated posts or plaster boards. Consult professional personnel to select appropriate screws. I Part H Part H Part H
-
 1
1 -
 2
2 -
 3
3 -
 4
4 -
 5
5 -
 6
6
 |
 |