BenQ G610HDA User Manual - Page 19
Display menu, H. Position - out of range
 |
View all BenQ G610HDA manuals
Add to My Manuals
Save this manual to your list of manuals |
Page 19 highlights
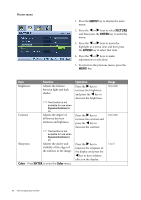
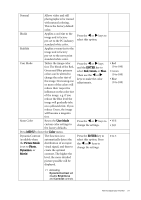
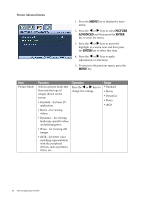
Display menu 1. Press the MENU key to display the main menu. 2. Press the W or X keys to select DISPLAY and then press the ENTER key to enter the menu. 3. Press the W or X keys to move the highlight to a menu item and then press the ENTER key to select that item. 4. Press the W or X keys to make adjustments or selections. 5. To return to the previous menu, press the MENU key. Item Auto Adjustment H. Position V. Position Pixel Clock Phase Function Optimizes and adjusts the screen settings automatically for you. The AUTO key is a 'hot-key' for this function. Adjusts the horizontal position of the screen image. Adjusts the vertical position of the screen image. Adjusts the pixel clock frequency timing to synchronize with the analog input video signal. See also: Picture optimization on page 15. Adjusts the pixel clock phase timing to synchronize with the analog input video signal. Operation Press the ENTER key to select this option and make adjustment. Press the W or X keys to adjust the value. Range 0 to 100 0 to 100 0 to 100 0 to 63 See also: Picture optimization on page 15. How to adjust your monitor 19
-
 1
1 -
2
-
3
-
4
-
5
-
6
-
7
-
8
-
9
-
10
-
11
-
12
-
13
-
 14
14 -
 15
15 -
 16
16 -
 17
17 -
 18
18 -
 19
19 -
 20
20 -
 21
21 -
 22
22 -
 23
23 -
 24
24 -
25
-
26
-
27
 |
 |
