BenQ PB7100 User Manual - Page 11
Caution - remote
 |
UPC - 840046004330
View all BenQ PB7100 manuals
Add to My Manuals
Save this manual to your list of manuals |
Page 11 highlights
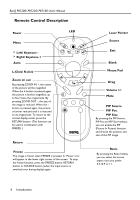
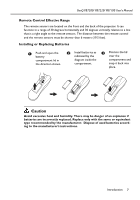
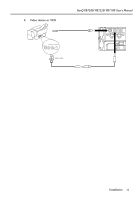
BenQ PB7200/ PB7220/ PB7100 User's Manual Remote Control Effective Range The remote sensors are located on the front and the back of the projector. It can function in a range of 30 degrees horizontally and 30 degrees vertically relative to a line that is a right angle to the remote sensors. The distance between the remote control and the remote sensors must be shorter than 6 meters (19.5 feet). Installing or Replacing Batteries 1 Push and open the battery compartment lid in the direction shown. 2 Install batteries as indicated by the diagram inside the compartment. 3 Position the lid over the compartment and snap it back into place. Caution Avoid excessive heat and humidity. There may be danger of an explosion if batteries are incorrectly replaced. Replace only with the same or equivalent type recommended by the manufacturer. Dispose of used batteries according to the manufacturer's instructions. Introduction 7
-
 1
1 -
2
-
3
-
4
-
5
-
 6
6 -
 7
7 -
 8
8 -
 9
9 -
 10
10 -
 11
11 -
 12
12 -
 13
13 -
 14
14 -
 15
15 -
 16
16 -
17
-
18
-
19
-
20
-
21
-
22
-
23
-
24
-
25
-
26
-
27
-
28
-
29
-
30
-
31
-
32
-
33
-
34
-
35
-
36
-
37
-
38
 |
 |
