BenQ RM8602K DMS Local User Manual - Page 13
Search specific IP range, Description, Identify, field to provide more
 |
View all BenQ RM8602K manuals
Add to My Manuals
Save this manual to your list of manuals |
Page 13 highlights
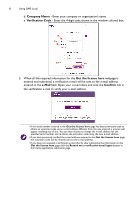
Using DMS Local 13 - Check the Search specific IP range box, enter the IP range set for the displays in the network by the IT administrator, and then click Scan. To obtain the IP range for the displays on your network, consult your IT administrator. 3. After DMS Local is finished scanning, a list of displays that are connected to your network will appear. In the displays list you can choose from the following options: cd b a a. Check the box next to the display(s) you want to add or check the select all box to select all the displays on the list. b. Enter a name for the display in the Name field. If you do not enter a name in the field the default name for the display (the IP address for the display followed by the display's model name) will be used. c. Enter a description for the display in the Description field to provide more detailed information about the display to be viewed in the Information Tab. d. Click the numbered button in the Identify field to help you identify which display corresponds to the display name shown. Once you click the numbered button, the corresponding display will flash a screen to help you identify the respective display.
-
 1
1 -
2
-
3
-
4
-
5
-
6
-
7
-
 8
8 -
 9
9 -
 10
10 -
 11
11 -
 12
12 -
 13
13 -
 14
14 -
 15
15 -
 16
16 -
 17
17 -
 18
18 -
19
-
20
-
21
-
22
-
23
-
24
-
25
-
26
-
27
-
28
-
29
-
30
-
31
-
32
-
33
-
34
-
35
 |
 |
