Beretta A300 Outlander Wood Beretta Owner Manual A300 Outlander - Page 17
Warning, Notice, Caution
 |
View all Beretta A300 Outlander Wood manuals
Add to My Manuals
Save this manual to your list of manuals |
Page 17 highlights
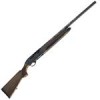
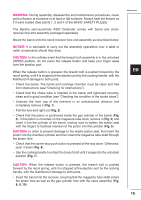
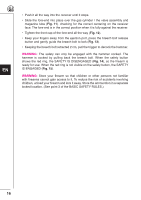
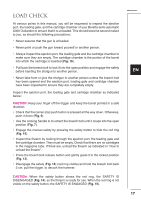
WARNING: During assembly, disassembly and maintenance procedures, never point a firearm at someone or at hard or flat surfaces. Always treat the firearm as if it were loaded (See points 1, 2 and 4 of the BASIC SAFETY RULES). The Beretta semi-automatic A300 Outlander comes with barrel and stockreceiver-fore-end assembly packaged separately. Mount the barrel onto the stock-receiver-fore-end assembly as described below. NOTICE: It is advisable to carry out the assembly operations over a table to catch components should they drop. CAUTION: In the unlikely event that the breech bolt assembly is in the unlocked (OPEN) position, do not press the release button and keep your finger away from the ejection port. When the release button is pressed, the breech bolt is pushed forward by the recoil spring, until it is stopped at the ejection port by the cocking handle, with the likelihood of damage to both parts. • Check the barrel. The barrel and cartridge chamber must be clean and free from obstructions (see "Checking for obstructions"). • Check that the choke tube is inserted in the barrel and tightened correctly, clean and in good condition (see "Checking the condition of the choke tubes"). • Unscrew the front cap of the fore-end in an anticlockwise direction and completely remove it (Fig. 1). • Pull the fore-end right out (Fig. 2). • Check that the piston is positioned inside the gas cylinder of the barrel (Fig. 3). If the piston is mounted on the magazine tube shaft, remove it (Fig. 4) and insert it into the cylinder of the barrel, making sure to tighten the elastic seal with the fingers to facilitate insertion of the piston into the cylinder (Fig. 5) CAUTION: In order to prevent damage to the elastic piston seal, first insert the piston into the chamber cylinder and then insert the magazine tube shaft through the piston hole. • Check that the carrier stop push button is pressed all the way down. Otherwise, push it down (Fig. 6). • Use the cocking handle to retract the breech bolt until it snaps into the unlocked position (Fig. 7). CAUTION: When the release button is pressed, the breech bolt is pushed forward by the recoil spring, until it is stopped at the ejection port by the cocking handle, with the likelihood of damage to both parts. • Insert the barrel into the receiver, ensuring that the magazine tube shaft enters the piston hole as well as the gas cylinder hole with the valve assembly (Fig. 8, 9, 10). EN 15
-
 1
1 -
2
-
3
-
4
-
5
-
6
-
7
-
8
-
9
-
10
-
11
-
 12
12 -
 13
13 -
 14
14 -
 15
15 -
 16
16 -
 17
17 -
 18
18 -
 19
19 -
 20
20 -
 21
21 -
 22
22 -
23
-
24
-
25
-
26
-
27
-
28
-
29
-
30
-
31
-
32
-
33
-
34
-
35
-
36
-
37
 |
 |