Beretta A300 Outlander Wood Beretta Owner Manual A300 Outlander - Page 22
Caution, Warning
 |
View all Beretta A300 Outlander Wood manuals
Add to My Manuals
Save this manual to your list of manuals |
Page 22 highlights
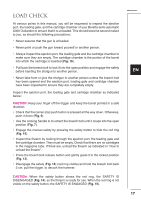
EN 20 CAUTION: The safety can only be engaged with the hammer in the cocked position. The hammer is cocked by pulling back the breech bolt. When the safety button shows the red ring, the SAFETY IS DISENGAGED (Fig. 14), so the firearm is ready for use. When the red ring is not visible on the safety button, the SAFETY IS ENGAGED (Fig. 15). WARNING: The manual safety is merely a mechanical device and is in no way a substitute for the Basic Safety Rules of firearm handling. • Introduce the first cartridge into the cartridge chamber through the ejection port (Fig. 17). • Keeping your hands away from the ejection port, press the release button and guide the breech bolt to lock (Fig. 18). WARNING: The firearm is now loaded and ready to fire after the manual safety is disengaged. Always keep your finger off the trigger and avoid contact with the trigger by other objects if you don't intend to fire. Never point a firearm at something that is not safe to shoot. (See points 1, 2 and 4 of the BASIC SAFETY RULES). WARNING: Beretta assumes no liability for any injury or property damage resulting from improper or careless handling or intentional or accidental firing of the shotgun. • Move the carrier to insert the cartridges into the magazine through the loading gate to hook onto the cartridge retaining tooth (Fig. 19). • To fire, disengage the safety (Fig. 14) (red ring visible) and pull the trigger. • After firing the first shot, release the trigger to set up the shotgun for the next round. • The shotgun will fire the cartridge in the chamber first, and then it will automatically introduce the cartridge from the magazine tube into the chamber WARNING: After pulling the trigger, if the shotgun doesn't fire, engage the safety, wait at least one minute and unload the shotgun as described in the corresponding section. Never attempt to reuse or fire ammunition that did not fire the first time. Dispose of unfired or damaged ammunition properly, in accordance with the ammunition manufacturer's recommendations. WARNING: If another cartridge is fired into an obstructed barrel, damage and very serious injury may occur. If you do not plan to fire a second shot, engage the safety (red ring not visible) keeping the firearm pointed in a safe direction and the fingers away from the trigger. If you have finished firing, unload the shotgun as indicated in: "How to unload the shotgun".
-
 1
1 -
2
-
3
-
4
-
5
-
6
-
7
-
8
-
9
-
10
-
11
-
12
-
13
-
14
-
15
-
16
-
 17
17 -
 18
18 -
 19
19 -
 20
20 -
 21
21 -
 22
22 -
 23
23 -
 24
24 -
 25
25 -
 26
26 -
 27
27 -
28
-
29
-
30
-
31
-
32
-
33
-
34
-
35
-
36
-
37
 |
 |
