Beretta A400 Xplor Light Beretta A400 Xplor User Manual - Page 18
Load Check
 |
View all Beretta A400 Xplor Light manuals
Add to My Manuals
Save this manual to your list of manuals |
Page 18 highlights
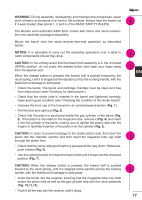
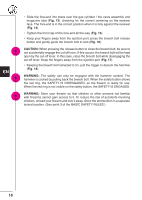
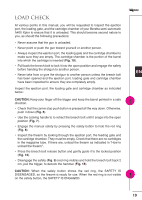
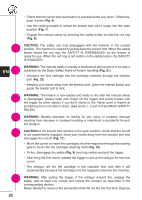
LOAD CHECK At various points in this manual, you will be requested to inspect the ejection port, the loading gate, and the cartridge chamber of your Beretta semi-automatic A400 Xplor to ensure that it is unloaded. This should become second nature to you, as should the following precautions: • Never assume that the gun is unloaded. • Never point or push the gun toward yourself or another person. • Always inspect the ejection port, the loading gate and the cartridge chamber to make sure they are empty. The cartridge chamber is the portion of the barrel into which the cartridge is inserted (Fig. 19). • Pull back the breech bolt to lock it into the open position and engage the safety before handing the shotgun to another person. • Never take from or give the shotgun to another person unless the breech bolt has been opened and the ejection port, loading gate and cartridge chamber have been inspected to ensure they are completely empty. Inspect the ejection port, the loading gate and cartridge chamber as indicated below: CAUTION: Keep your finger off the trigger and keep the barrel pointed in a safe direction. • Check that the carrier stop push button is pressed all the way down. Otherwise, push it down (Fig. 6). • Use the cocking handle to to retract the breech bolt until it snaps into the open position (Fig. 7). • Engage the manual safety by pressing the safety button to hide the red ring (Fig. 8). • Inspect the firearm by looking through the ejection port, the feeding gate and the cartridge chamber. They must be empty. Check that there are no cartridges in the magazine tube. If there are, unload the firearm as indicated in "How to unload the firearm". • Press the breech bolt release button and gently guide it to the locked position (Fig. 16). • Disengage the safety (Fig. 9) (red ring visible) and hold the breech bolt back 2 cm, pull the trigger, to decock the hammer (Fig. 18). CAUTION: When the safety button shows the red ring, the SAFETY IS DISENGAGED, so the firearm is ready for use. When the red ring is not visible on the safety button, the SAFETY IS ENGAGED. EN ! ! 19
-
 1
1 -
2
-
3
-
4
-
5
-
6
-
7
-
8
-
9
-
10
-
11
-
12
-
 13
13 -
 14
14 -
 15
15 -
 16
16 -
 17
17 -
 18
18 -
 19
19 -
 20
20 -
 21
21 -
 22
22 -
 23
23 -
24
-
25
-
26
-
27
-
28
-
29
-
30
-
31
-
32
-
33
-
34
-
35
-
36
-
37
-
38
 |
 |
