Biostar A960G Setup Manual - Page 3
Introduction - + drivers
 |
View all Biostar A960G manuals
Add to My Manuals
Save this manual to your list of manuals |
Page 3 highlights
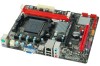
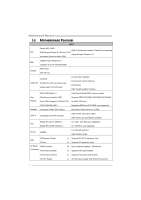
A960G+/A960GL+ CHAPTER 1: INTRODUCTION 1.1 BEFORE YOU START Thank you for choosing our product. Before you start installing the motherboard, please make sure you follow the instructions below: „ Prepare a dry and stable working environment with sufficient lighting. „ Always disconnect the computer from power outlet before operation. „ Before you take the motherboard out from anti-static bag, ground yourself properly by touching any safely grounded appliance, or use grounded wrist strap to remove the static charge. „ Avoid touching the components on motherboard or the rear side of the board unless necessary. Hold the board on the edge, do not try to bend or flex the board. „ Do not leave any unfastened small parts inside the case after installation. Loose parts will cause short circuits which may damage the equipment. „ Keep the computer from dangerous area, such as heat source, humid air and water. 1.2 PACKAGE CHECKLIST Serial ATA Cable X 2 Rear I/O Panel for ATX Case X 1 Installation Guide X 1 Fully Setup Driver DVD X 1 (full version manual files inside) USB 2.0 Cable X1 (optional) Serial ATA Power Cable X 1 (optional) Note: The package contents may be different due to area or your motherboard version. 1
-
 1
1 -
 2
2 -
 3
3 -
 4
4 -
 5
5 -
 6
6 -
 7
7 -
 8
8 -
 9
9 -
10
-
11
-
12
-
13
-
14
-
15
-
16
-
17
-
18
-
19
-
20
-
21
-
22
-
23
-
24
-
25
-
26
-
27
-
28
-
29
-
30
-
31
-
32
-
33
-
34
-
35
-
36
-
37
-
38
-
39
-
40
-
41
-
42
-
43
-
44
-
45
-
46
-
47
 |
 |
